Building a custom web app with integration to SAP S/4HANA - part 2
project
by Alexander Roan on 8 Aug 2025
Building the integration flow details
If interested to experiment with SAP Integration Suite, I'd suggest working through the CodeJam. A lot of effort has been put into the instructions and reference information. It also includes additional mock servers and covers integration with other technologies.
The instructions are on a GitHub repository.
In the following section I'll share some tips and recommendations from my own notes including the basics of the various tools involved.
Building this will involve encountering issues and require some debugging, just reference the documents and use google on errors.
Information sources & tools
SAP Accounts: BTP and Integration Suite
A trial account for business technology platform is required.
And a a trial for Integration Suite
See the pre-requisites pre-requisites document in the CodeJam repository.
Containerisation & Docker
When running the S/4HANA business partner mock server locally, one option is to install the necessary JavaScript runtime environment and run it manually. Another option is to run it inside a container.
Containers are a key concept in Cloud architecture.
A container packages an app and all it's dependencies together so that it can run independently of the underlying computer (server, laptop, etc.).
This is a key concept for Cloud as it allows applications to run on different hardware and operating systems with minimal set up effort.
Docker is a platform to build and manage containers.
Docker and container features:
- Package an app and all it's dependencies
- A container is like a lightweight virtual machine
- Key terms
- image: blueprint (.zip) containing app, dependencies, and OS
- container: running instance of an image
- dockerfile: instructions to build image
- volume: how to persist data outside the container
- port mapping: expose internal port to machine (e.g. 8080 to 3001).
I'll come back to this in the section on running the BP mock server.
Data basics
The following data standards/formats are used in this exercise:
JSON (JavaScript Object Notation)
- A lightweight, human-readable format for storing and sharing structured data
- Looks like nested key-value pairs (like a shopping list with categories)
- Commonly used in web apps and APIs for sending data between systems.
For example:
{
  "employee_id": "1234567",
  "employee_name": "Alexander"
}
XPATH
- A query language used to navigate and extract data from XML or HTML documents
- Lets you point to specific elements using a path-like syntax
- Example: find the third paragraph inside a section
- Used in tools like web scrapers and automation scripts.
For example:
//title[contains(text(), 'Programming')]
XML (eXtensible Markup Language)
- A flexible, tag-based format for representing structured data
- Similar to HTML in appearance
- But used for data storage and exchange, not page display.
For example:
 <book id="bk01">
      <author>Roan, Alexander</author>
      <title>Front end to S/4HANA</title>
HTML (HyperText Markup Language)
- The standard language for building web pages and displaying content in browsers
- Uses tags to define elements like headings, paragraphs, links, and images
- Focused on structure and layout, not data exchange.
Terminal
I worked through this demo/test on Mac so I used Terminal, which is the Mac default command line interface (CLI).
The CLI is necessary for activities such as setting up and starting servers or working with docker containers.
Terminal basics
- Open a folder
cd <folder name>(change directory)cdon it's own will go to the home directory- (Note that
~represents home directory in terminal) cd ..will go up a folder
- List folders
ls(list files in the current directory) - Open a file
open <file name>(open a file) - Quit sub-screen and return to terminal
q - Stop a running process hold control and c
- Clear terminal
clear
To run JavaScript servers, JavaScript runtime is required. It's easier to install and manage things like this using a package manager in Terminal. Homebrew is a popular package manager for Mac.
Homebrew
- A package manager for Mac
- To install homebrew homebrew:
- Launch terminal (launchpad > other > terminal)
- Visit Homebrew in your web browser
- Copy the installation command
- Paste it into terminal press enter.
Java/JavaScript
To complete the demo/test a few different JavaScript things are needed.
Node.js
- This is a JavaScript that can be installed locally to create and run web-servers and web applications
- Install using Homebrew
- In terminal, enter:
brew install node - Test the installation of Node.js
- In terminal, enter:
node -v, it should return the node version number.
- In terminal, enter:
- In terminal, enter:
NPM
- NPM is the node package manager
- It's installed with Node.js
- It's used to run a server
- Install it in any directory a Node.js server sits in
- To check the installation of NPM
- In terminal, enter:
npm -v, it should return the npm version number
- In terminal, enter:
Java development kit (JDK)
- Cloud Connector is a more complex application and requires JDK
- More notes in the Cloud Connector section.
API client (Bruno/Postman)
The CodeJam utilised Bruno for API testing.
For the CodeJam a folder of pre-configured settings for Bruno is provided. However I'd suggest to start experimenting without the pre-configuration to build a solid understanding of the basics.
I'll include more notes in later sections.
Building and testing an integration flow
Set up the S/4HANA business partner mock server
Start by setting up the S/4HANA business partner mock server
- Download the mock server from GitHub
- Scroll down to the readme
- Either download the archive linked under 'How to run this server'
- Or if using GitHub clone the repository and checked the branch 'mock-server'
- Move it to a convenient folder of your choice
- I set it a
users/<username>/projects/integration/cloud-s4-sdk-book
Run the server: option 1: use NPM
Node.js and the node package manager (NPM) can be used to run the server directly on a computer.
- Open terminal
- Navigate to
users/<username>/projects/integration/cloud-s4-sdk-book- (or wherever you saved the folder)
- Enter:
npm install(install node package manager in the folder) - Enter:
npm start(start the server) - This should return something like:
> bupa-mock-odata@1.0.0 start
> node server.js
Mock server started on port 3000 after 1 ms, running - stop with CTRL+C (or CMD+C)...
Terminal tells us which port the server is running on. Port "3000" is accesible in the browser or an API client via "http://localhost:3000".
To stop the server in terminal use ctrl+c.
For the curious, you can look at the files that make up the mock server in the above folder. Check out:
- server.js
- This includes the JavaScript code for the server
- The code references other files such as app.js
- package.json
- This is like a configuration file for a node.js server
- business partner > business-partner-data.json
- This contains the demo test business partner data.
Theoretically you could use this Node.js server as a template to simulate other SAP Odata APIs with some adjustments to these files.
Run the server: option 2: use Docker
The mock server can also be run as a Docker container. This is a little more convenient as after the first run we can stop and start it from the Docker desktop app.
Note the server already has a Dockerfile, so it's already set up to run as a container.
If we run something inside a docker container we need to interact with it via ports on the container. The application is really running contained inside a container. When we run a docker container we provide a mapping between a local port on the computer and the container port. We can then access the docker application via this mapping.
To run as a Docker container:
- Launch the docker app
- Open terminal
- Enter
docker run -p 3005:8080 bp-mock-server- 3005 is the local port
- 8080 is the docker container port
- Local port can be any free port on your computer. I choose 3005
- The container port is 8080
- Enter
- View the status of the container in the Docker app
- Use the browser to check
http//localhost:3005
Note if there wasn't already a dockerfile we would need to create one and build the app before running it.
A simple docker demo
This was my first time using docker, so I experimented by creating a simple "Hello, World!" style server from scratch. Here it is if you want to try:
- Create a JS file "index.js"
- Add
console.log("hello from docker"); - This just prints text to the console (Terminal)
- Add
- Create a package file "package.json"
- Add the following JSON to "package.json"
{
  "name": "hello-docker",
  "version": "1.0.0",
  "main": "index.js",
  "scripts": {
    "start": "node index.js"
  }
}
- Create a dockerfile "dockerfile"
- Add the following to "dockerfile"
FROM node:18

WORKDIR /usr/src/app

COPY package*.json ./
RUN npm install

COPY . .

CMD ["npm", "start"]
You can see Docker uses NPM, in the same way we would with a manual run, but it's installing and running NPM inside the container, not on the computer.
To build and run:
- Build docker container
docker build -t hello-docker . - Run docker container
docker run hello-docker
Testing with the web browser
The simplest way to test the API is running locally is to put the local address in the web browser.
- For NPM it was "http//localhost:3000"
- For docker image it was "http//localhost:3005"
The main domain should return the API details including the links such as:
"http://localhost:3000/sap/opu/odata/sap/API_BUSINESS_PARTNER" "http://localhost:3005/sap/opu/odata/sap/API_BUSINESS_PARTNER"
To access the service to return the general data of all business partners we add A_BusinessPartner
"http://localhost:3005/sap/opu/odata/sap/API_BUSINESS_PARTNER/A_BusinessPartner"
In the browser, this should return a JSON document containing the list of business partners.
We can pick a business partner number from the list and use it with the path to select a specific business partner:
"http://localhost:3005/sap/opu/odata/sap/API_BUSINESS_PARTNER/A_BusinessPartner('1003764')"
Testing with an API client (Bruno)
Rather than just using the web browser to check the API an API client can be used, this has a few benefits:
- We can build the URLs through a selection of 'input fields'
- We can save different requests for easy and quick re-testing
- We can pass data in the request body
To test with Bruno:
- Launch Bruno
- Use the '...' menu to create a collection
- Name it 'bp-mock'
- Specify a location. I used "users/{username}/projects/integration"
Create a request for all business partners
- Use the '...' menu next to bp-mock and select 'new request'
- Enter request name 'All business partners'
- Under URL select 'GET' and enter the URL that returns all business partners
http://localhost:3005/sap/opu/odata/sap/API_BUSINESS_PARTNER/A_BusinessPartner
Run a request
- Look to the right of the 'GET' line on the main page and click the '->' to run
- The right panel will show the JSON response
- The same response as shown earlier in the web browser.
Create a request for a single business partner (1003765)
- Use the '...' menu next to bp-mock and select 'new request'
- Enter request name 'Specific business partners'
- Enter the same URL details as above.
- In the 'params' tab click '+ param' and enter
- Name:
&filter - Path: 'BusinessPartner eq '1003766'
- Name:
- Run the request. A single business partner should be returned.
Note as the params are entered the URL dynamically updates.
Basics on OData API URLs
- The base for the API is "/API_Business_Partner"
- A service of the API is then appended "/A_BusinessPartner"
- Queries can then by added, OData queries include:
- Filtering:
/A_BusinessPartner?$filter=Name eq 'Max' - Selecting fields:
/A_BusinessPartner?$select=Name,City - Pagination:
/A_BusinessPartner?$top=5&$skip=10 - Accessing nested data:
/A_BusinessPartner?$expand=Address
- Filtering:
- When working with OData:
- Field names are case sensitive
- String values in single quotes
Keep in mind the S/4HANA mock business partner server only includes limited functionality. The above filters and selects won't work.
Java SDK for SAP Cloud Connector
The next step is to set up SAP Cloud Connector
Recall Cloud Connector will provide a secure tunnel allowing SAP Cloud to talk to the S/4HANA business partner mock server.
Cloud Connector requires a full Java Development Kit (JDK).
- You can use "javac -version" in terminal to check if you already have JDK
- There is a SAP Help page for Cloud Connector
- Check the prerequisites section, it lists the JDK options
- I choose SAP machine 21 JDK
- You can download this from GitHub
- I have a dev folder for items like this in my home folder
- "Users/{username}/dev"
- Use Homebrew to install
- Open terminal and enter "brew install openjdk@21"
- I have a dev folder for items like this in my home folder
It's likely you may run into version, compatibility, authorisation issues. These are all very common and a web search should help.
Install Cloud Connect
Next install Cloud Connector.
Cloud connector is listed under the SAP development tools page under Cloud.
- Download the cloud connector file for your OS
- My Mac is Apple Silicon so I chose 'sapcc-2.18.1.2-macosx-aarch64.tar.gz'
- Unzip and move it to a folder of your choice
- Navigate inside the downloaded folder in terminal
- Check contents with 'ls', you should see a 'go.sh' file
- Enter: './go.sh' this will run Cloud Connector
- Cloud connector should now be running, note the address in the terminal log
- Login with default account: 'Administrator' and password: 'manage'
- Change password
- Keep a note of the account and password.
I received authorisation issues on the first attempt to run it:
- Click through them, then goto apple > settings > privacy&security
- Scroll down to security and click 'allow anyway'
- Try: './go.sh' again.
Install and set up SAP Integration Suite
To continue from here SAP Integration has to be installed and active as per the earlier instructions.
Connect SAP Cloud Connector to SAP Integration Suite
As Cloud Connector bridges between SAP Cloud and the S/4HANA business partner mock server we need to set it up to connect to SAP Cloud. We get the security/authentication data to do this from our SAP BTP trial account.
- After logging into Cloud Connector click '+Add Subaccount'
- Hit 'next' to skip the HTTPS settings
- Select 'Configure using authentication data'
- Select 'Add subaccount authentication data from file '
- In your browser got to your SAP BTP trial homepage
- Click on your subaccount
- On the left menu expand Connectivity and select Cloud Connectors
- Click on 'download authentication data'
- Return to Cloud Connector
- Click browse and select the downloaded file 'authentication.data'
- Click next
- Leave location ID blank
- (This would be relevant if there were multiple Cloud Connectors)
- Click finish.
Double check the settings in the subaccount overview:
- BTP trial region = Cloud Connector region
- BTP Subaccount ID = Cloud Connector Subaccount
- The region host in Cloud Connector = Cloud Foundry API Endpoint in BTP.
Cloud Connector to Mock BP Server
There's no security on S/4HANA business partner mock server so it is simply a matter of adding the address.
- In Cloud Connector, on the left sidebar click 'Cloud to On-Premise'
- To the right of 'Mapping Virtual to Internal Systems' click
+ - Select back-end, enter: "Non-SAP system", click 'next'
- Select protocol: "HTTP", click 'next'
- For internal host enter "localhost"
- For internal port enter: "3005"
- For virtual host: "s4-mock"
- For virtual Port: "3006"
- Uncheck allow principal propagation
- Click through to finish.
Replace the internal port name with the one your mock server is running on locally. You are free to choose the virtual host and port.
It's critical to select "Non-SAP system" and HTTP, not HTTPS.
A new entry will appear under 'Mapping Virtual to Internal Systems'
- Make sure your mock bp server is still running on the host and IP you entered
- From the icons on the right, click on 'check availability..'
- You should see status 'reachable'
At this stage https://localhost:3005 is now mapped to https://s4-mock:3005 in the SAP Cloud.
You can also check in integration suite to see if Cloud Connector is connected.
- In the left hand menu select connectivity > cloud connectors.
Errors at this stage are likely related to
- Mistakes in the host name, port name, or system type
- The mock server or cloud connector is not running.
Design integration flow
Create an integration flow
- Login to BTP trial home
- From the left hand menu expand Services and select Instances and subscriptions
- Under 'Subscriptions' click on 'Integration Suite'
- On the left menu select expand 'Design' and select 'Integrations and APIs'
- Choose 'Create' on the top right to create a new package.
- Give it a name
- Shift to the 'Artifacts' tab
- Select 'Add' and choose 'Integration Flow' from the list
- Give it a name
- Click add
- Click on the newly created integration flow
The integration flow screen is read-only by default, click edit.
Set up the sender
Define an 'address' for the SAP Integration Suite endpoint.
- Click on sender
- Click connector arrow
- Drag to start event
- In adapter type pop-up select HTTPS
- To configure the adapter click on the drawn line (if not selected)
- The settings are in the bottom panel, drag it up to expand it
- Navigate to 'connection' tab, enter the following:
- Address:
/request-business-partners - Authorisation:
User Role - User Role:
ESBMessaging.send - CSRF Protected:
Unchecked(Cross-site request forgery).
- Address:
Add flow elements
The CodeJam has excellent instructions for walking through different flow steps as per their exercises.
I will summarise a few elements I used in my design.
Router
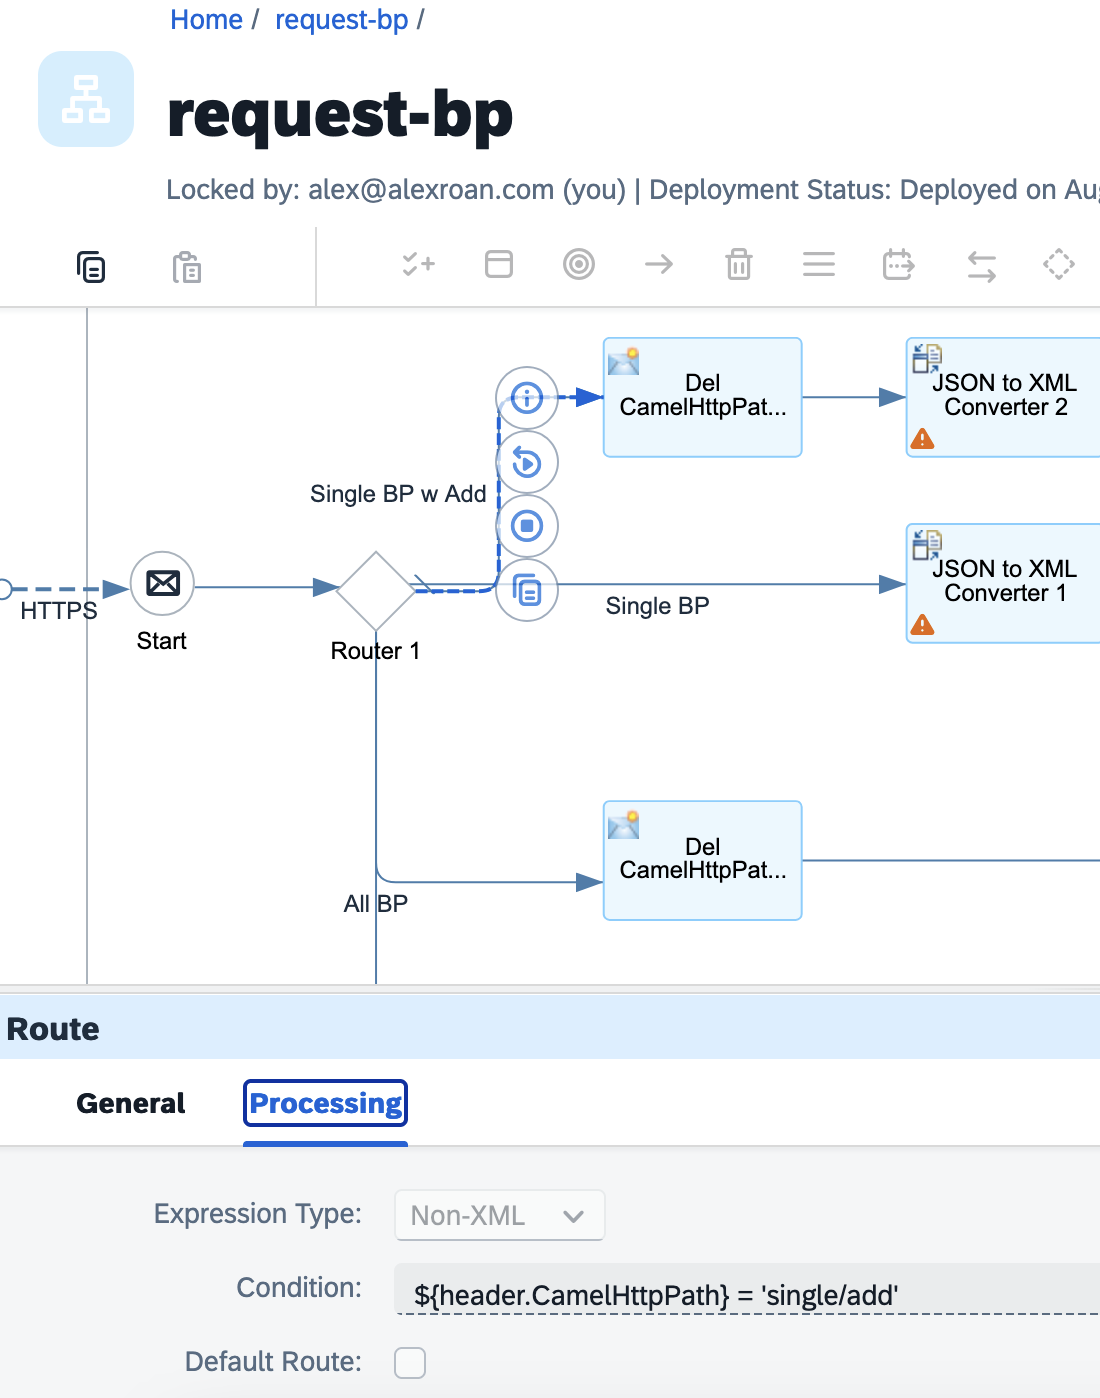
- The router allows you to split the flow based on a condition.
- This example splits the flow into 4 based on the incoming URL
- For example where the incoming URL ends in "single/add"
- Re-call our integration flow address was "request-business-partners"
- In this case a message arrives to "request-business-partners/single/add"
- Intelligent Suite assigns the last part to the variable CamelHttpPath
- Which is part of the message header hence: header.CamelHttpPath.
The route path we are looking at in this example is the one that returns a single business partner with address data.
Content modifier - case 1
Case 1:
- The content modifier allows us to modify the message header or body.
- In the above screenshot a content modifier is added directly after the routing.
- This deletes the CamelHttpPath, in this case "single/add"
- After routing we no longer need this part of the URL in the message header.
JSON to XML converter
- This converts the JSON in the message body to XML.
- In the case of searching for a single BP the message body includes JSON:
{
  "employee_id": "1234567"
}
- This will be converted to XML
<root>
  <employee_id>1234567</employee_id>
</root>
Content modifier - case 2
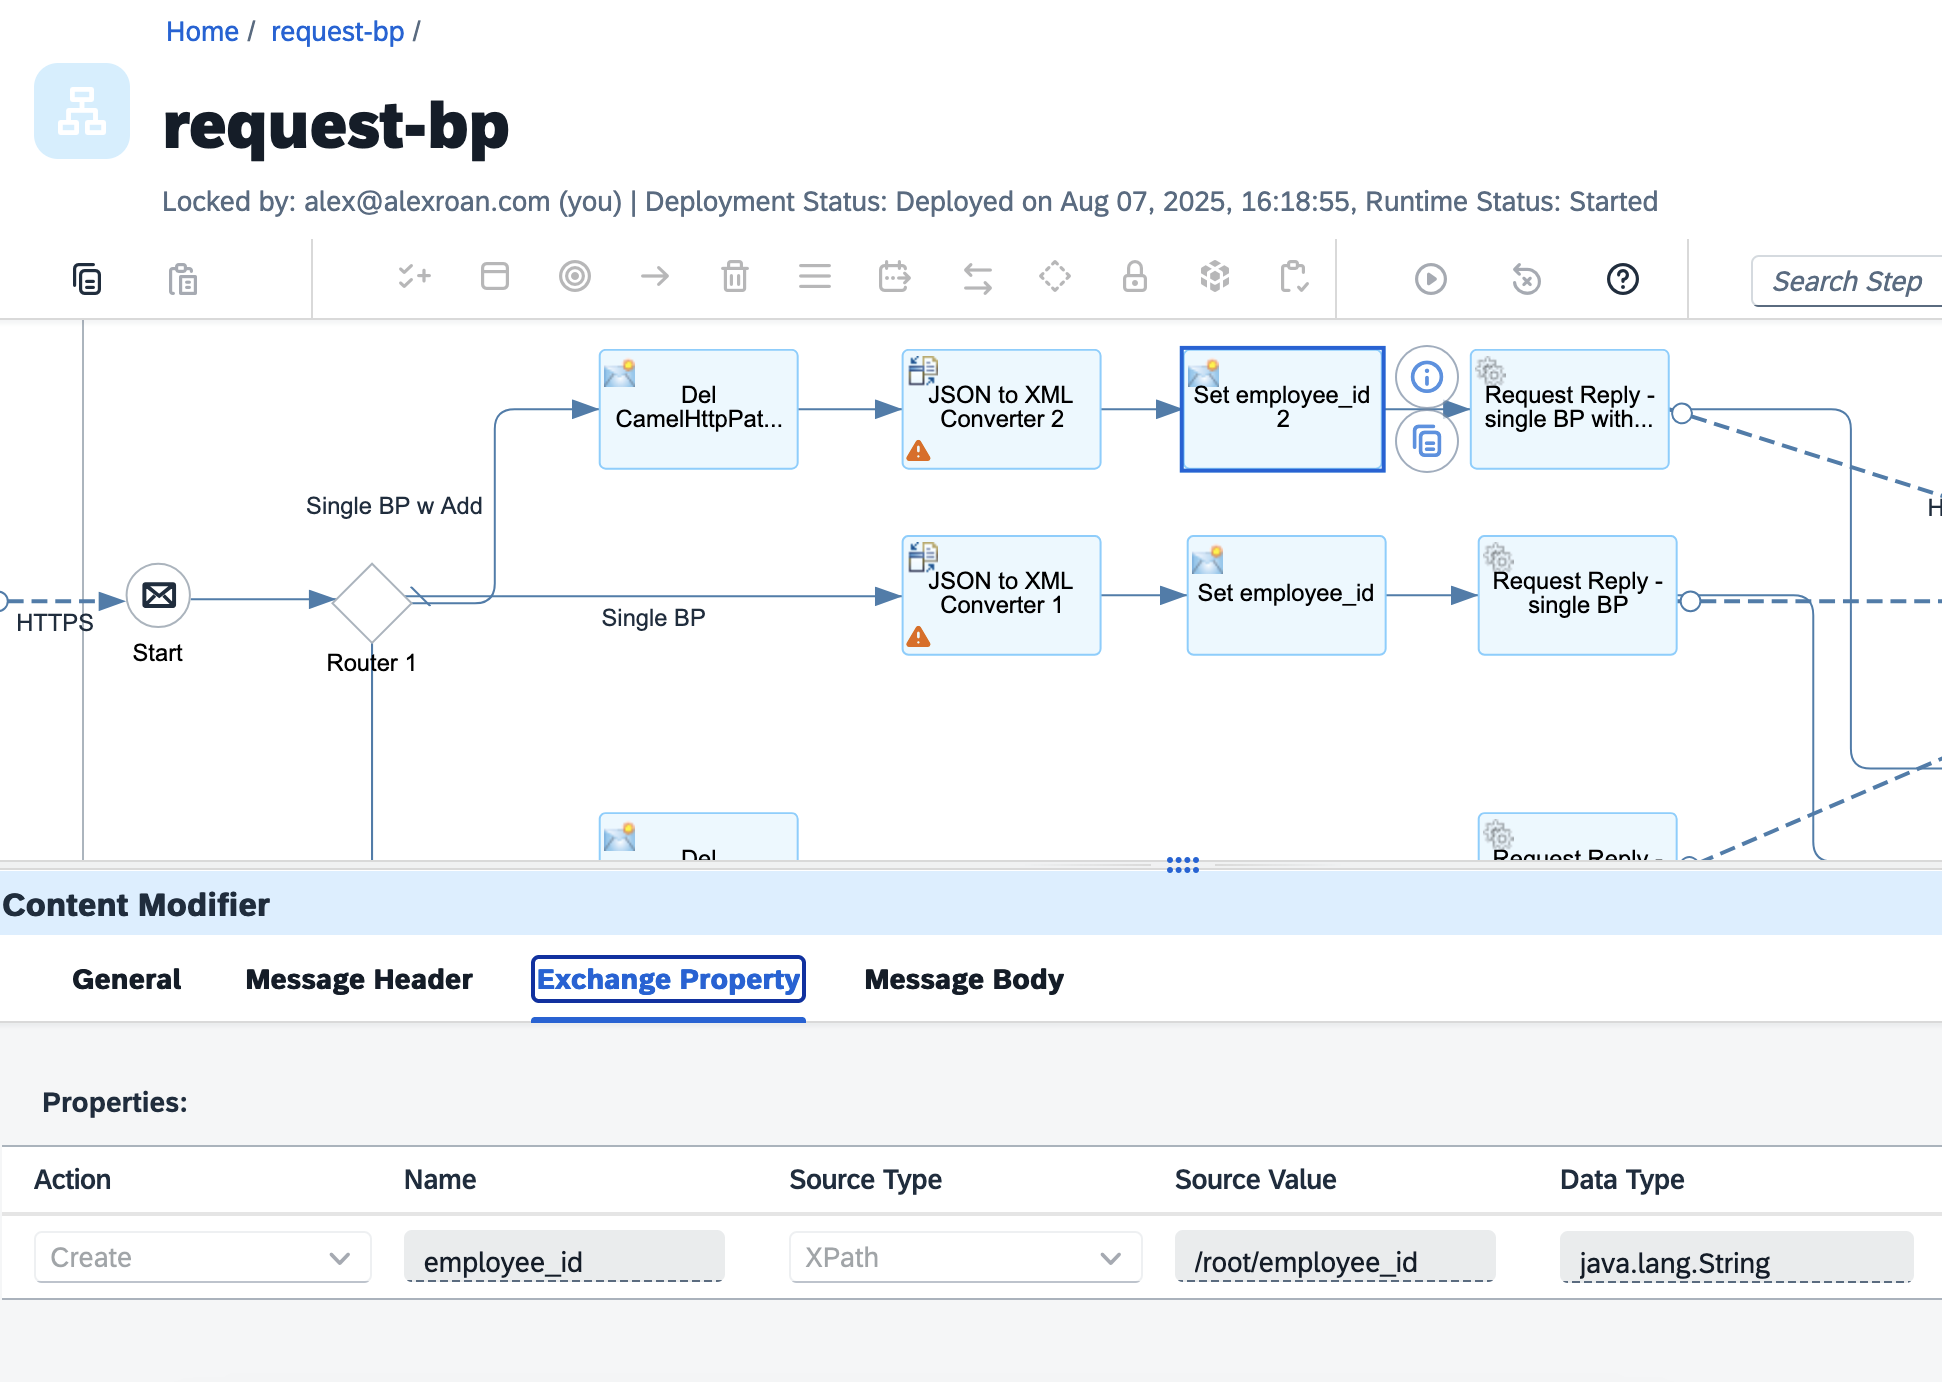
- In this case the content modifier gets "employee_id" from the message body
- And assigns it to a new variable
- XPath can be used to access the XML value
- "/root/employee_id"
- The variable name is set as employee_id
- The data type is set as a Java string.
Request Reply
Request reply let's us send a request to a server.
- Click on the Set employee_id
- Click add flow step on the canvas
- Select 'Request Reply' under call > external call
- Click on 'Request Reply'
- Click on 'connector' and drag to the receiver
- Select adapter type 'HTTP'
- Under 'HTTP' in the connector properties, select 'Connection'
- Enter the address of the cloud connector:
- The path for a single business partner with address data involves updating:
- Address: "http://s4-mock:3006/sap/opu/odata/sap/API_Business_Partner/A_BusinessPartner('${property.employee_id}')"
- Query: "$expand=to_BusinessPartnerAddress"
- Proxy Type:
On-premise - Method:
GET - Authentication:
None - Save
- Deploy
To check deployment status go to Monitor > Integration and APIs. On this page the endpoint to access the service is shown:
"https://{your trial}-cpitrial03-rt.cfapps.ap21.hana.ondemand.com/http/request-business-partners"
Test Cloud Integration with API client
At this point we can test consuming the API through SAP Integration Suite.
Unlike testing the local mock server, we need to deal with authentication and security. The way this works is:
- We pass a "client id" and "secret" to a "token URL"
- BTP passes back a "token" which is valid for a certain period of time
- This "token" has to be attached to any requests to the API in Intelligent Suite.
Accessing security details
- Navigate to your BTP trial account
- Expand services and click on 'instances and subscriptions'
- Scroll down to instances and look for your integration flow instance
- Integration Suite uses Cloud Foundry so the runtime will be cloud foundry
- It will likely be named 'default_it-rt_integration-flow'
- Scroll down to service keys and click on the service key, note the values for:
- "clientid"
- "clientsecret"
- "url"
- "tokenurl"
For local testing we can hardcode these values in our test tools, but be careful not to upload or share these anywhere.
In production, never hardcode secrets or tokens. Use environment variables or a secure credential store.
Request a token with Bruno
In Bruno create a new request:
- Name:
TOKEN - Method:
POST - URL: enter the "tokenurl" from above
- Navigate to the Params tab:
- Select 'Add Param'
- Enter name:
grant_typepath:client_credentials
- Navigate to Auth
- Switch 'Inherit' to 'Basic Auth' and enter:
- Username:
client_id - Password:
client_secret
- Username:
- Save
Send the request. This should return a JSON document with a long value in "access_token". There should also be a expiry time e.g. 4199 seconds.
When sending a request, if the token is not valid Integration Suite will return a 401 error code. This means we need to request a new token.
Within Bruno we can save this token value to a variable. This saves us from copying and pasting it into other requests.
- Goto Environments > Configure > Create Environment
- Name: 'integration-flow'
- Click '+ Add Variable'
- Enter name: 'access_token'
- For value, leave it blank
- Save and close
Navigate to 'scripts' under the TOKEN request. Under Post Request enter:
if (res.status == 200) {
  const token = res.body.access_token;
  bru.setEnvVar("access_token",token);
}
- If the request receives a response (status 200)
- Get the access_token value from the response
- Assign to environment variable "access_token".
Save and run the TOKEN request. Goto the environment and click 'configure'. You should see the access_token variable updated with the value from the response.
Test the API with a request with for a single BP
- In Bruno create a new request
- Name: "BP via integration suite"
- URL: "https://{your-trial}.it-cpitrial03-rt.cfapps.ap21.hana.ondemand.com/http/request-business-partners"
- Replace the above with your actual endpoint from Intelligent Suite.
- Navigate to the 'Auth' tab
- Click on 'Inherit' and change to 'Bearer Token'
- In Token enter: ``
- This eferences an environment variable in Bruno
- Add the request body
- The JSON with our employee ID
{
  "employee_id": "1003764"
}
Building and testing a frontend
At this point a request to SAP Integration Suite should be successfully routed and transformed to the S/4HANA business partner mock server.
The next part would be building and testing the web app. However, there is too much to cover in building and testing the frontend to cover in this post. I may produce a video on this if anyone is interested.
Share, comment/discuss
Share to: LinkedIn, X