Building a custom web app with integration to SAP S/4HANA - part 1
project
by Alexander Roan on 8 Aug 2025
Introduction
"Build A Web App and Connect to S/4HANA with SAP Integration Suite"
A big part of the magic behind AI, advanced analytics, and {insert tech buzzword here} is the humble API!
I remember the excitement about service-oriented architecture in the late 1990s and early 2000s. Back when most organisations had 'fat' ERPs with extensive customisation, the idea that we could split things up into different apps and connect in a standardised way was refreshing.
I recently noticed a SAP CodeJam on the SAP community events calendar that involved connecting systems to S/4HANA using SAP Integration Suite.
I thought it might be fun to build a web app and see if I could successfully connect it to S/4HANA.
A basic understanding of frontend to enterprise backend via cloud architecture is useful for everyone; business experts, technology experts, and people experts
The article is broken into three parts: an introduction, a step-by-step explanation for generalists, and my build/test notes for anyone working on something similar. The third section includes details on all the test tools, and configuration settings.
A couple of quick disclaimers:
- I'm not an integration expert:
- I don't look at integration suite vs. other solutions
- I don't cover best practices, typical challenges, good use cases
- My solution here is likely not optimal
- It's just a vanilla HTML, CSS, JS frontend
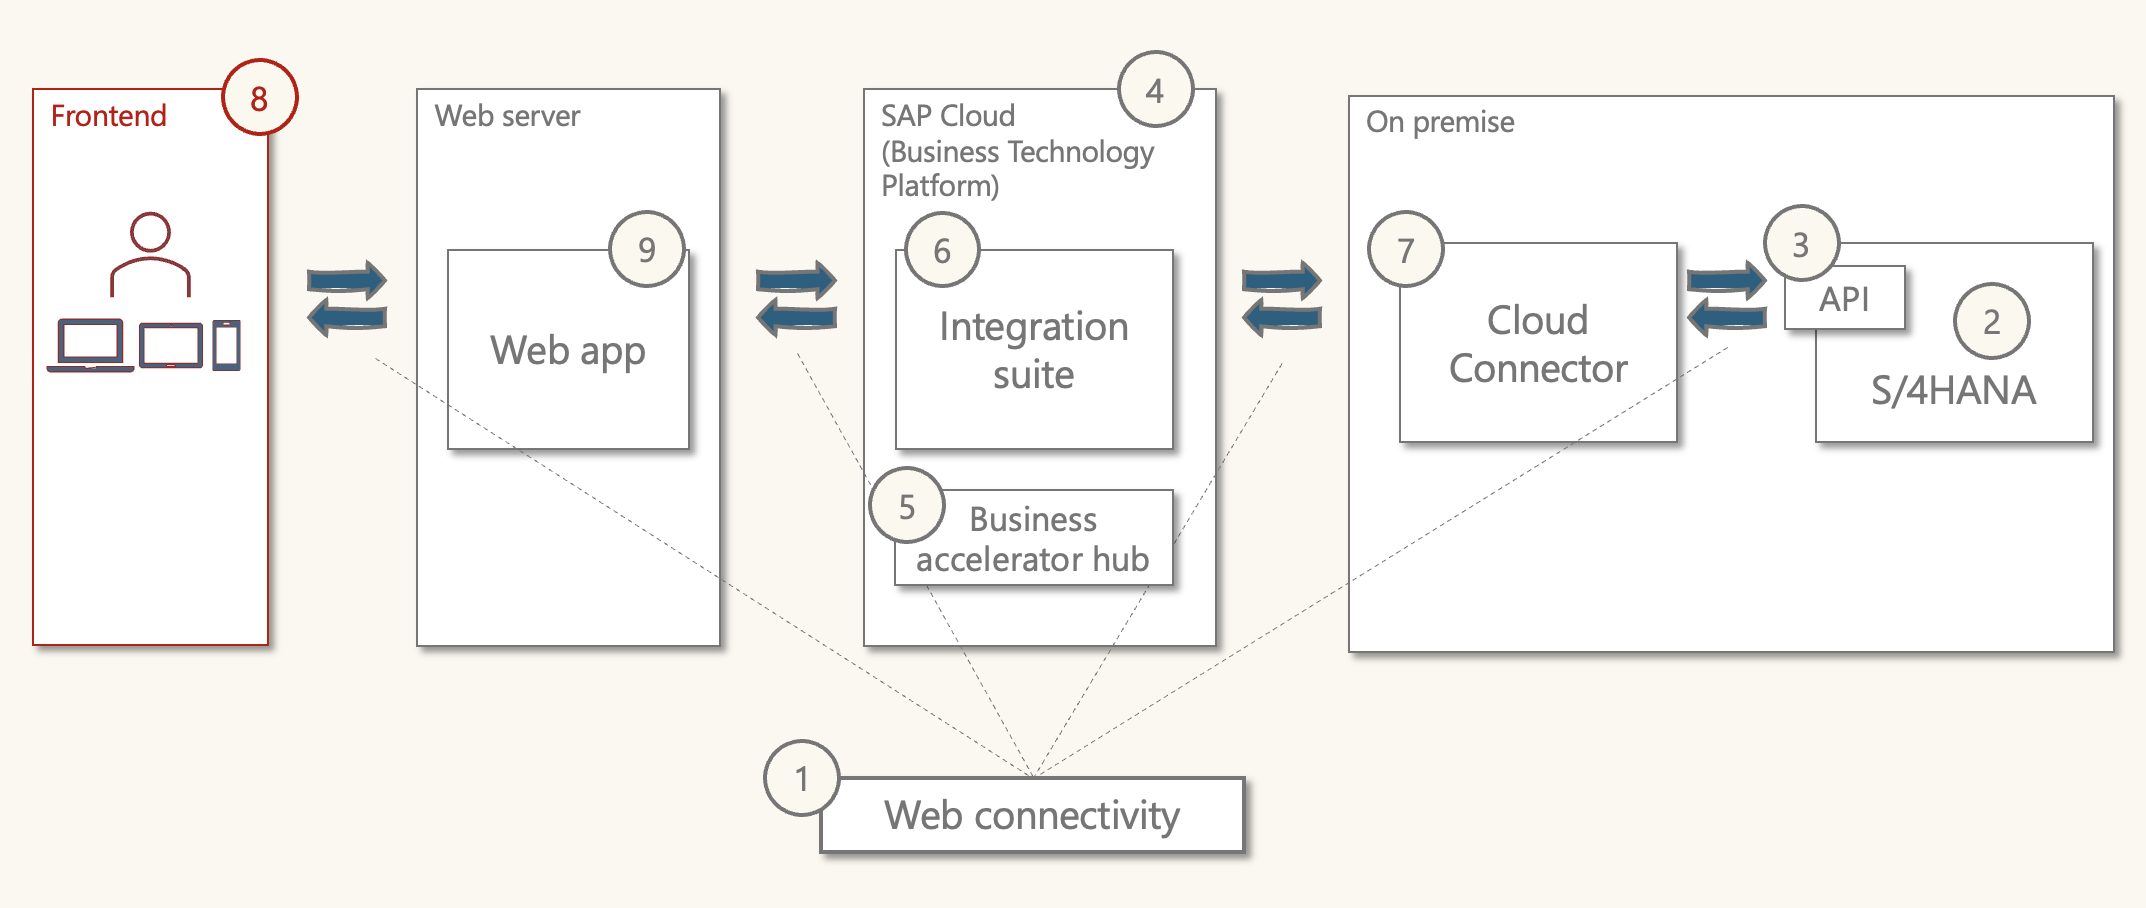
From web app to S/4HANA
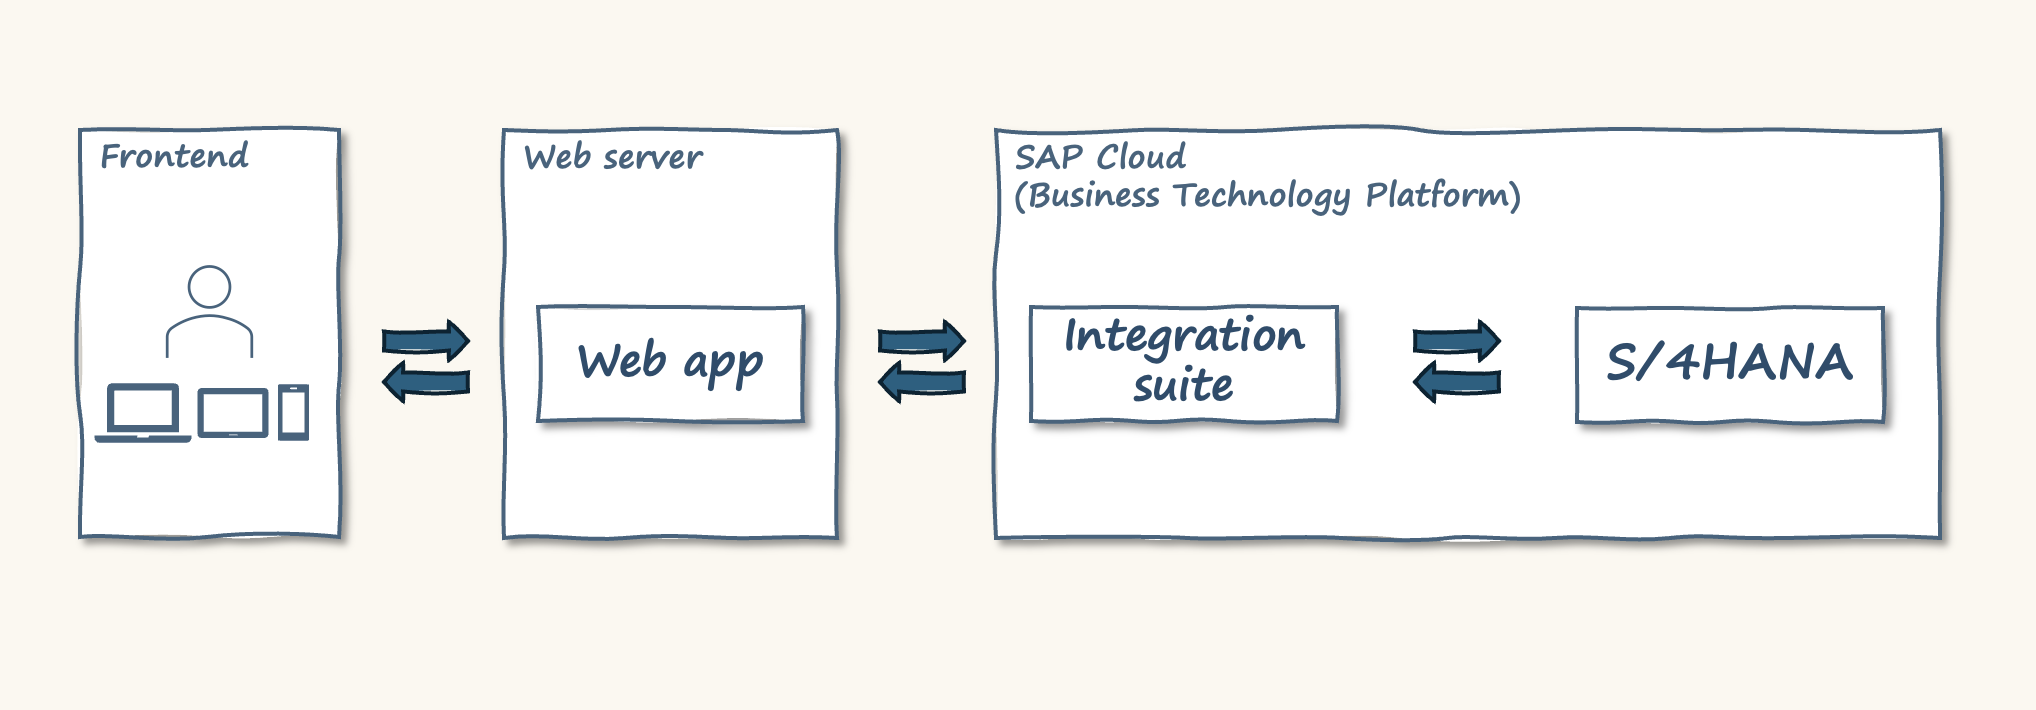
The plan:
- The frontend is a web page to search for data from within S/4HANA
- The web server handles communication between the frontend and SAP Cloud
- SAP Integration Suite will route and format the message for S/4HANA
- S/4HANA is the source of data.
Tools/technology:
- Utilise the free trial account for SAP BTP and Integration Suite
- Build the frontend and web app ourselves
- We can't access S/4HANA. However, the CodeJam provides a S/4HANA mock server that mimics the behaviour of an API within S/4HANA.
If we use a mock system, we will need to run it locally. So, adjusting the architecture.
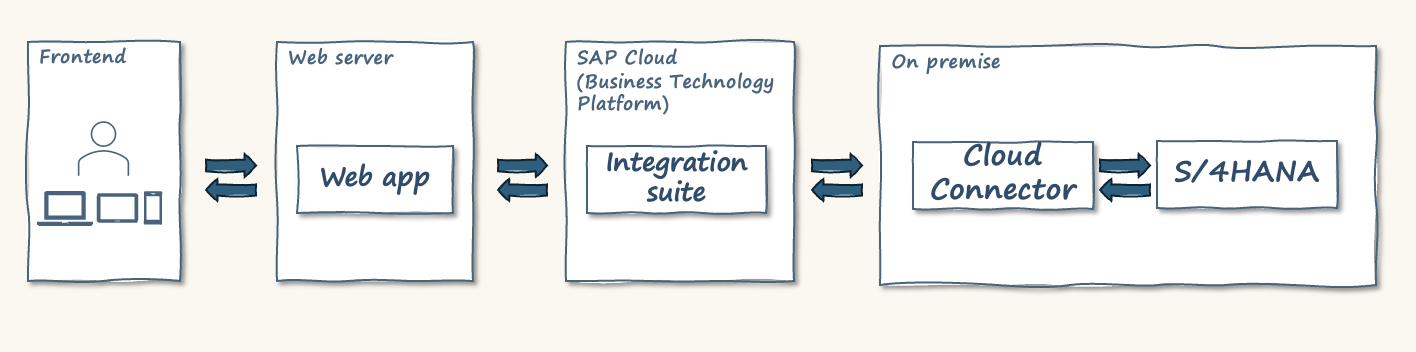
This adds SAP Cloud Connector which allows an "on-premise" application to connect with SAP Cloud.
The front end
The completed app offers a summary view and a detailed view. Here's a short screen recording.
Summary view
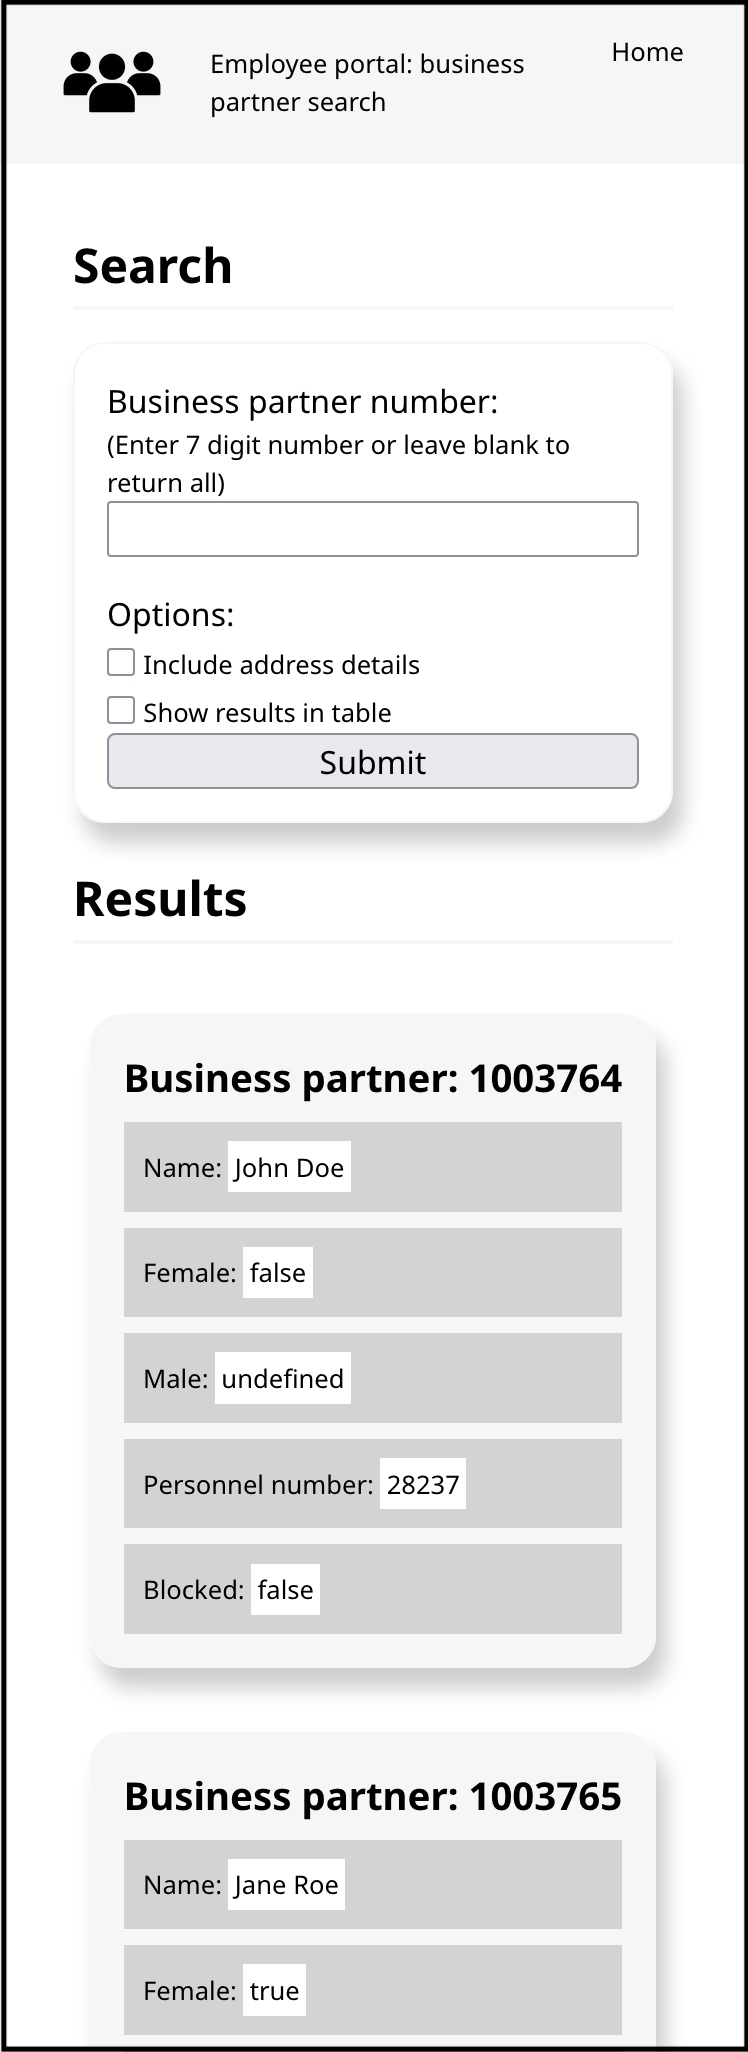
This is a screenshot from the web browser (firefox).
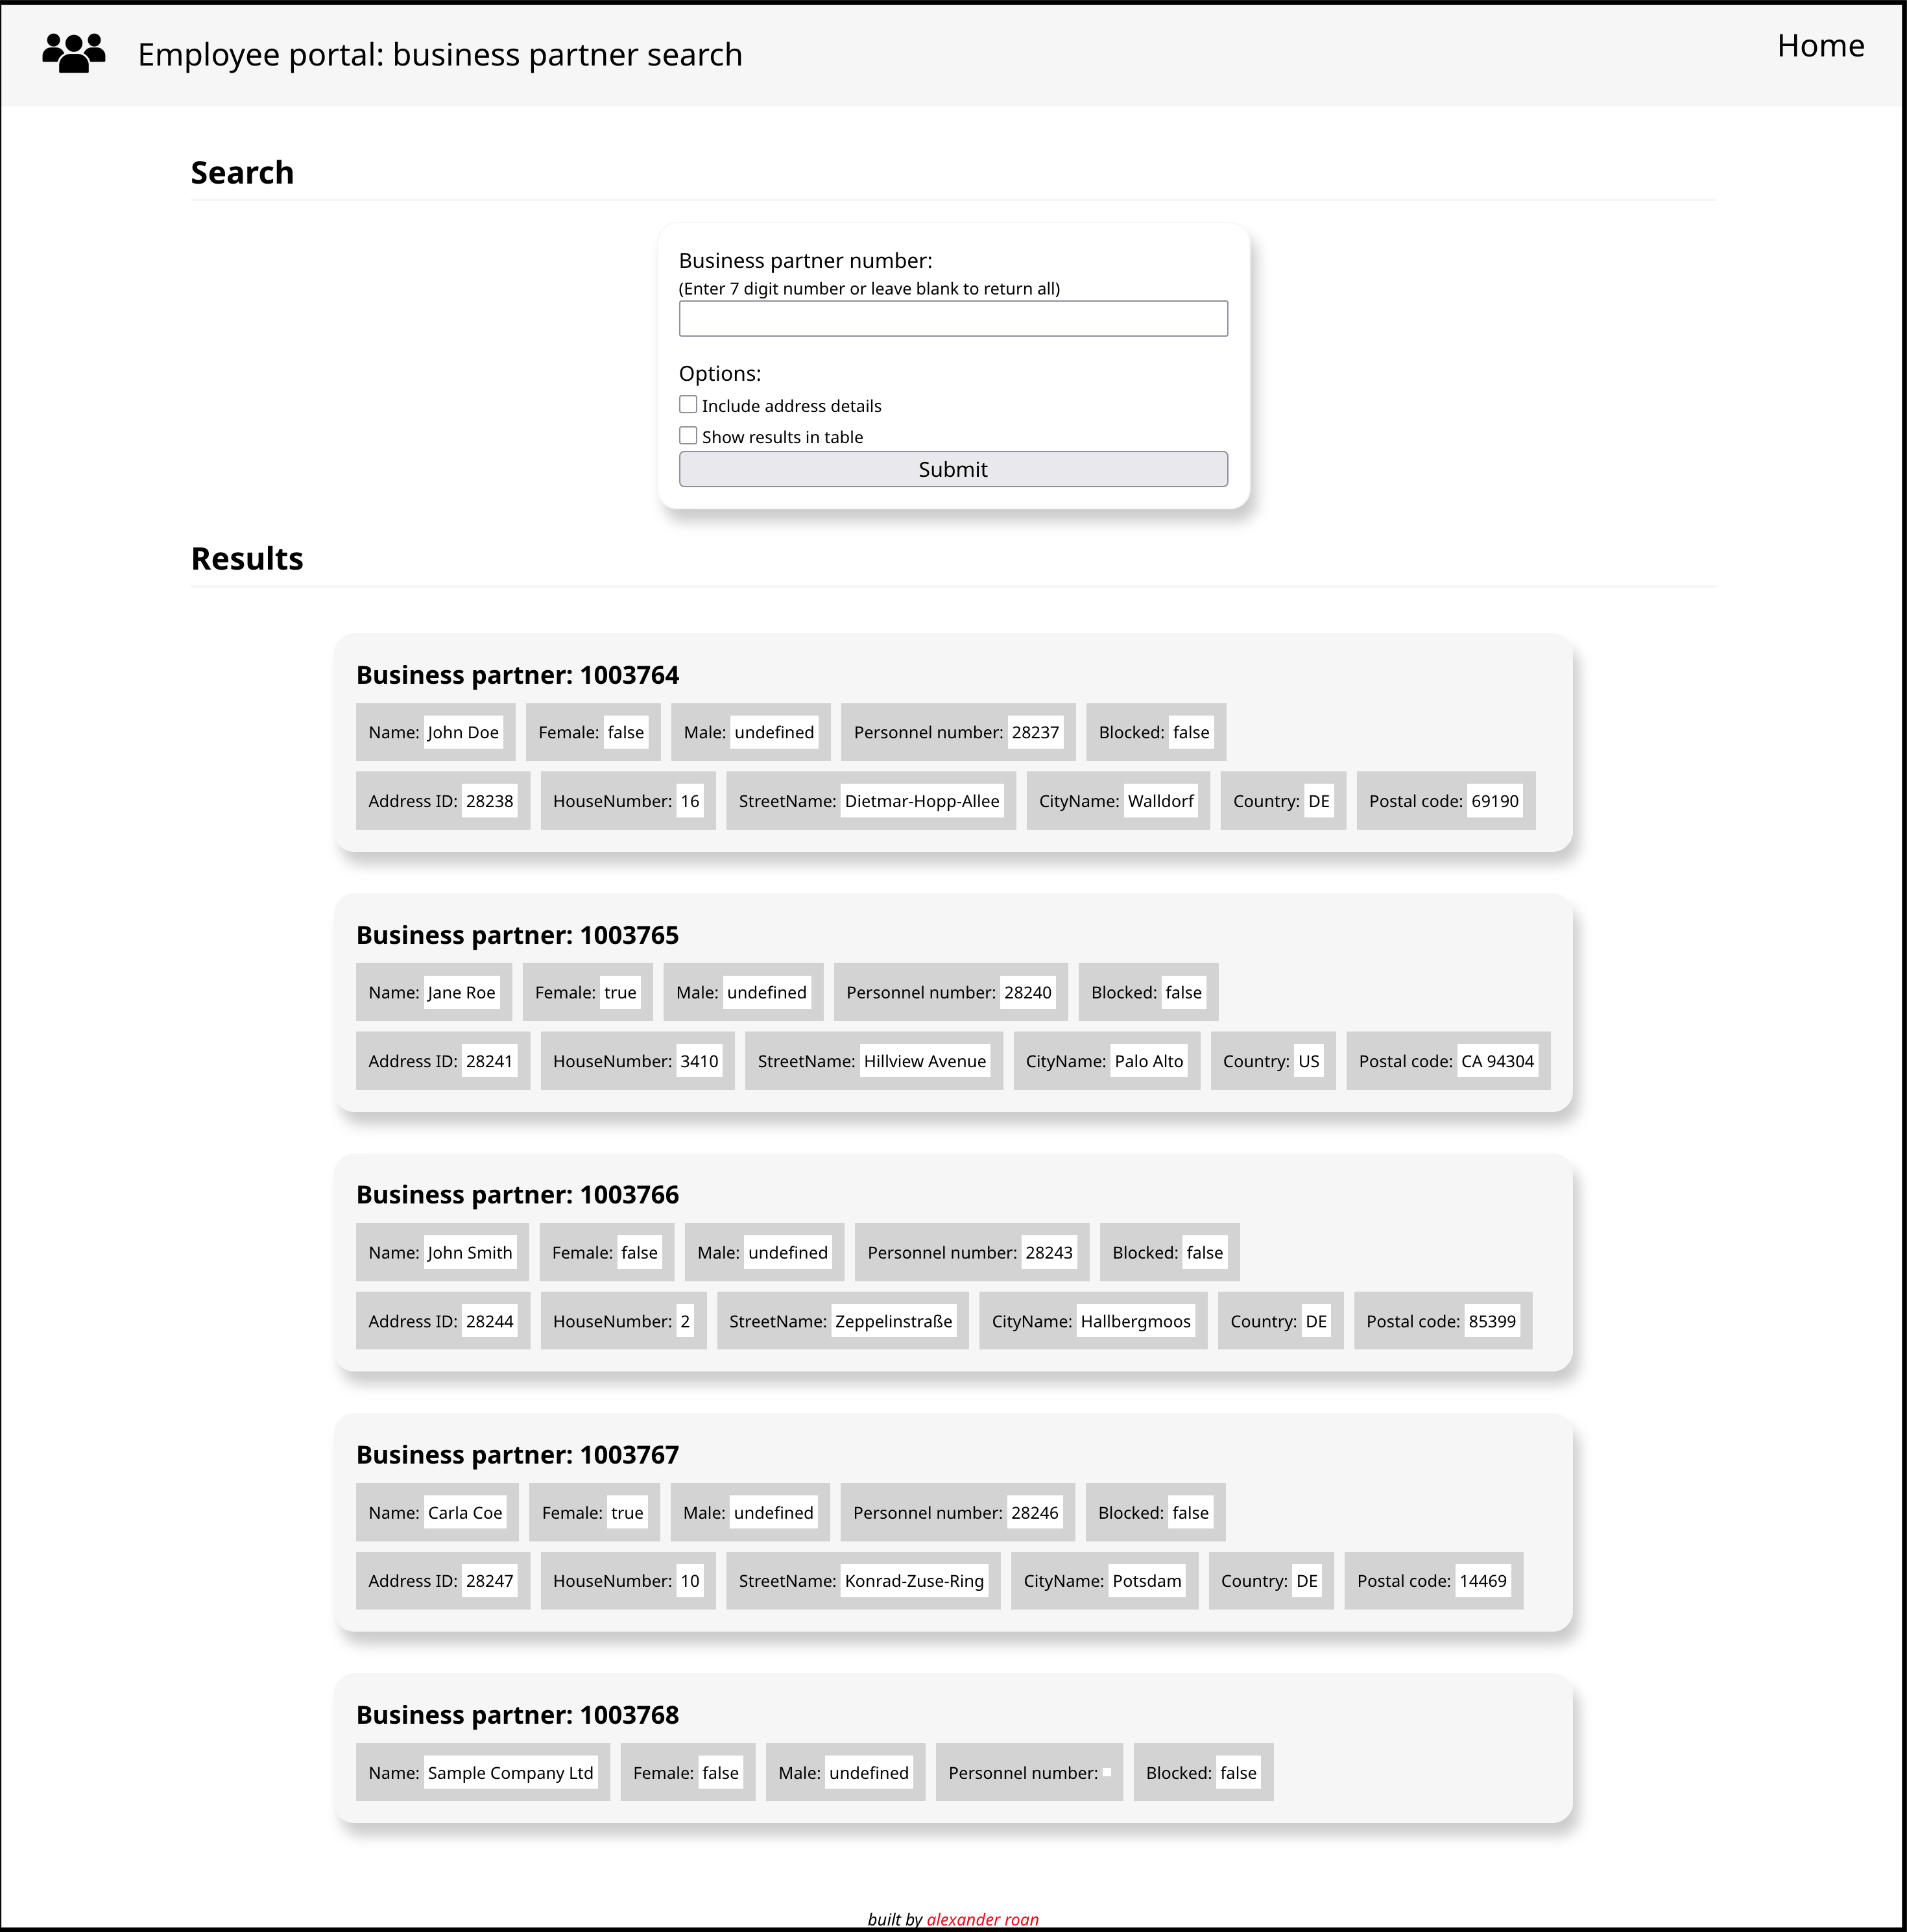
The top part of the page has a search form that allows you to search for a business partner. The bottom part of the page shows the results with a selection of key fields in a card style layout.
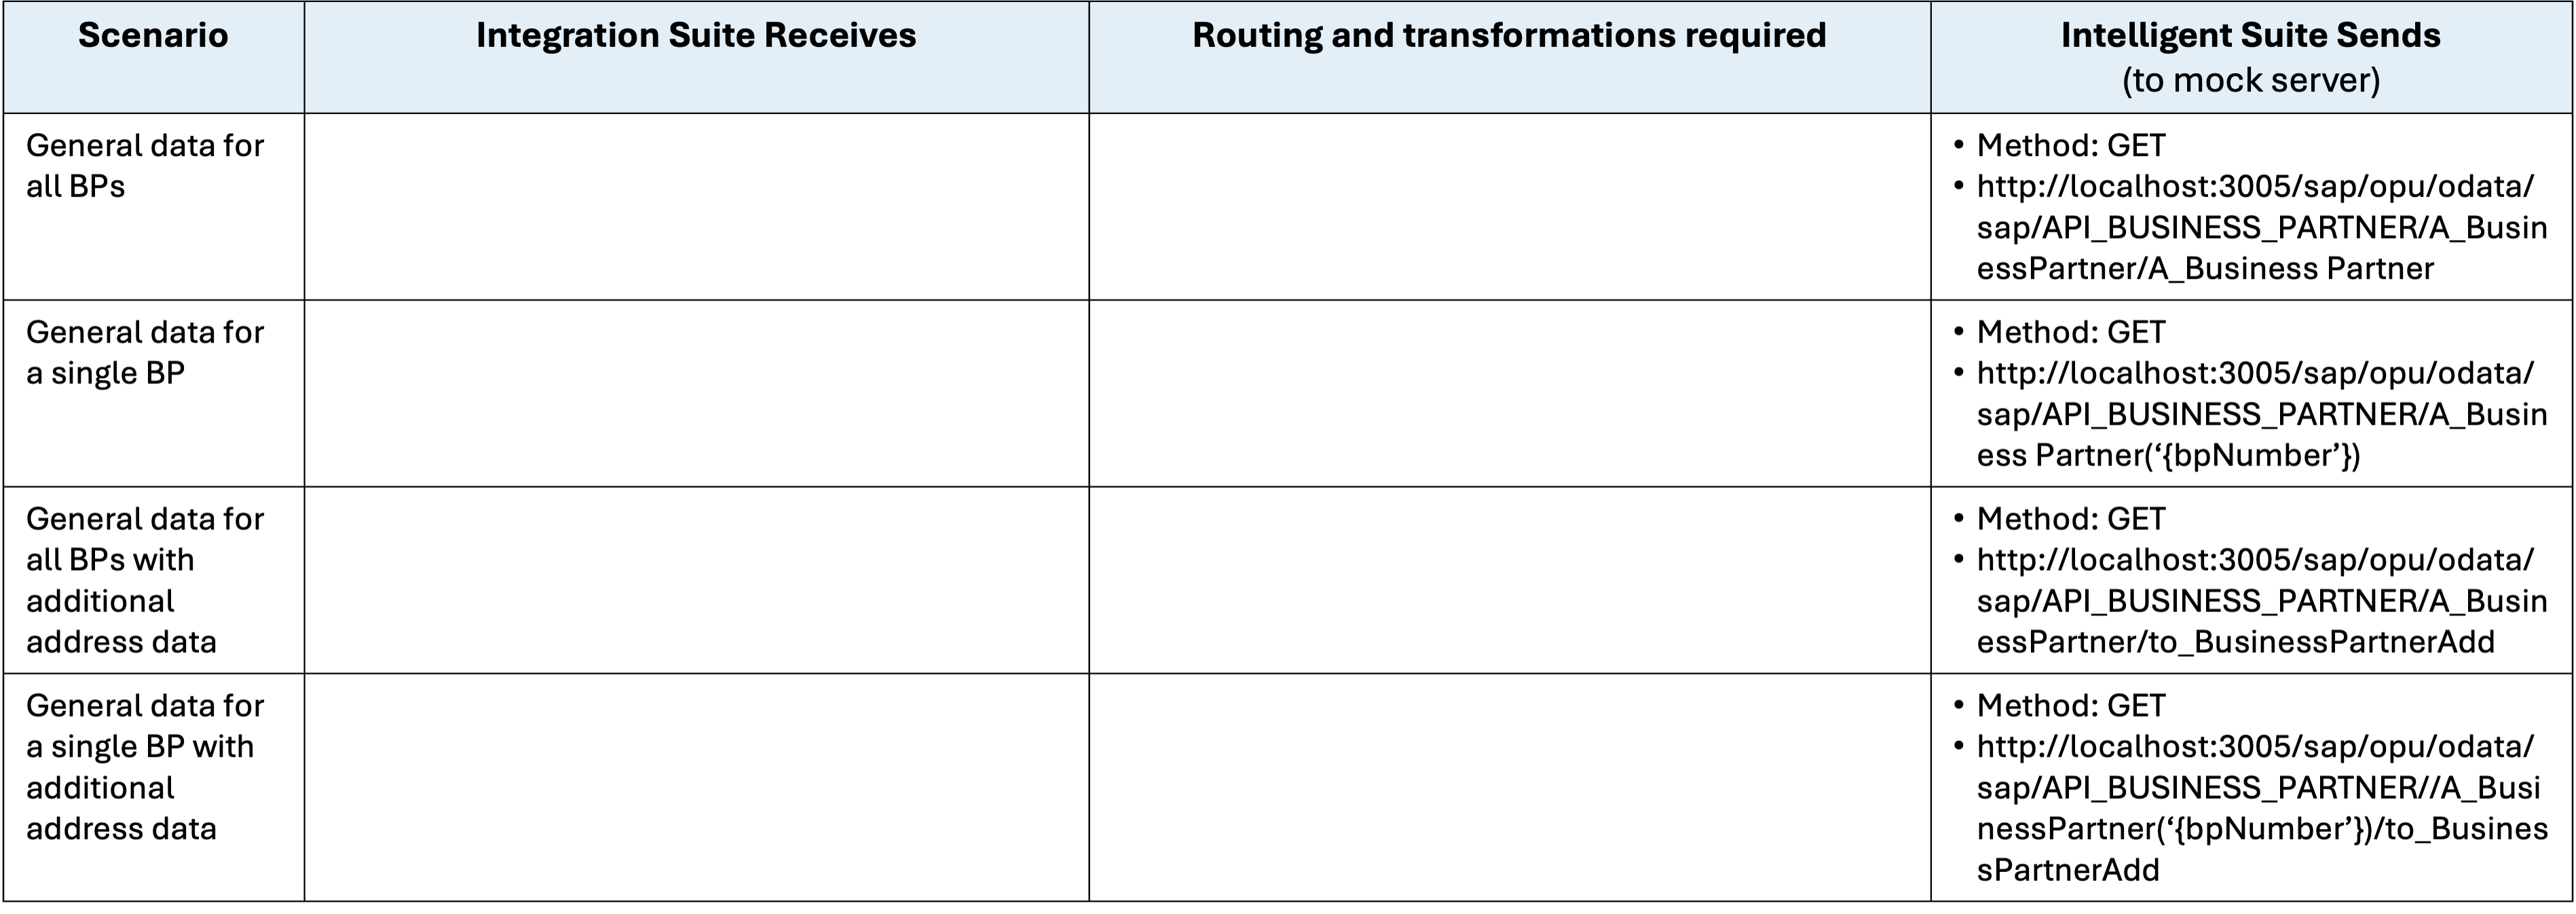
The mock system we are using allows for four different search possibilities:
- Search for a single business partner by number
- Search for all business partners
- Search for a single business partner by number, including address details
- Search for all business partners, including address details.
Detail view
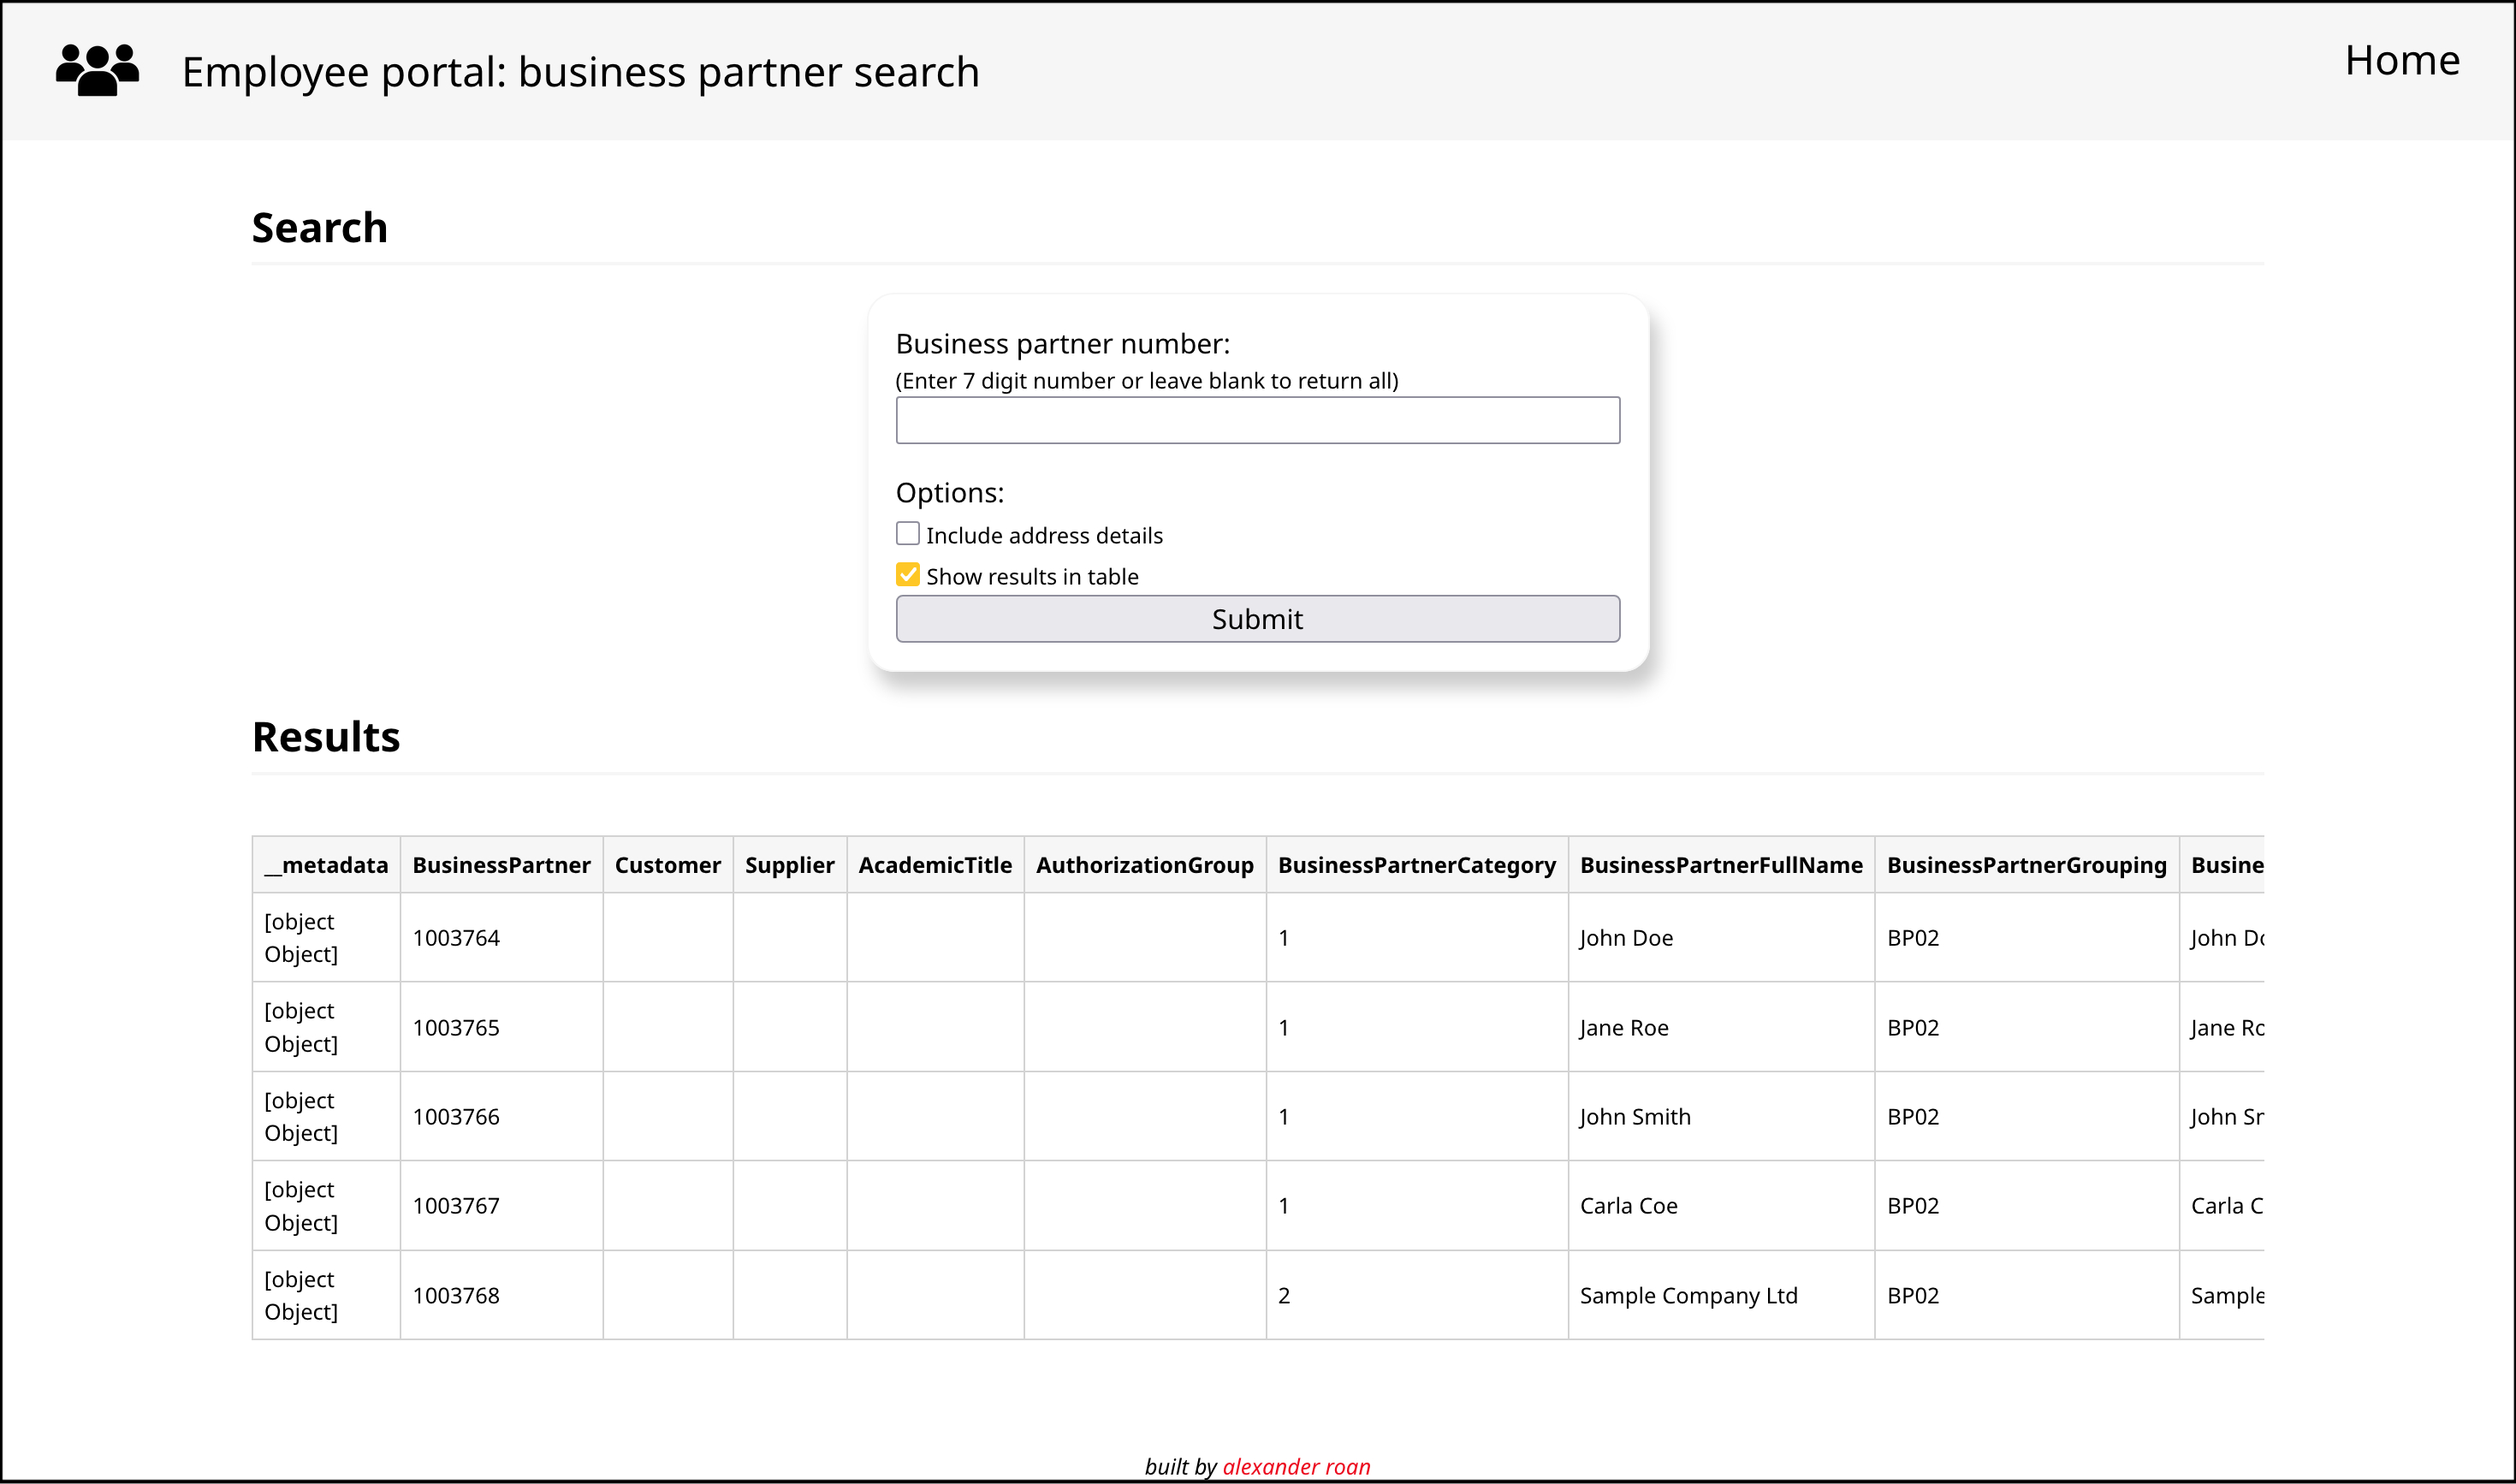
The detail view shows the results in a table. This table has a horizontal scroll bar, which can be adjusted to view all the fields. The table includes 'raw' results, so there are some 'technical' entries like [object Object] and some blanks, which I think is fine for this mock up stage.
Responsive view
For tablets and mobile, the card view resizes with the browser window.
I'll come back to how this front end was built after running through the integration flow.
S/4HANA
The value of this flow is being able to design and build a frontend to access real-time, trusted business data from S/4HANA in a standardised way. In a real-world example, our frontend could be an employee portal or supplier portal.
S/4HANA is:
- SAP's enterprise software for large organisations. It handles processes such as purchasing, manufacturing, sales, shipping, finance, etc.
- An evolution from their earlier ERP products (R/1, R/2, R/3, ECC).
- A complex platform comprising thousands of programs, tables, and customisations used by many large enterprises.
S/4HANA already comes with a web frontend called Fiori, which includes thousands of apps. However, in this example imagine we are building something for a casual user that does not require the full capability of Fiori. Or, just consider it's for fun.
Further reading on S/4HANA:
Business partner
The mock server simulates one of the business partner APIs for S/4HANA.
A business partner is a reference or master data record that represents a third party that an organisation works with. This includes customers, suppliers, and employees.
Business partner master data is organised by key fields such as "category" and "role".
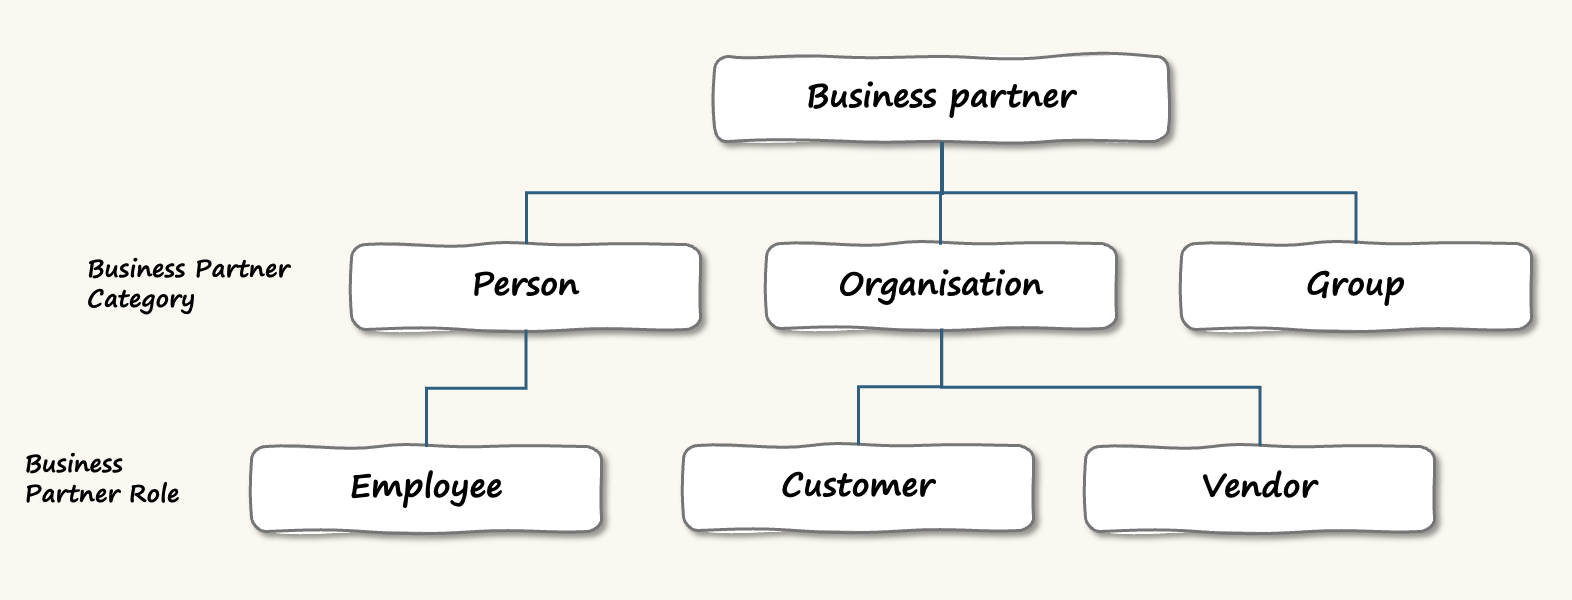
All business partners have general data such as name, address, etc., then they have role-specific data, which may include, but are not limited to:
- Purchasing data
- Sales data
- Accounting data
- And so on.
To understand how business partner data is used, consider a typical ERP process like order-to-cash:
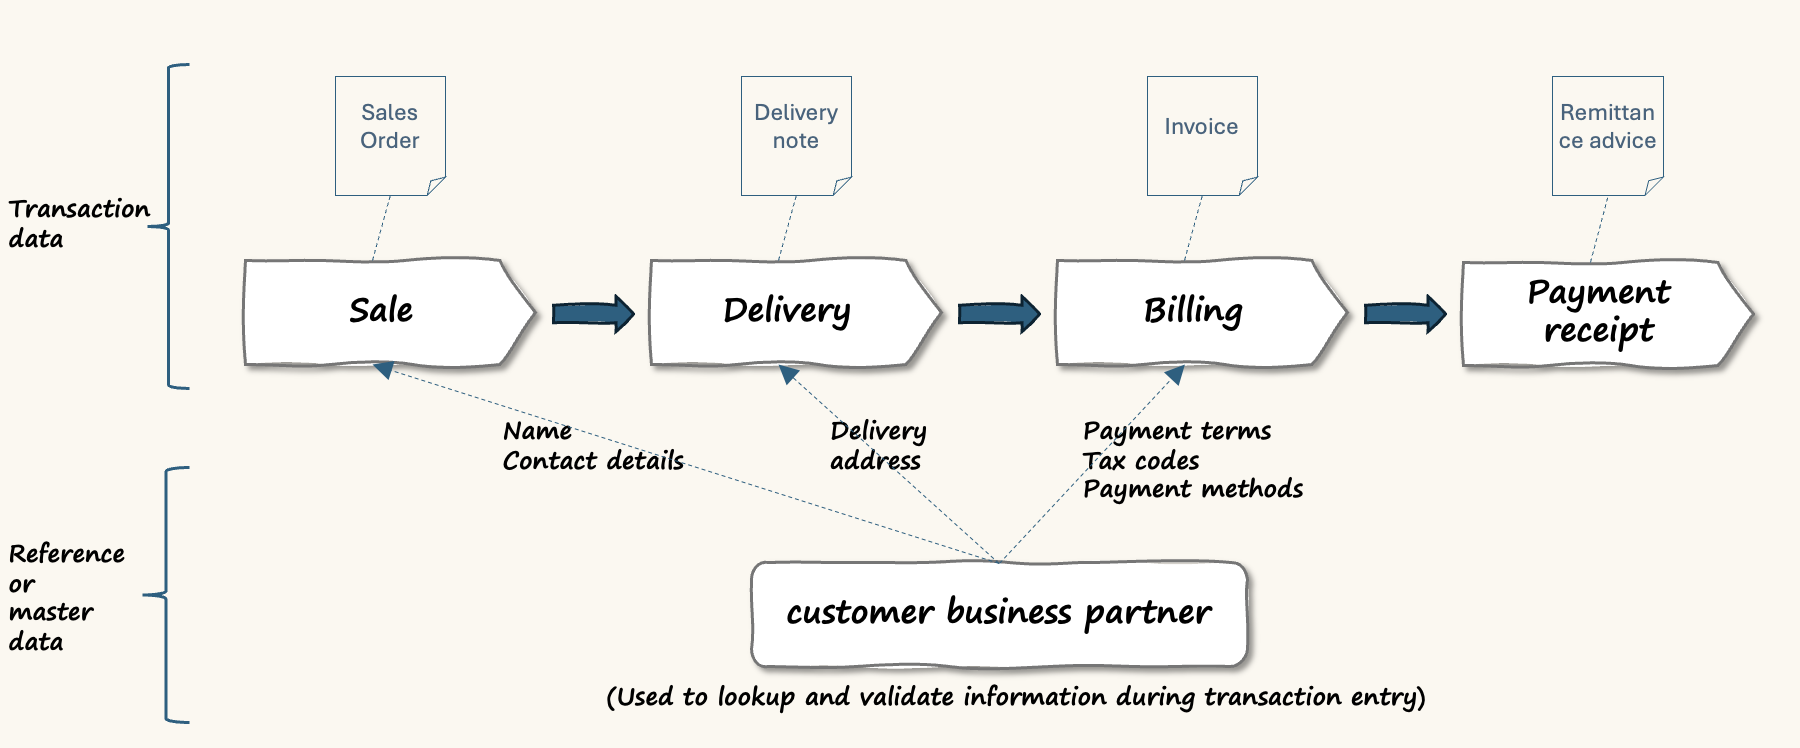
This is a summary of the order to cash process. During sales, deliveries, and billing, information from the business partner master record is utilised.
The business partner master stores long-term stable information about the customer. It's used for both reference and validation during transaction entry.
This ensures there is consistency across transactions over time in terms of how they reference business partners. This is critical for reporting. Consider comparability, aggregation, etc.
Further reading on business partners:
S/4HANA Architecture
The mock server simulates an S/4HANA API. Let's look inside S/4HANA.
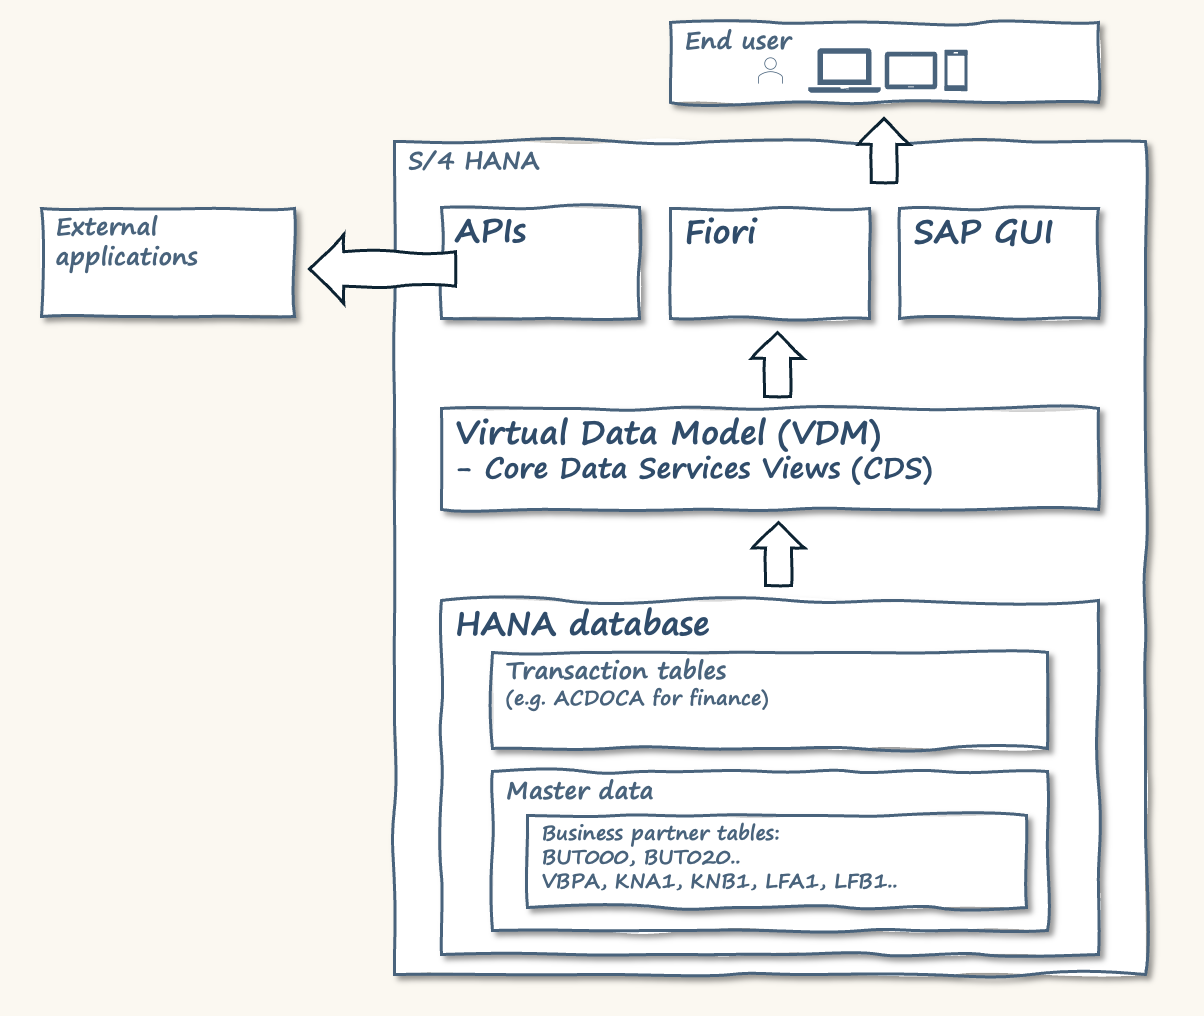
Starting from the top right, S/4HANA has two primary ways for users to interact. The traditional SAP graphical user interface (GUI) and the modern Fiori web-based user interface.
I've drawn APIs to the left of these. The APIs allow applications to interact with S/4HANA.
Consider the data model in S/4HANA in two separate parts. The first is the traditional HANA database. This is where master data and transactional data are stored. On top of this is the virtual data model. This consists of core data services views. This is a way to define different sets of data to meet the needs of APIs and Fiori Apps.
In this example, we are using a business partner data API. Behind the scenes, the API sources data from CDS views, which in turn connect to the HANA DB tables.
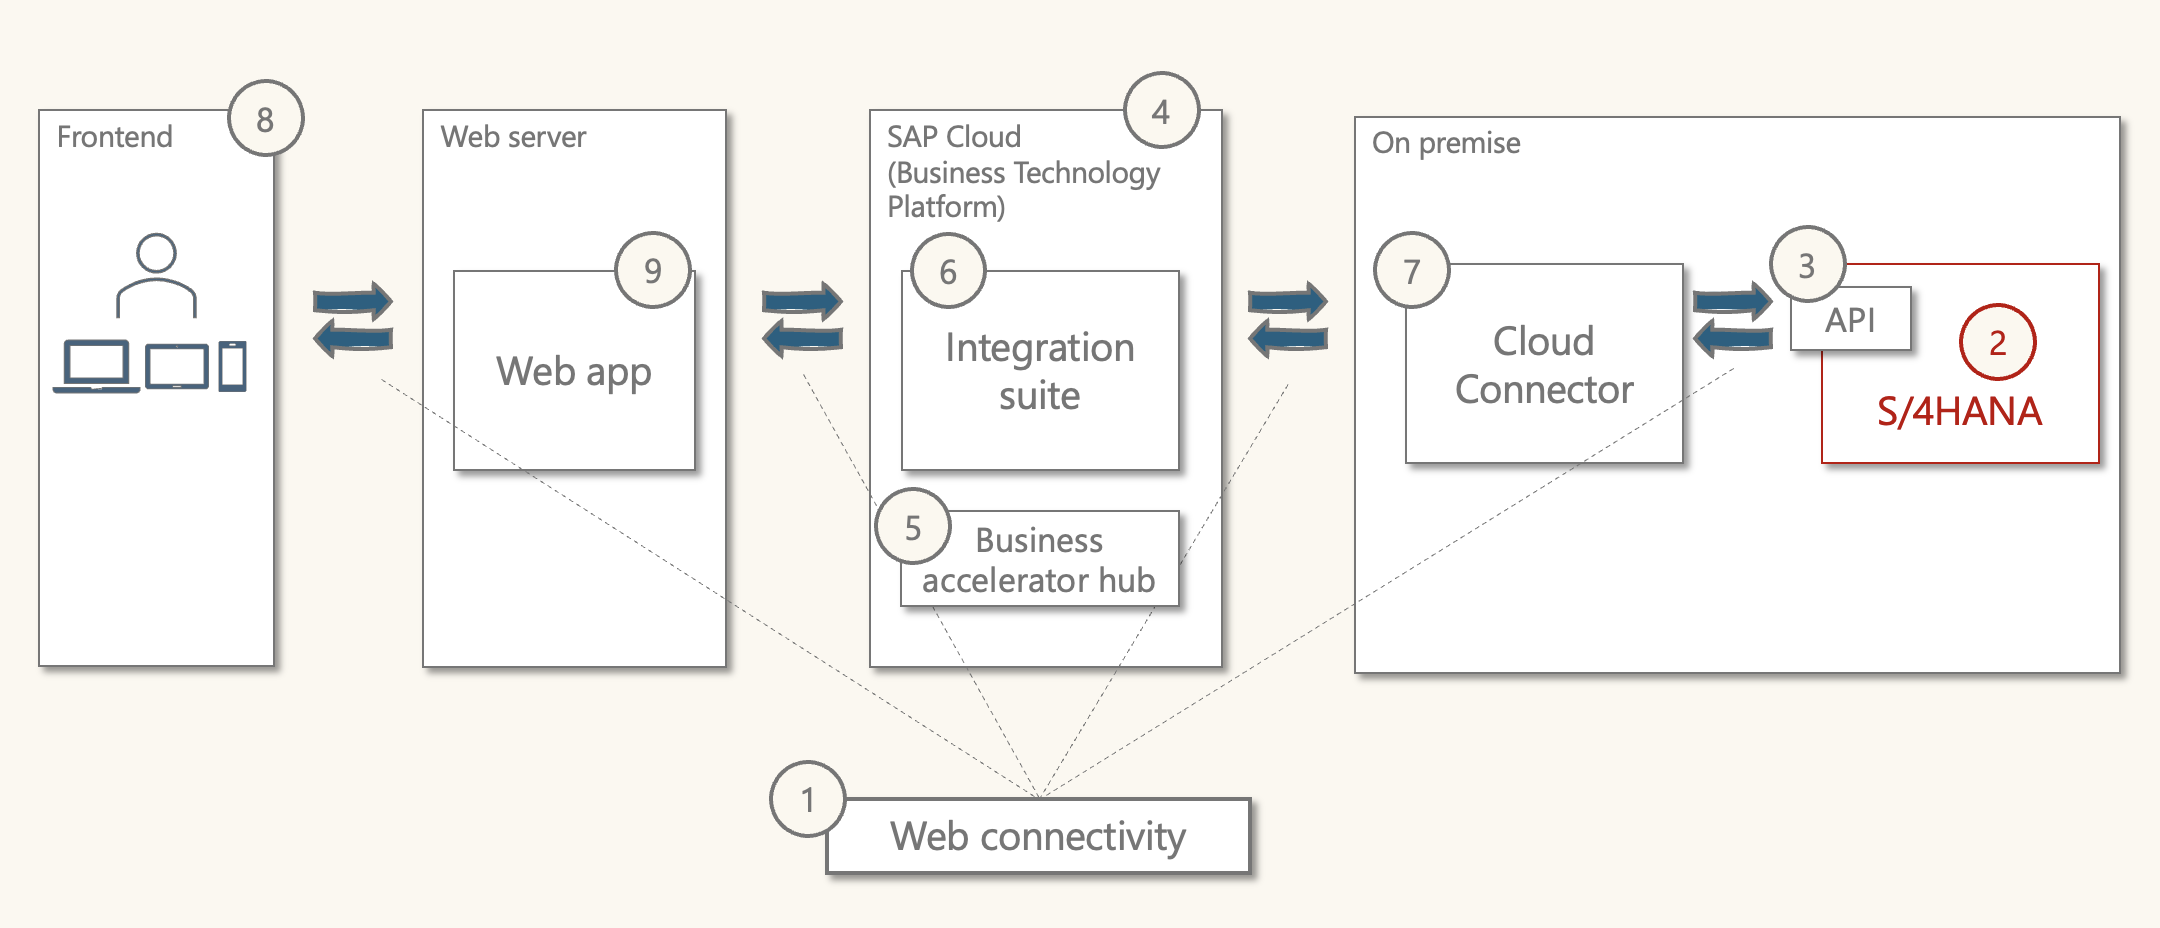
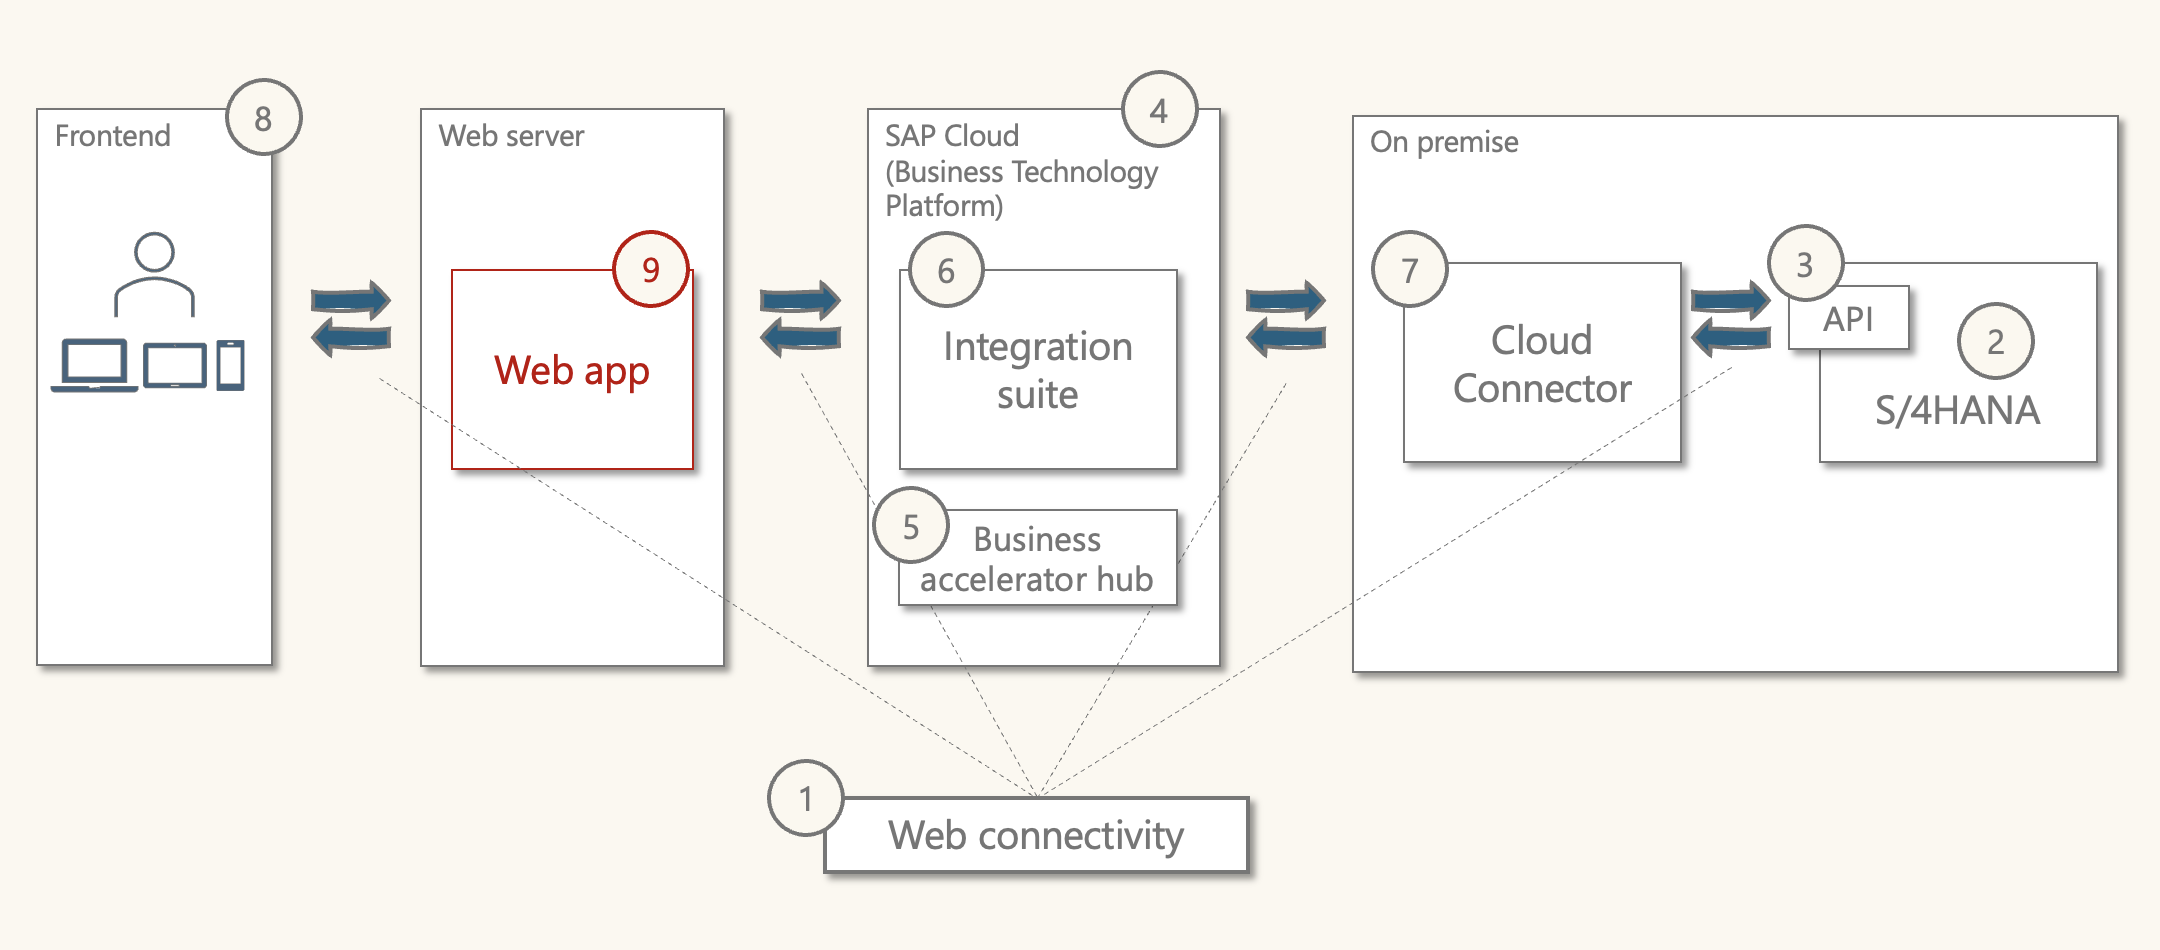
A step by step walkthrough
overview of the integration flow
In this section, I'll summarise the process and technology involved at each step.
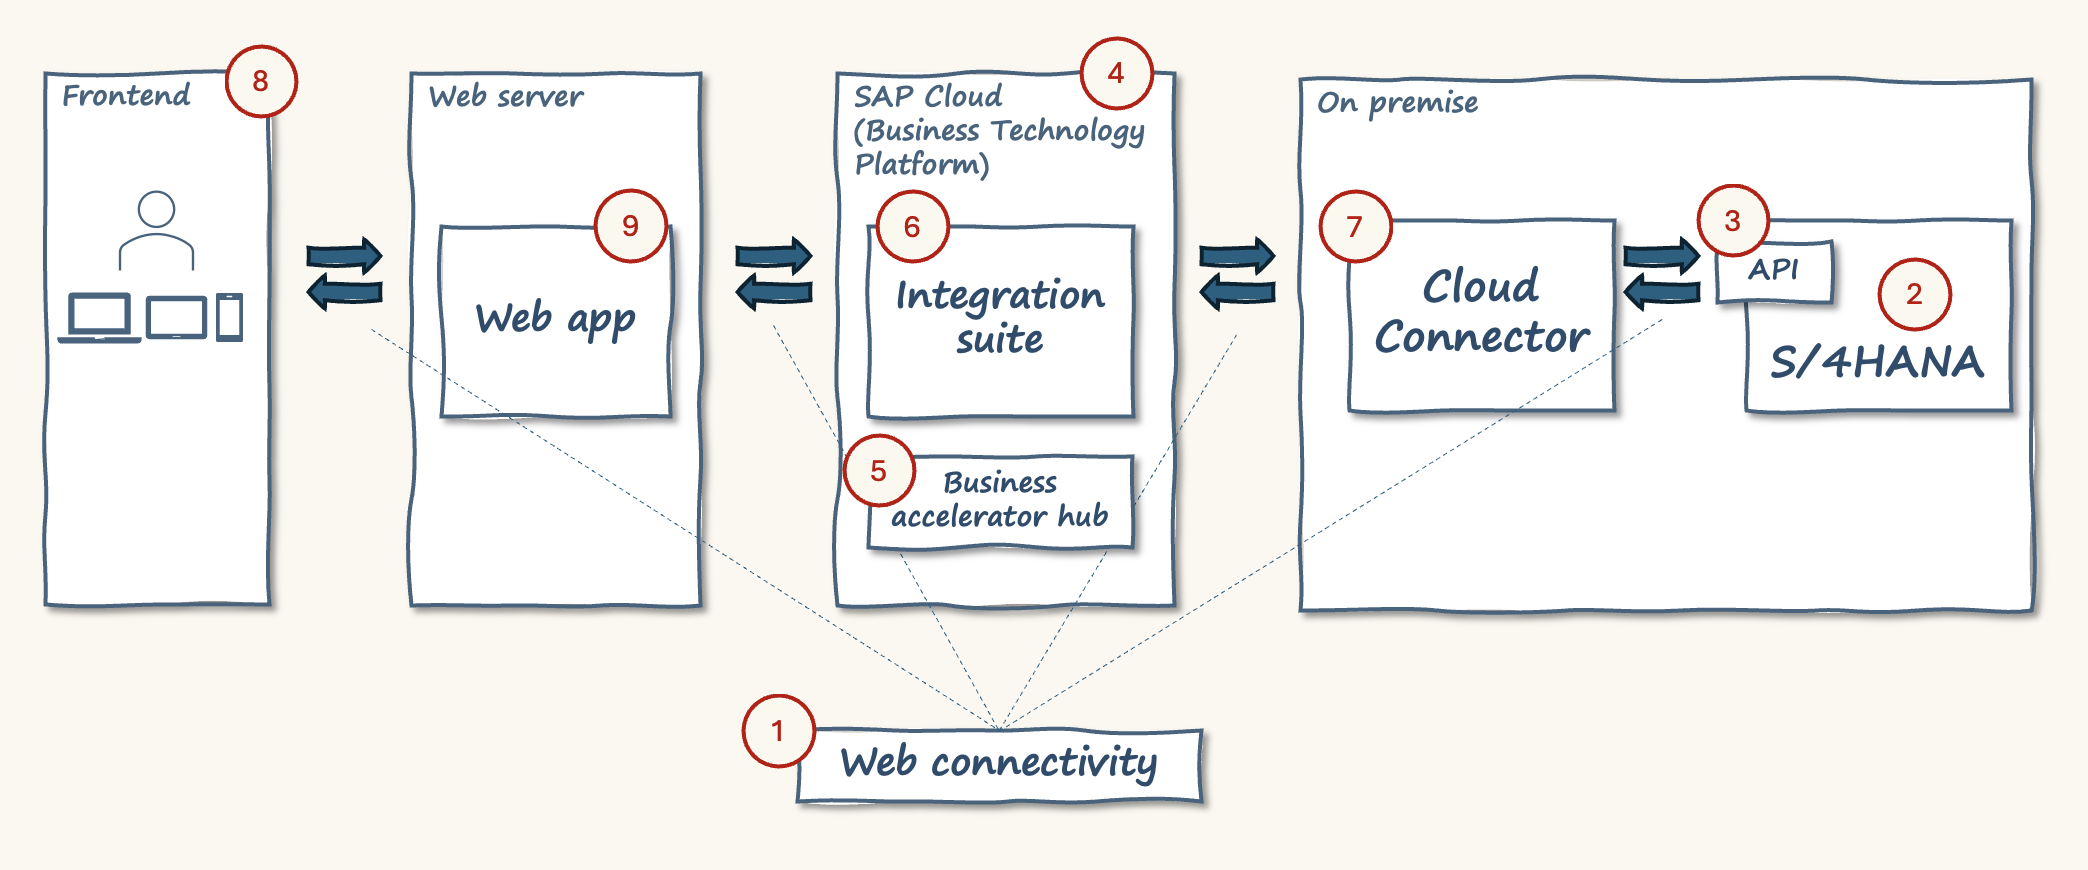
Point 1: Web communication
Building an integration flow between web connected applications relies on protocols and standards for web communication. Let's run through the main concepts.
Client/server
The terms client and server are used to describe the requester and receiver. For example, the web browser on a computer is a client, and google search is a server.
Internet communications use the HTTP protocol.
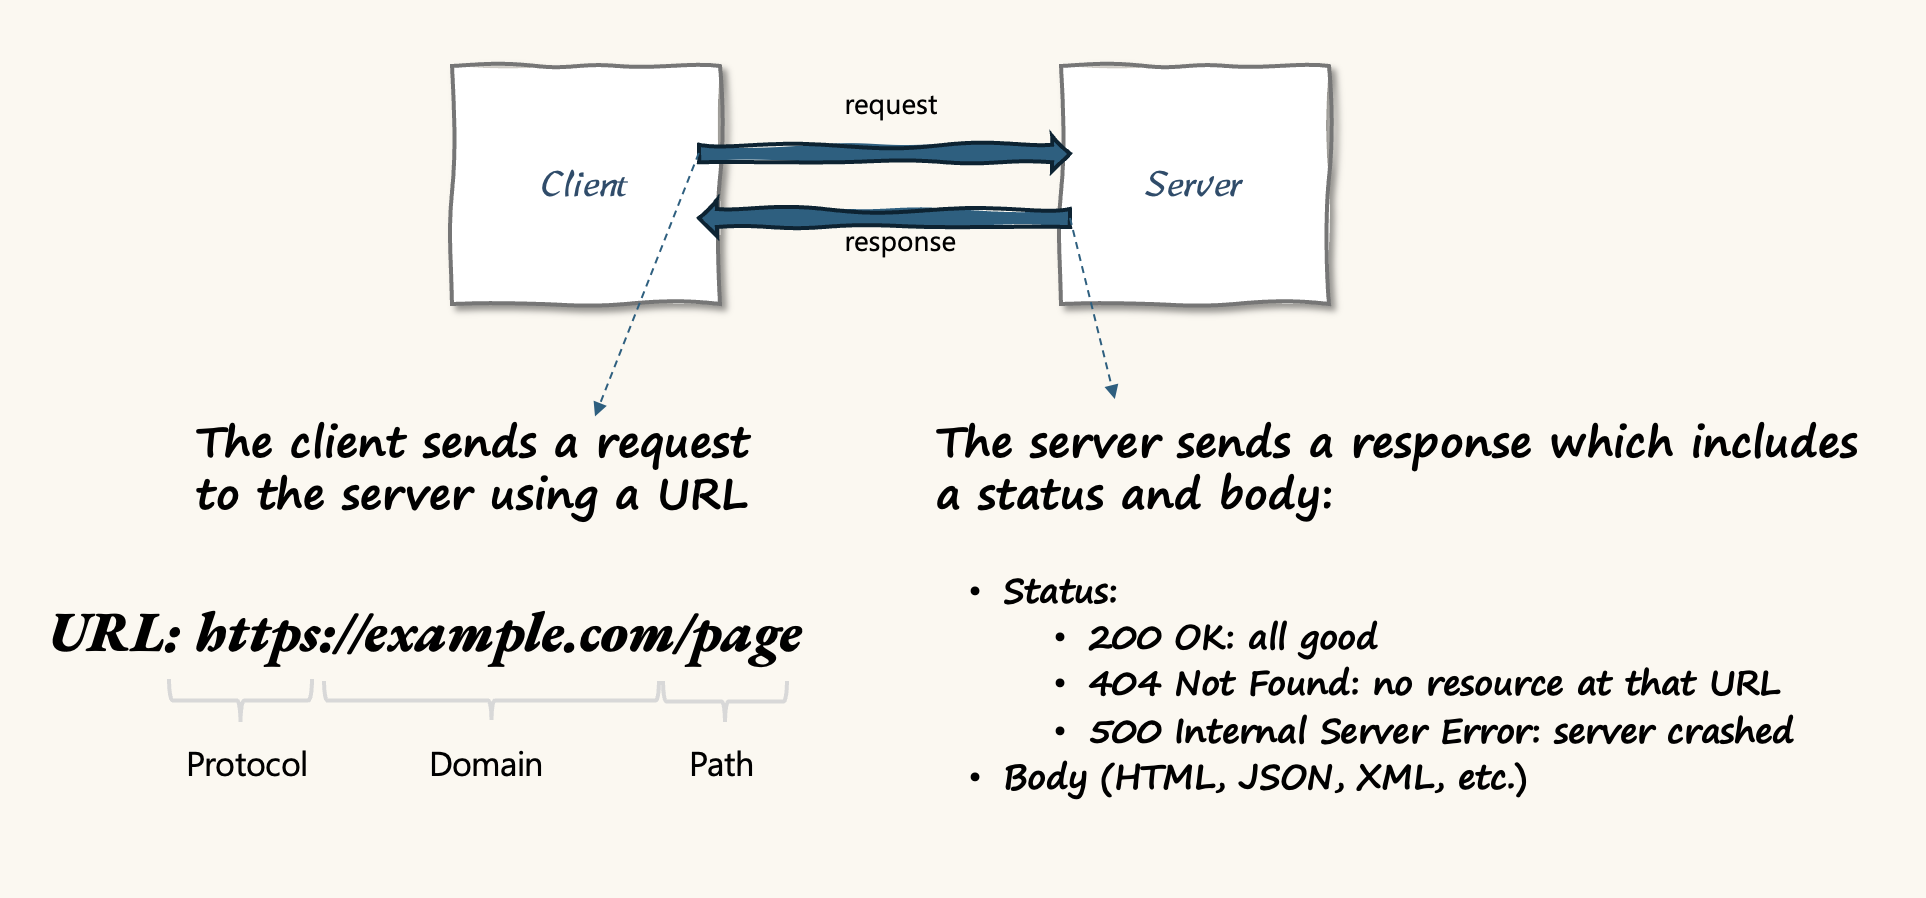
Hypertext Transfer Protocol (HTTP) is a standard protocol for communication between clients and web servers. Web pages are written in Hypertext Markup Language (HTML).
The term Uniform Resource Locator (URL) is used to describe an address.
The structure of a URLs
URLs have five key parts:
- Protocol:
http:// - Domain:
www.example.com - Path:
/pages/ - Query string:
?id=1&cat=test - Fragment:
#article(an internal page reference, often not present)
When it comes to APIs, the query string provides the ability to specify parameters for search and filter. In this case, the query string could include a business partner number.
HTTPS
HTTPS uses the HTTP protocol, but it adds a secure transport layer. HTTPS means the HTTP message is encrypted before transmission.
The only part that isn't encrypted is the domain name.
Internet protocol (IP) address
While URLs are designed to be human-readable. An IP is a numerical label like "192.0.2.1" that identifies a computer or network.
URLs are used for navigation. IPs are used for routing and communication. They identify a specific device on a network (laptop, server, etc.).
An IP address can be used in place of a domain name with HTTP and HTTPS
"http://192.0.2.1"
While an IP address represents a computer. The term "port" is used to specific a specific input/output location.
Ports are identified using 4 digits.
"http://{server}:{port}" "http://192.0.2.1:1000"
A server is often referred to by 'host'
"http://{host}:{port}"
You can access ports on your own computer by using its IP or "localhost"
"http://localhost:1000"
From domain to IP
The web browser uses a domain lookup service to translate a URL into an IP address.
"http://www.example.com" becomes "http://192.0.2.1"
This is called the Domain Name System (DNS). Popular look up services include: Cloudflare, Google DNS, and OpenDNS.
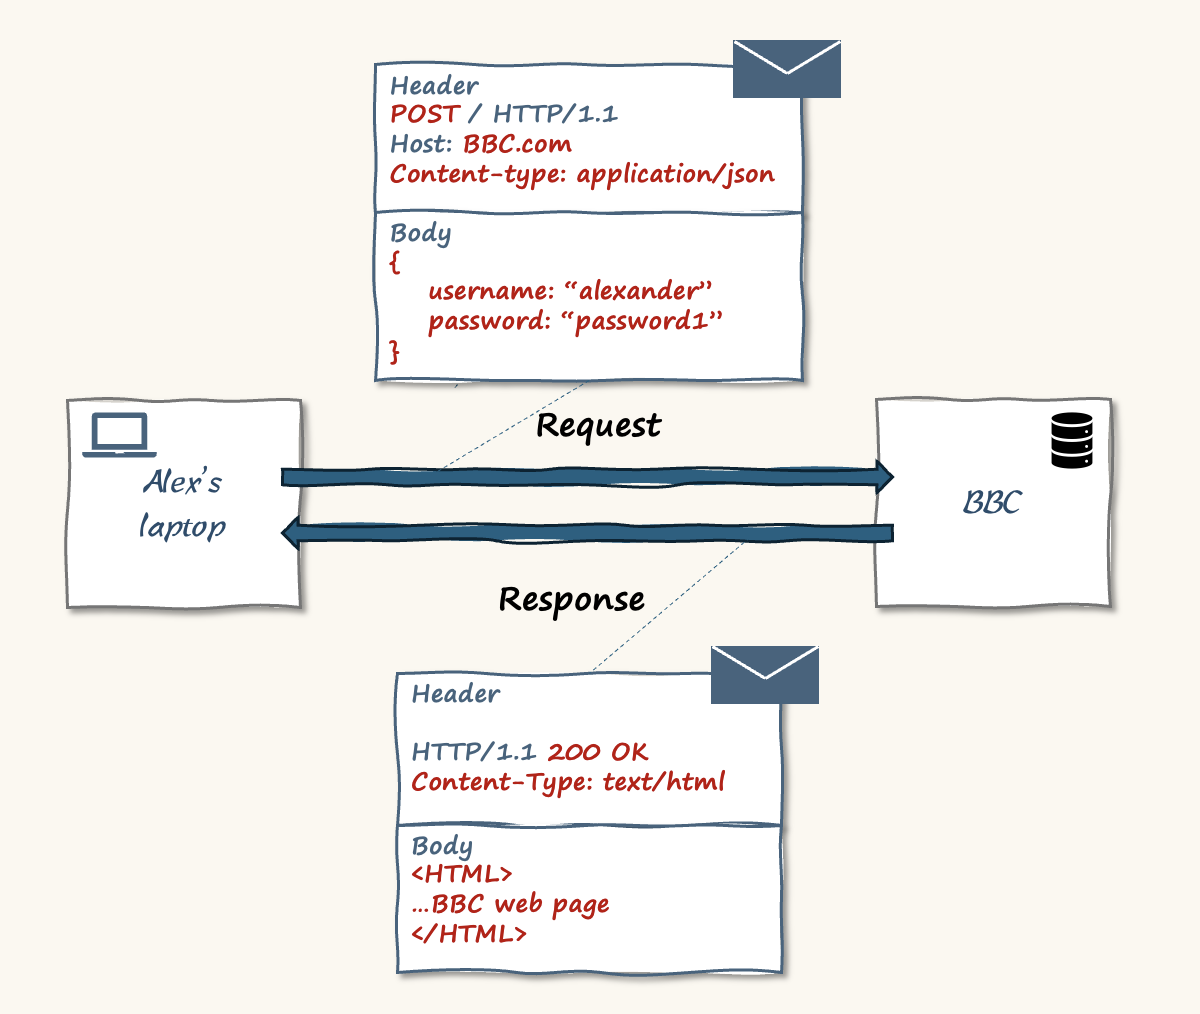
Messages
The communications themselves can be thought of as messages. They contain a header and a body.
The header includes:
- The URL
- The method, most commonly GET and POST
- GET sends a request without a body
- POST sends a request with a body
- Additional information on the content type and authorisation
The body includes detailed content. For example:
- If you fill in a form on a web page, it would include the form data
- If a server returns a web page, it would include the web page.
Server Responses
When a server receives a request, it responds with a status code and a body. Status codes include '200' representing "ok" and '404' representing 'Not Found'.
(404 has definitely reached meme levels of fame!).
The body that's returned depends on the status and the server's purpose.
Real life examples
Consider visiting the BBC website from a web browser, a simple GET request would return the home page.
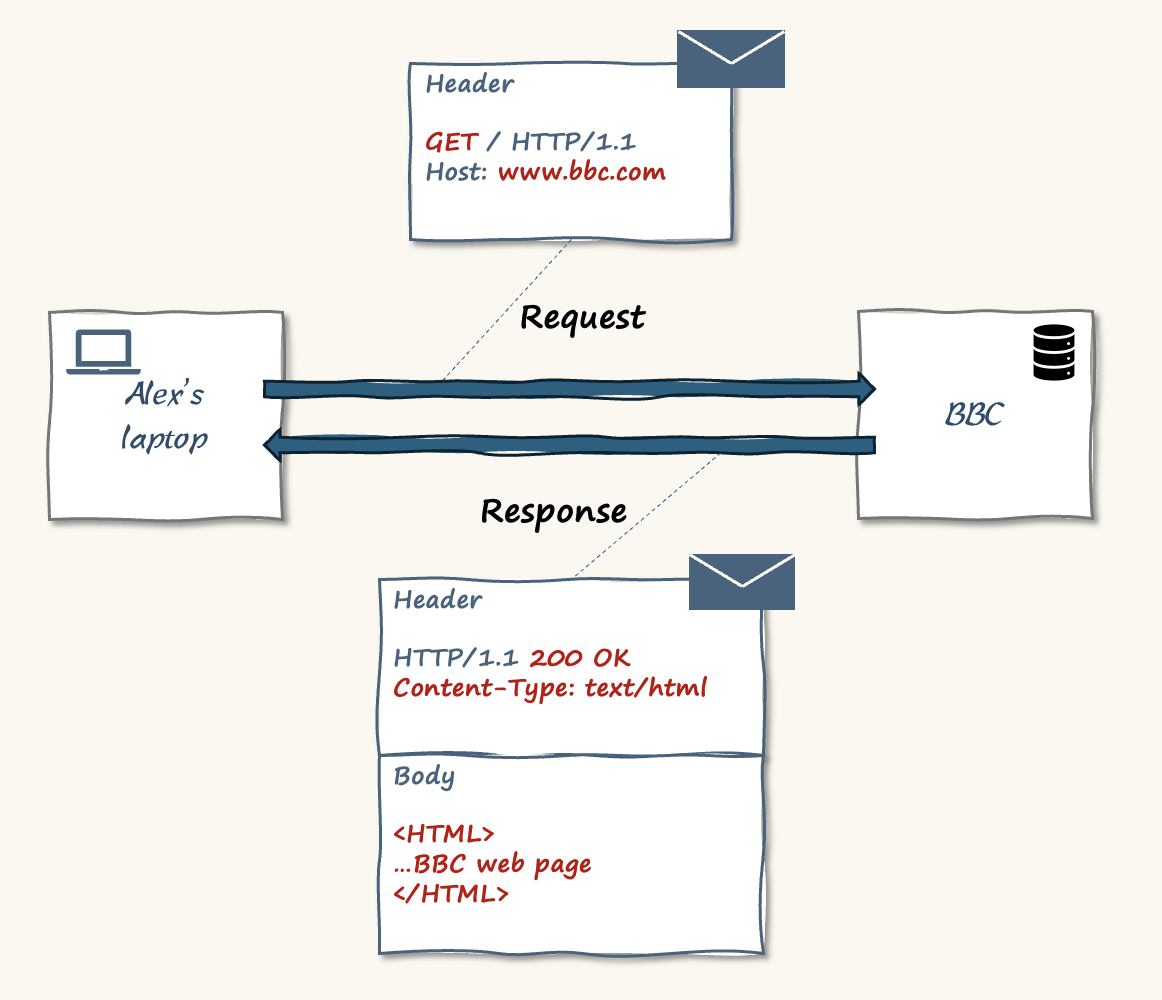
On the other hand, consider logging into the BBC website. In this case, the browser sends the login name and password. Therefore, a POST request is used, and the request includes a body.
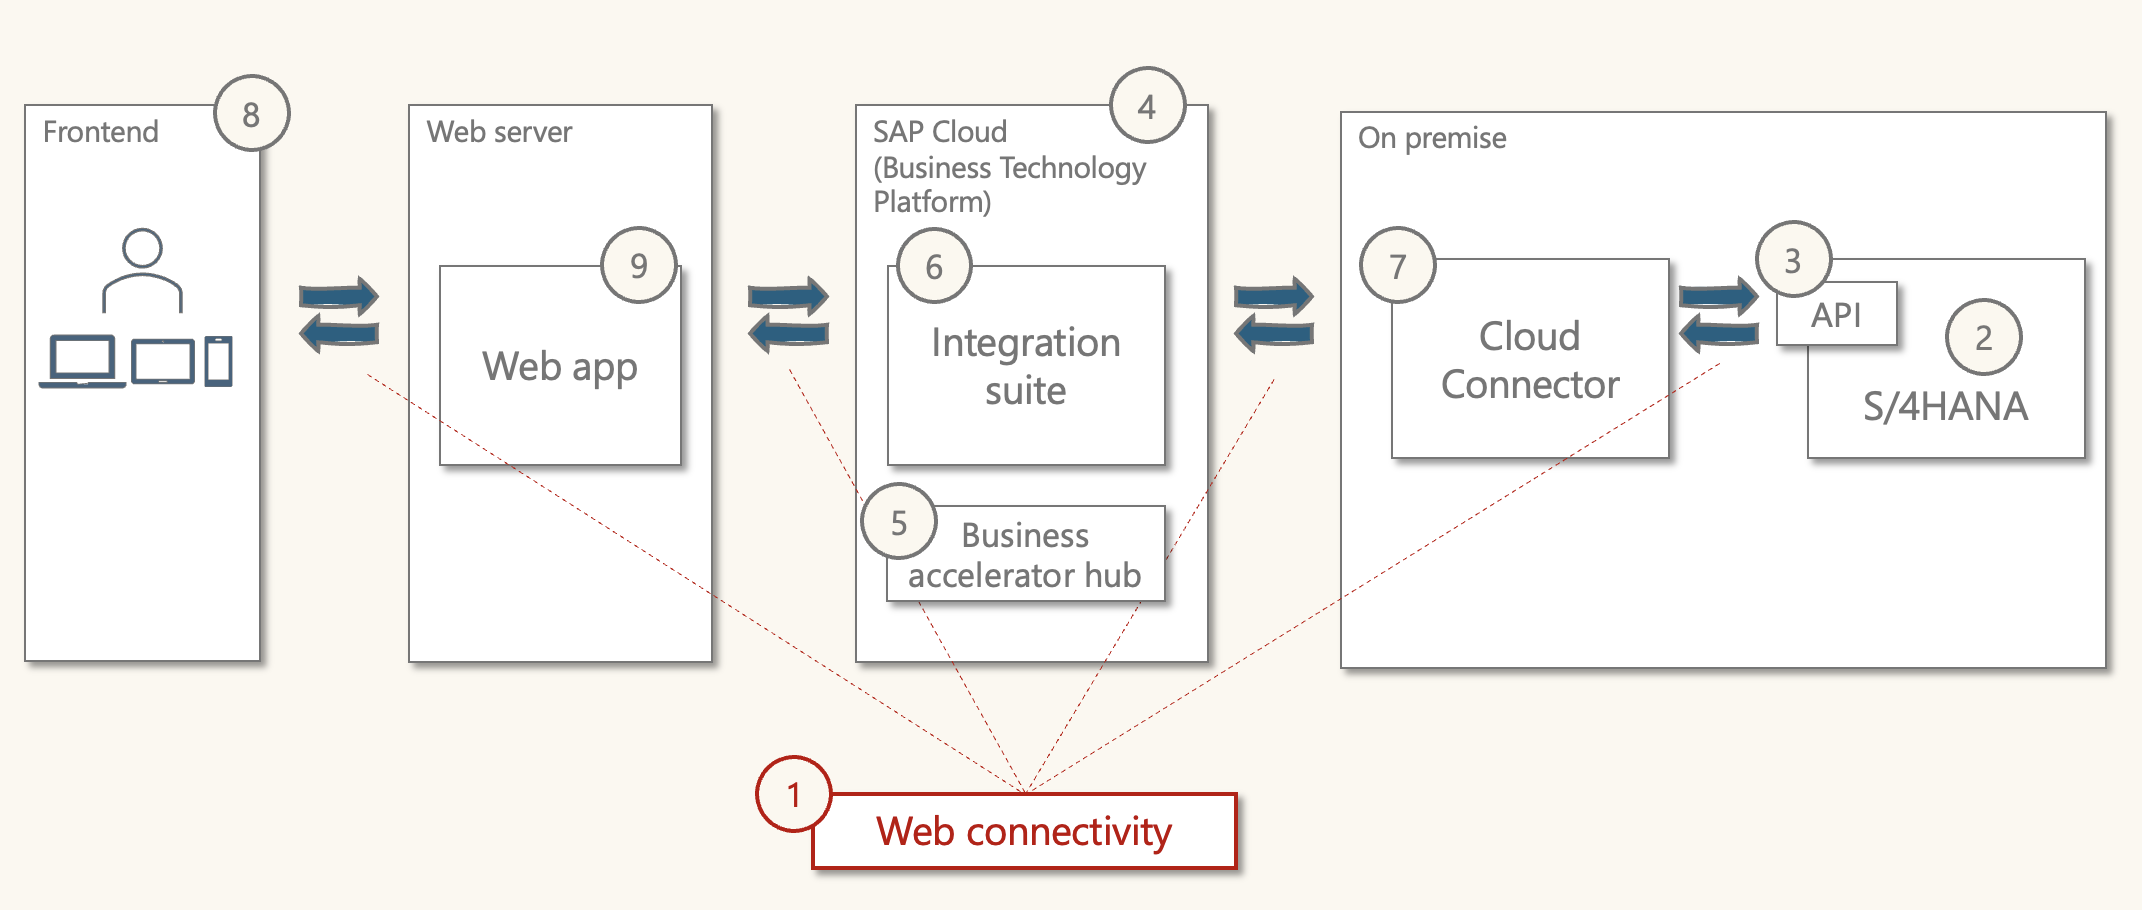
Web connectivity and SAP
Most SAP applications can use HTTPS communication. This is possibly one of the simplest ways we could define "Cloud" strategy.
- S/4HANA Cloud Public and S/4HANA Cloud Private can both utilise HTTPS
- SAP BTP which includes SAP Integration Suite can utilise HTTPS
Outside the SAP Cloud, we have systems like S/4HANA On-Premise. This is usually at an SAP customer's data centre or their 3rd party hosting service provider's data centre. On premise systems are usually not directly connected to the public internet. This is where SAP provide Cloud Connector to create a secure tunnel between on-premise and SAP Cloud.
HTTP data transfer standards
There are further standards as to how data is transferred using HTTP.
There are multiple standards for data transfer with HTTP. One of the earlier and more common standards is REST (Representational State Transfer).
Many SAP APIs utilise OData (Open data transfer protocol).
Point 2: S/4HANA business partner API mock server
Purpose: Mimic the business partner API of an S/4HANA system.
What is it: A simple JavaScript server that can be run locally.
The mock server provided by the SAP community provides a simple way to simulate the design and test of an S/4HANA API.
- The mock server mimics the business partner (A2X) API
- This is one of the S/4HANA APIs (programmed inside S/4HANA)
- In the case of the mock server, it's a JavaScript server
- The mock server has limited functionality, it supports:
- Sample data for a few business partners
- Retrieve all business partners
- Retrieve a single business partner
- Include additional address data in the response.
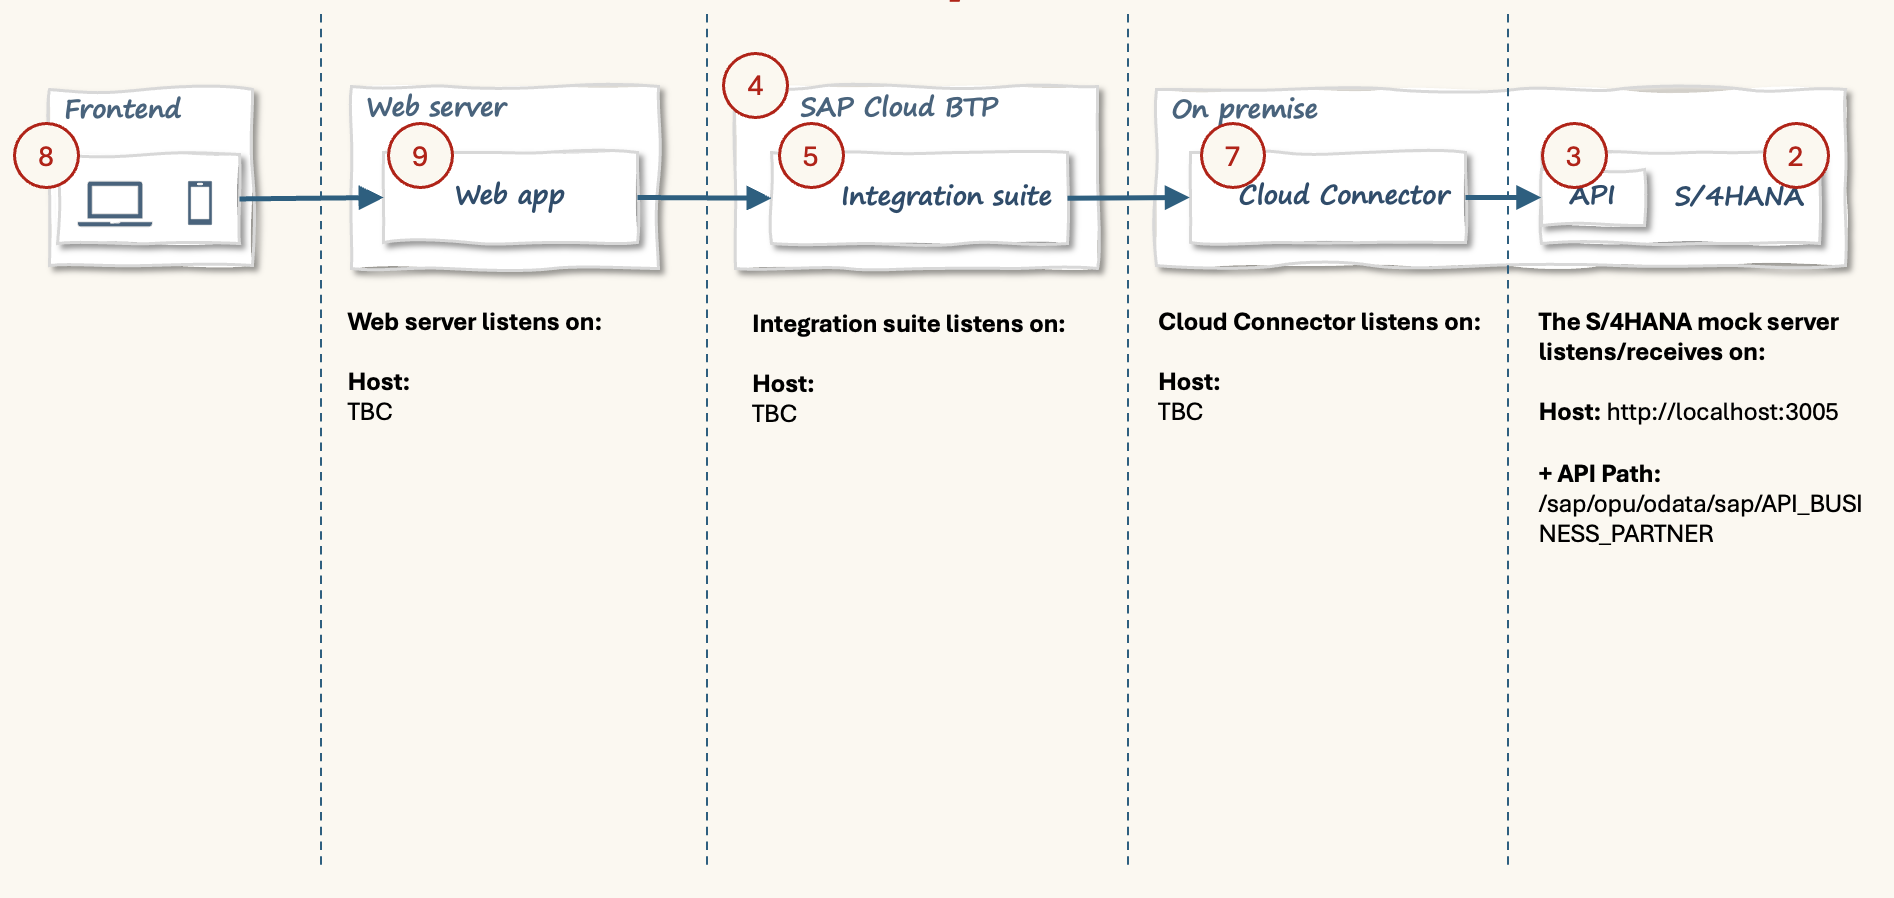
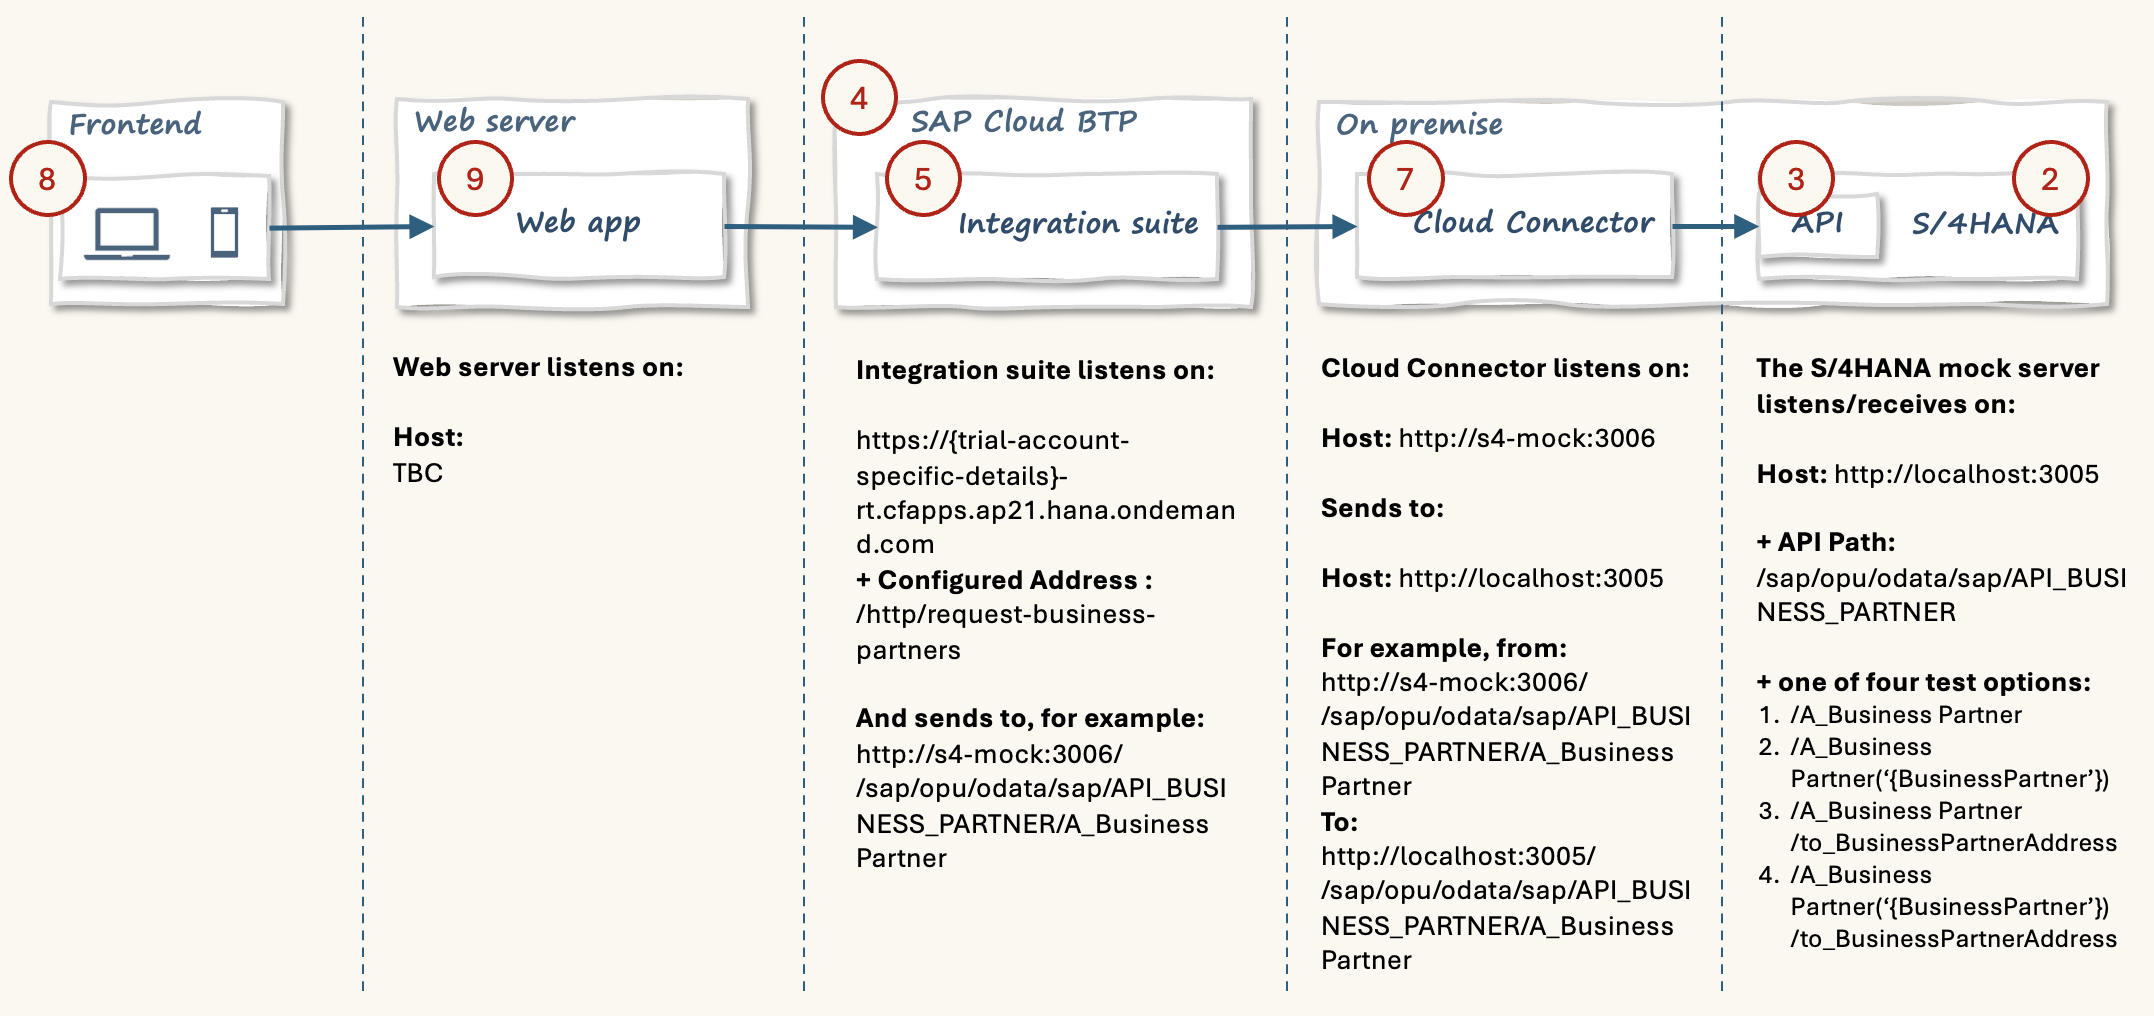
Installing and running the mock server is simple. The instructions are in part 3. When we run it our computer a local address is returned.
On my computer, it runs on "http://localhost:3005/"
This is the address for the Business Partner API. Entering this address in the web browser gives the following response:
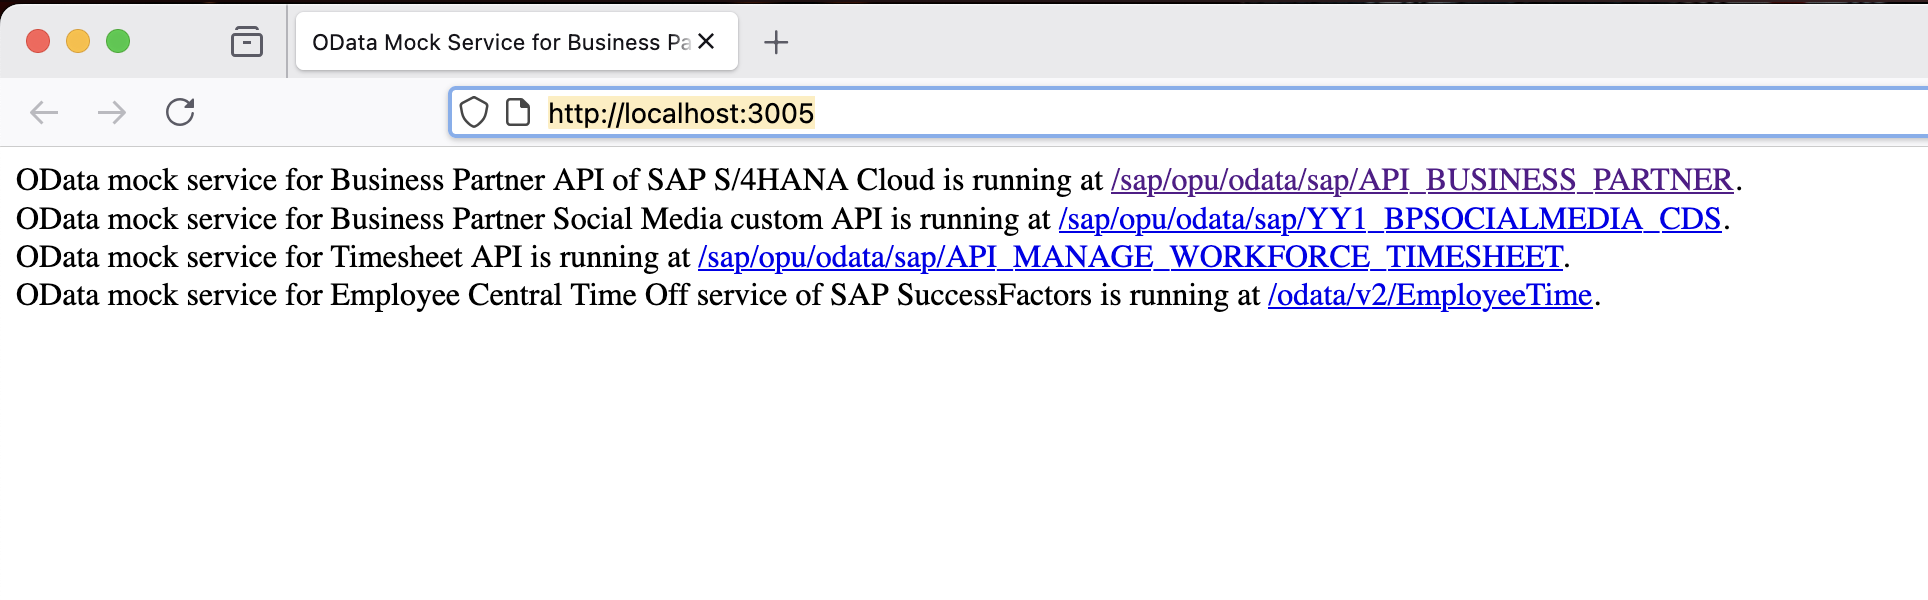
The first item refers to the business partner API. This is the first point in the exercise where we can see the path for the Business Partner API:
"/sap/opu/odata/sap/API_BUSINESS_PARTNER"
The API path is just appended to the host, so:
"http://localhost:3005/sap/opu/odata/sap/API_BUSINESS_PARTNER"
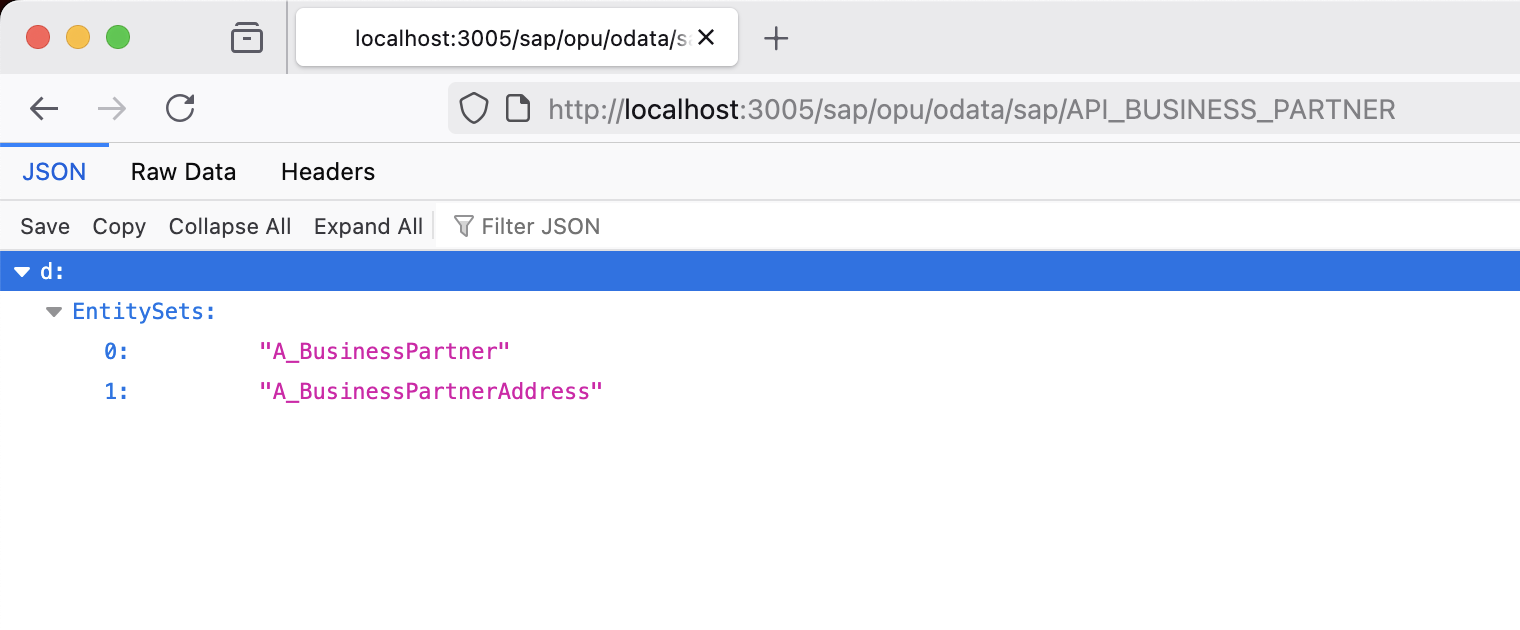
Clicking on the link in the browser shows additional information about the API. Note that the only services listed are A_BusinessPartner and A_BusinessPartnerAddress.
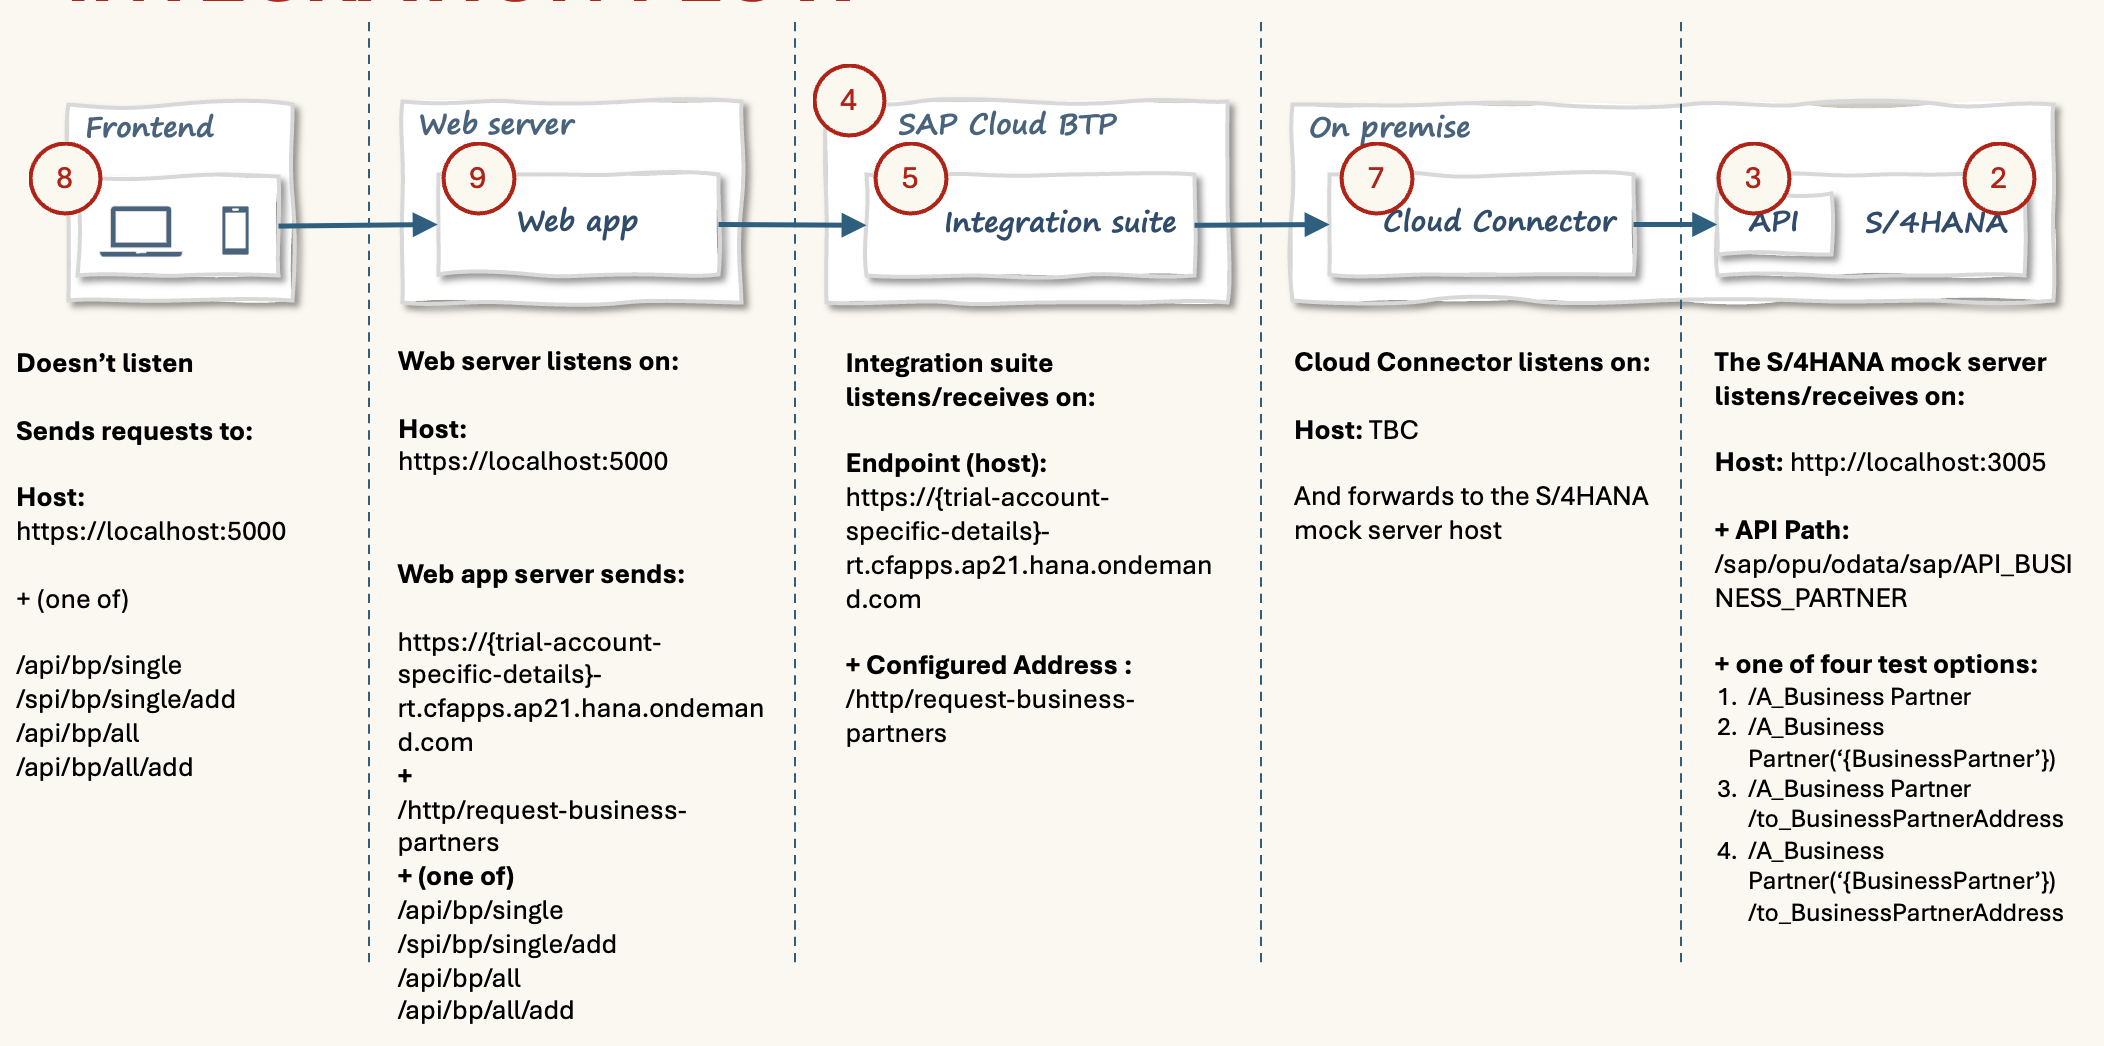
When building an integration flow, the mix of host names, port names, and paths can quickly become confusing. It's useful to track these as we go.
Further reading on the mock server:
Point 3: Application programming interface (API)
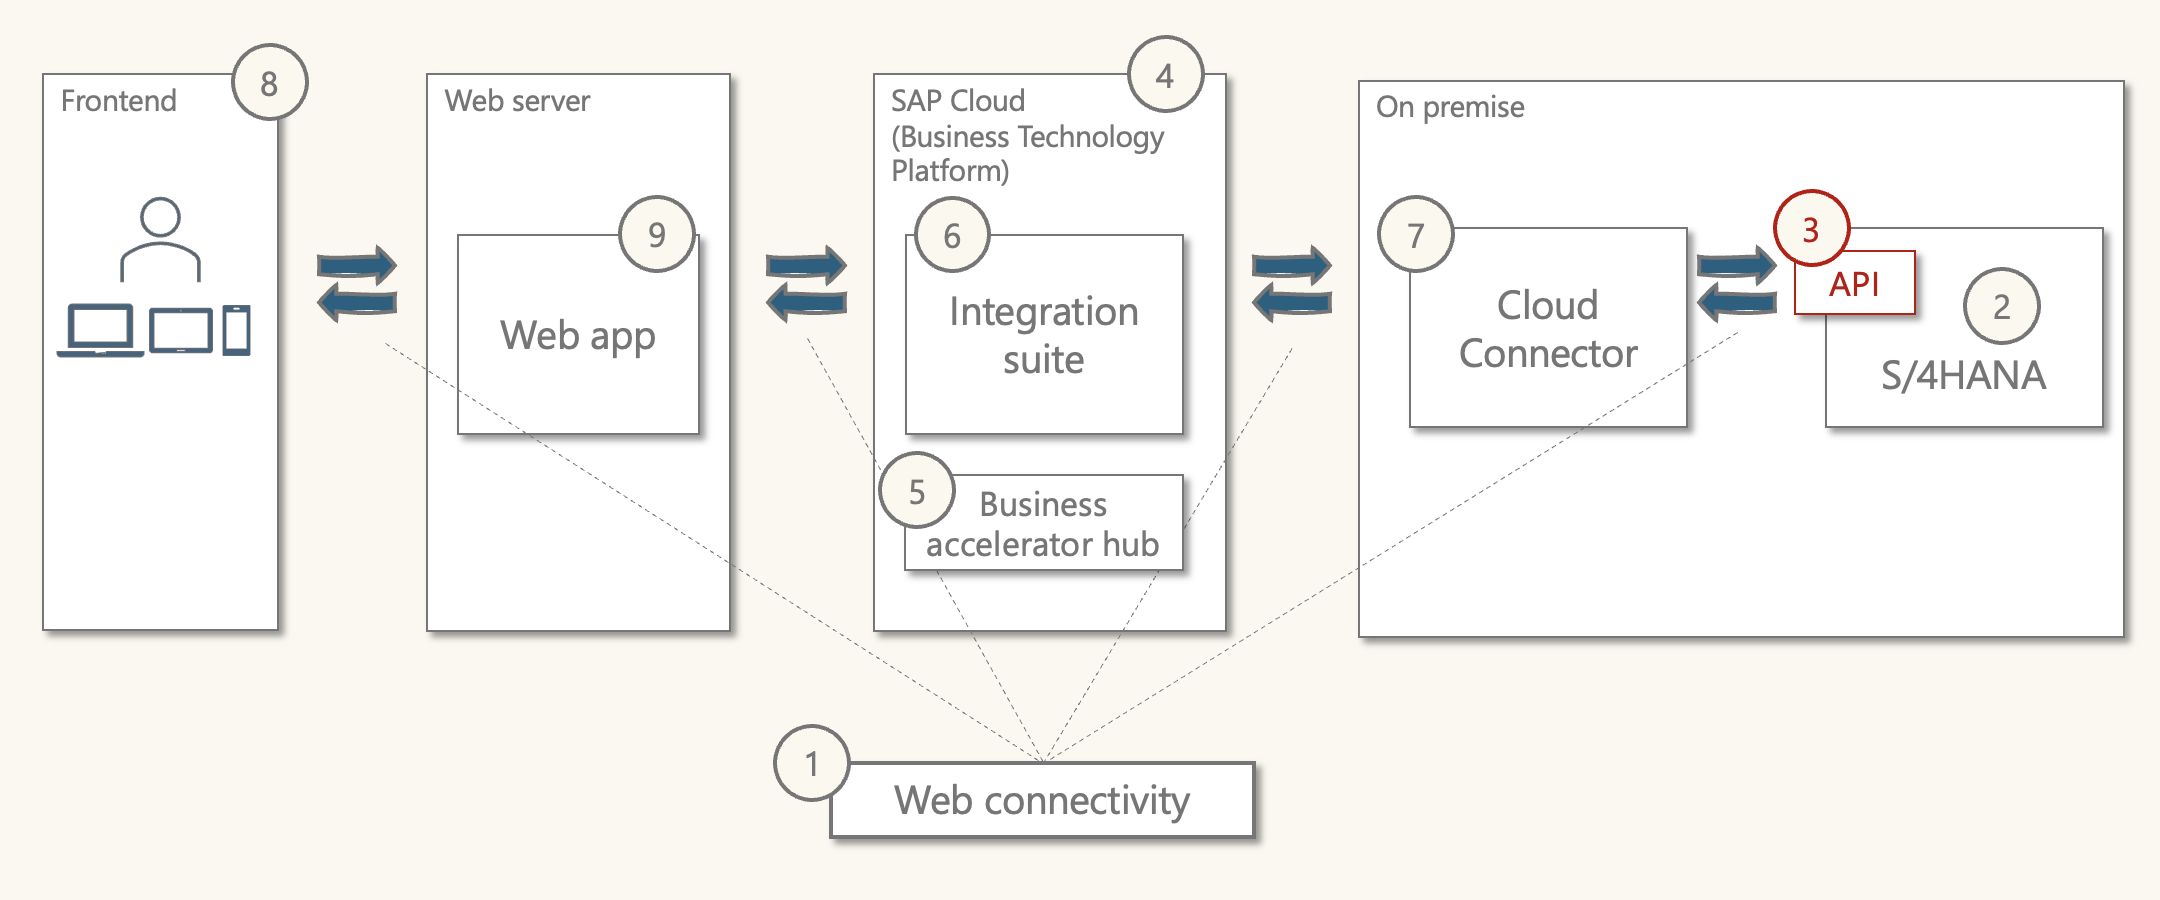
Purpose: Provide a standard way to define and operate services for an application that can be consumed by other applications.
What is it: SAP have a large catalogue of standard APIs that come with S/4HANA.
The Business partner API
The API that was introduced under the S/4HANA business partner mock server is called 'business partner (A2X)'. It is a SAP standard API that uses the OData V2 standard.
While HTTP is the communication protocol. OData is an open standard related to the data.
When viewing the API details in the web browser, the display was JSON. This is JavaScript Object Notation, which is used in Odata.
Point 5. in the flow will show more detail on this API.
Further reading on APIs and Odata:
- Open API spec openAPIspec
- OData
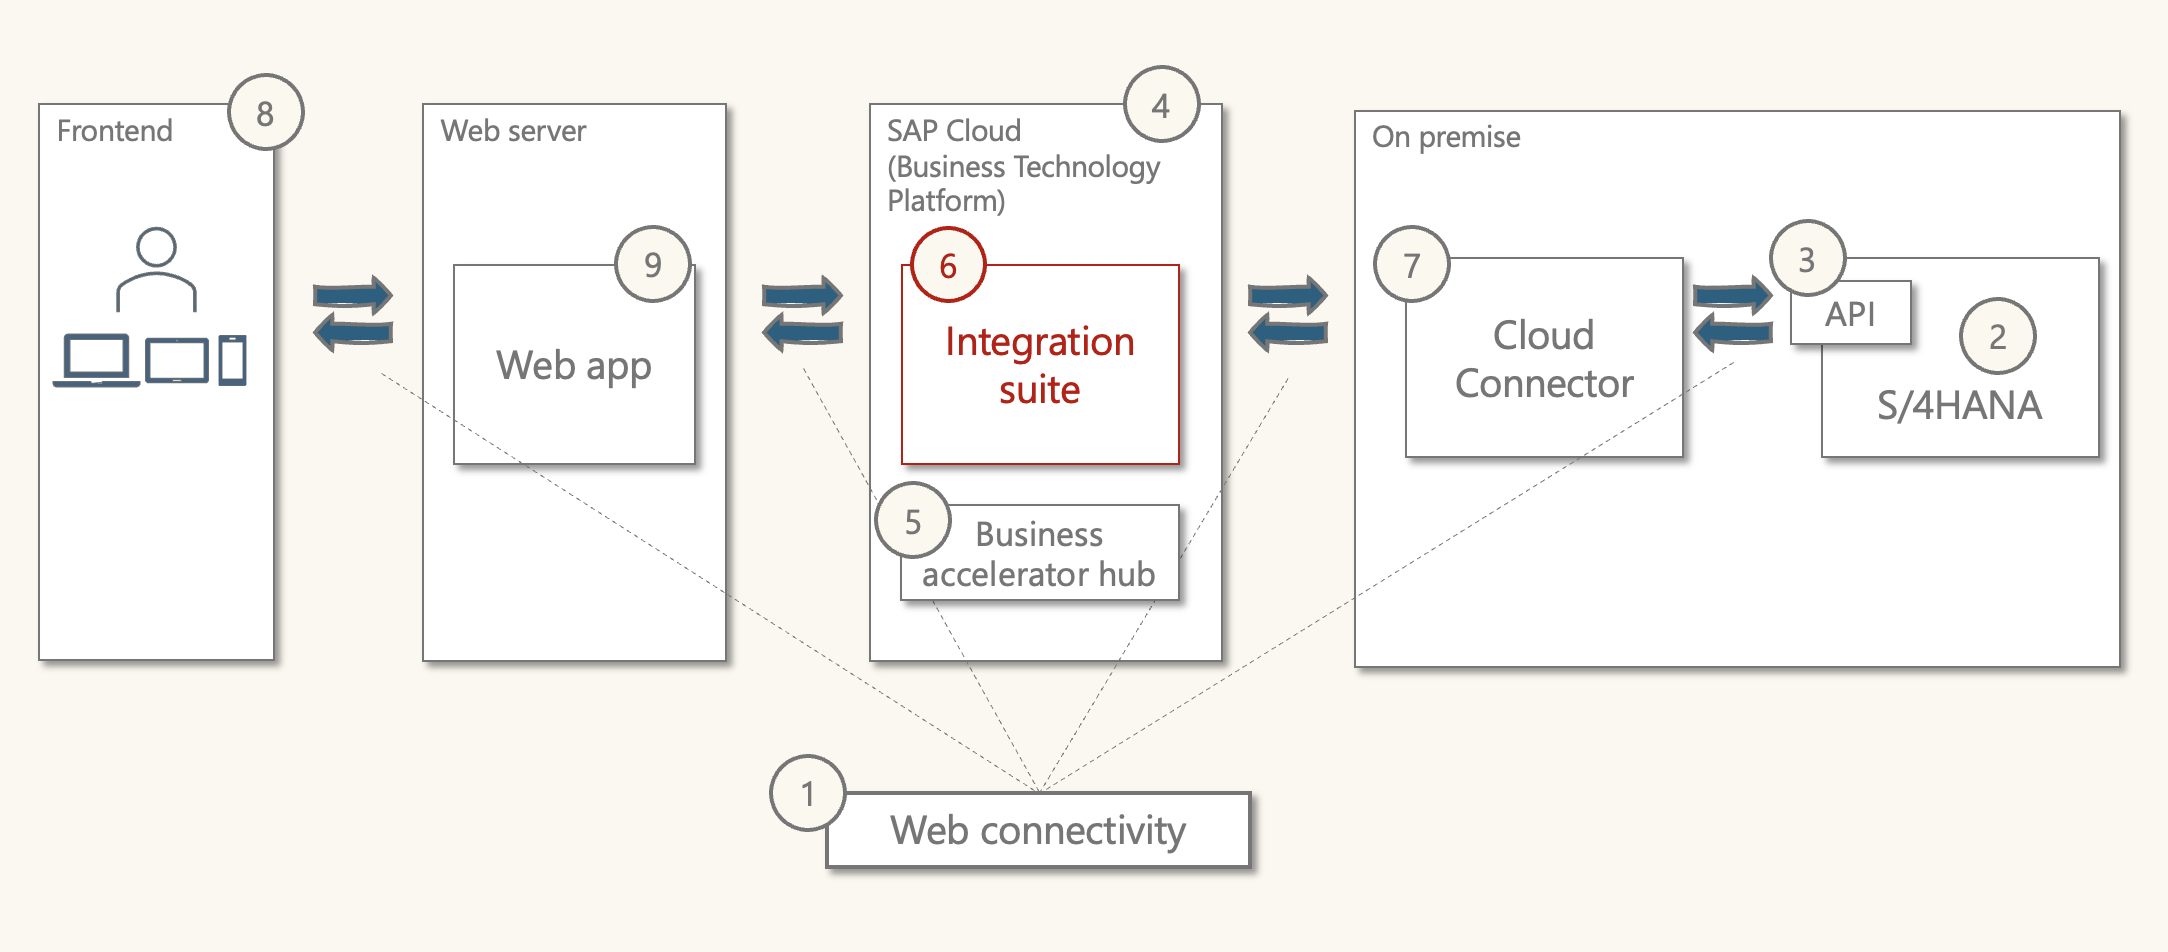
Point 4: Business technology platform (BTP)
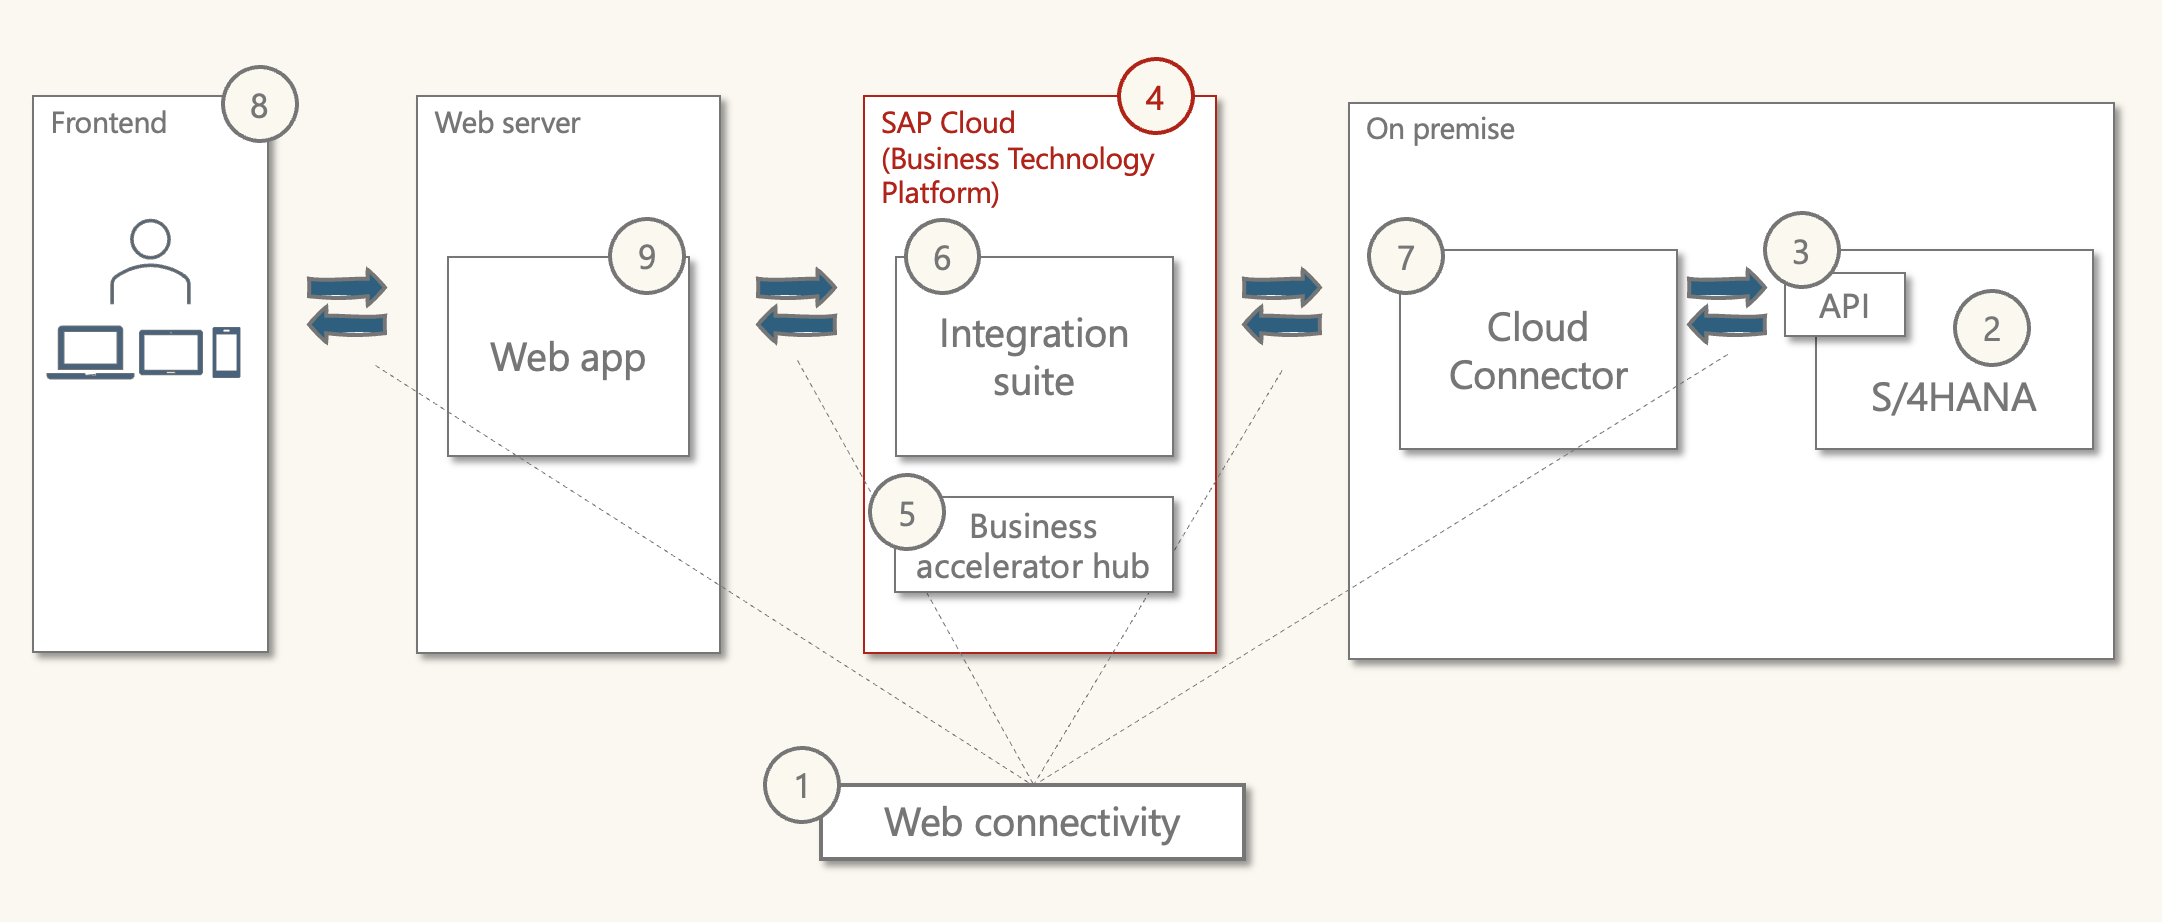
Skipping Cloud Connector for now, brings us to BTP. Details from BTP are needed to set up Cloud Connector.
Purpose: Enable customers to manage and build on SAP applications.
What is it: A set of tools encompassing various capabilities and environments.
SAP offer a free trial for BTP, which can be used to build and test integration flows. Instructions on how to register and set up BTP are included in part 3.
The BTP cockpit is where we can search for and set up different services.
It supports multiple infrastructures and runtimes so you can manage/build various types of applications from traditional SAP ABAP to web apps.
- Supports multiple infrastructures/runtimes & languages, including:
- Cloud Foundry: develop new apps/services, multiple languages, runtimes
- ABAP: extend ABAP based products (S/4HANA)
- Kyma: Kubernetes to develop/run cloud-native apps
- Neo: HTML5, Java, and HANA extended apps
BTP has multiple regions and infrastructure providers
- Regional deployment
- Provided by SAP or Infrastructure-as-a-Provider (IaaS)
- AWS, Azure, Google Cloud, Alibaba Cloud
The key features of BTP include managing and building:
- Compose business processes
- Application development and automation
- Build and extend SAP applications
- Integrate data
- Analytics
- Intelligent technologies
SAP Integration Suite utilises the Cloud Foundry environment. After we set up Business Technology Suite and SAP Intelligent Suite, a Cloud Foundry API endpoint will be provided in BTP.
In my case, this is "https://api.cf.ap21.hana.ondemand.com"

Point 5: Business Accelerator Hub
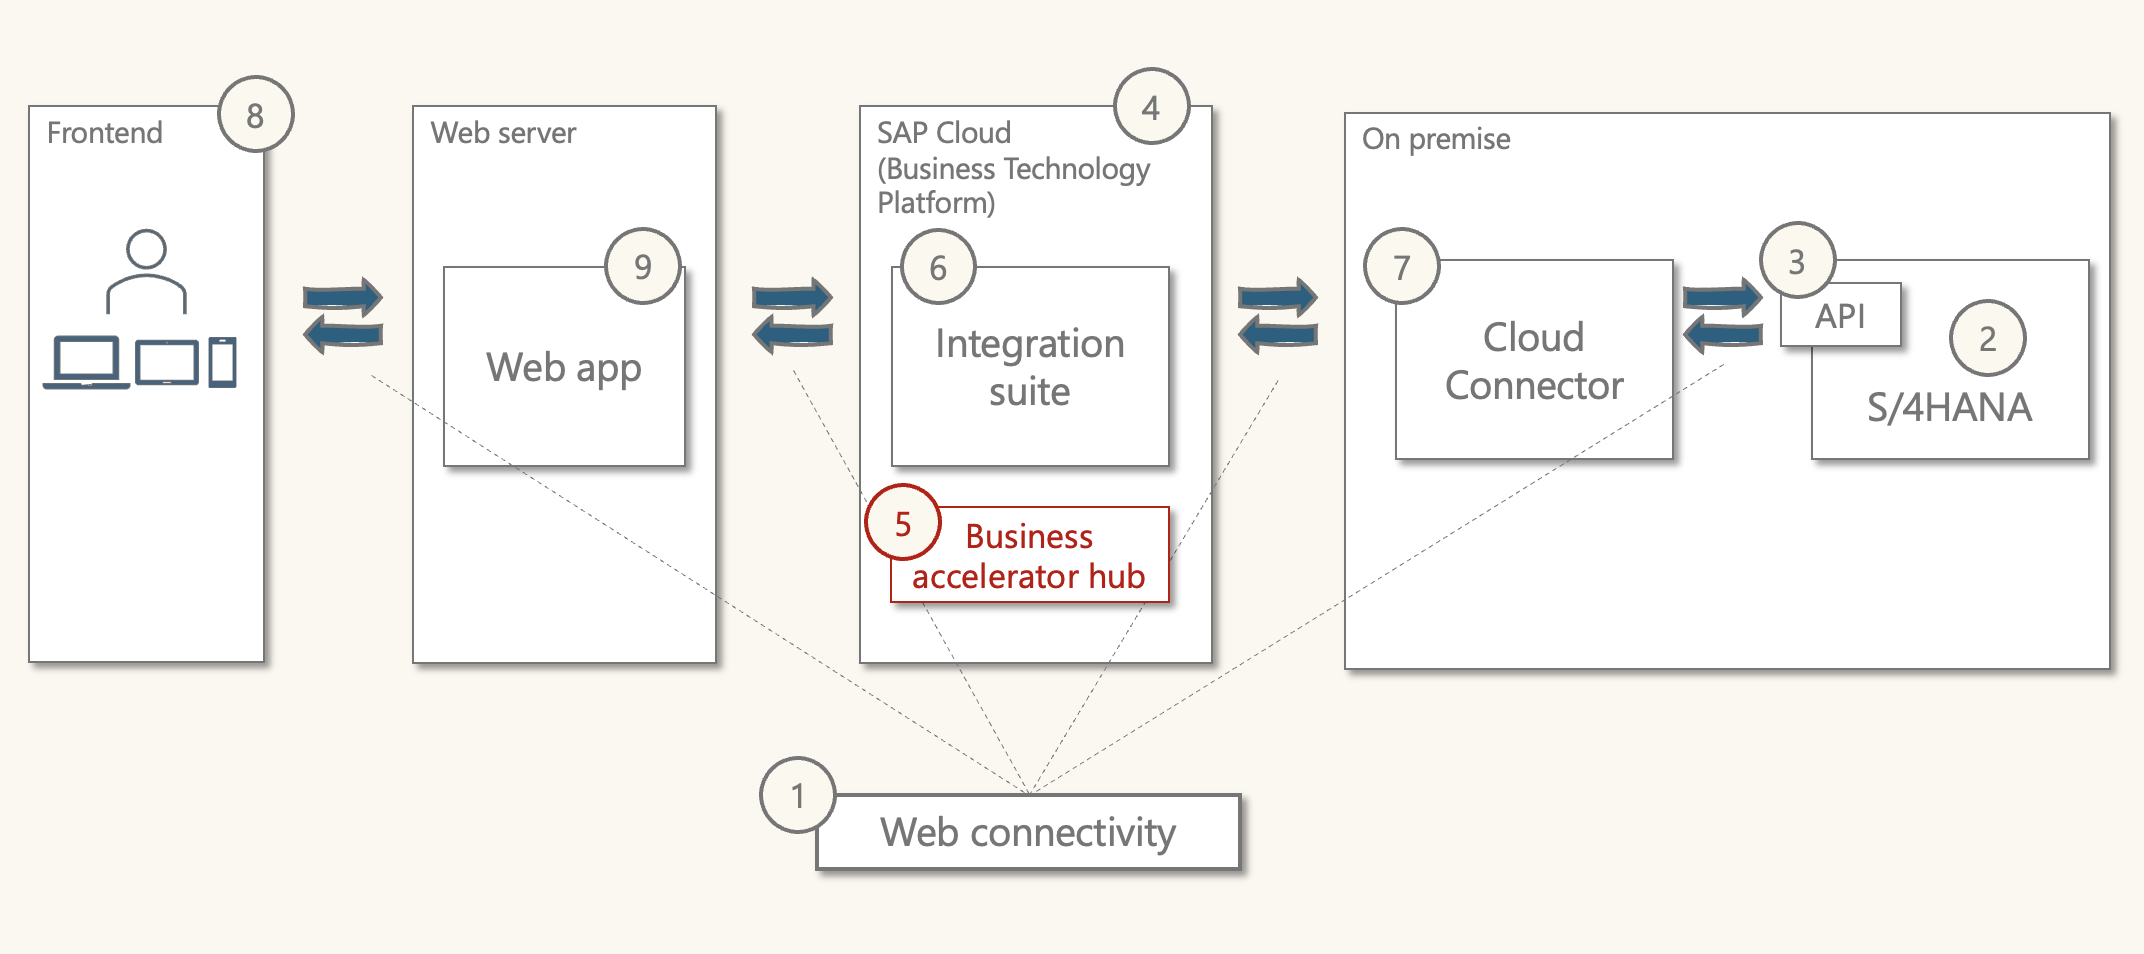
Purpose: Provides a central source of information on SAP's APIs
What is it: A web page with API details. Highly integrated with BTP.
Business Accelerator hub is a web resource from SAP. I've drawn it inside BTP as it closely relates to BTP content. It's a central repository for APIs from SAP & selected partners.
Main features
- Discover, explore, and test APIs
- Consume integration and workflow content
The Business Partner (A2X) API that is tested here can be viewed on Business Accelerator Hub.
- Login to business accelerator hub
- Search 'business partner (A2X)'
- Click on the entry in the results
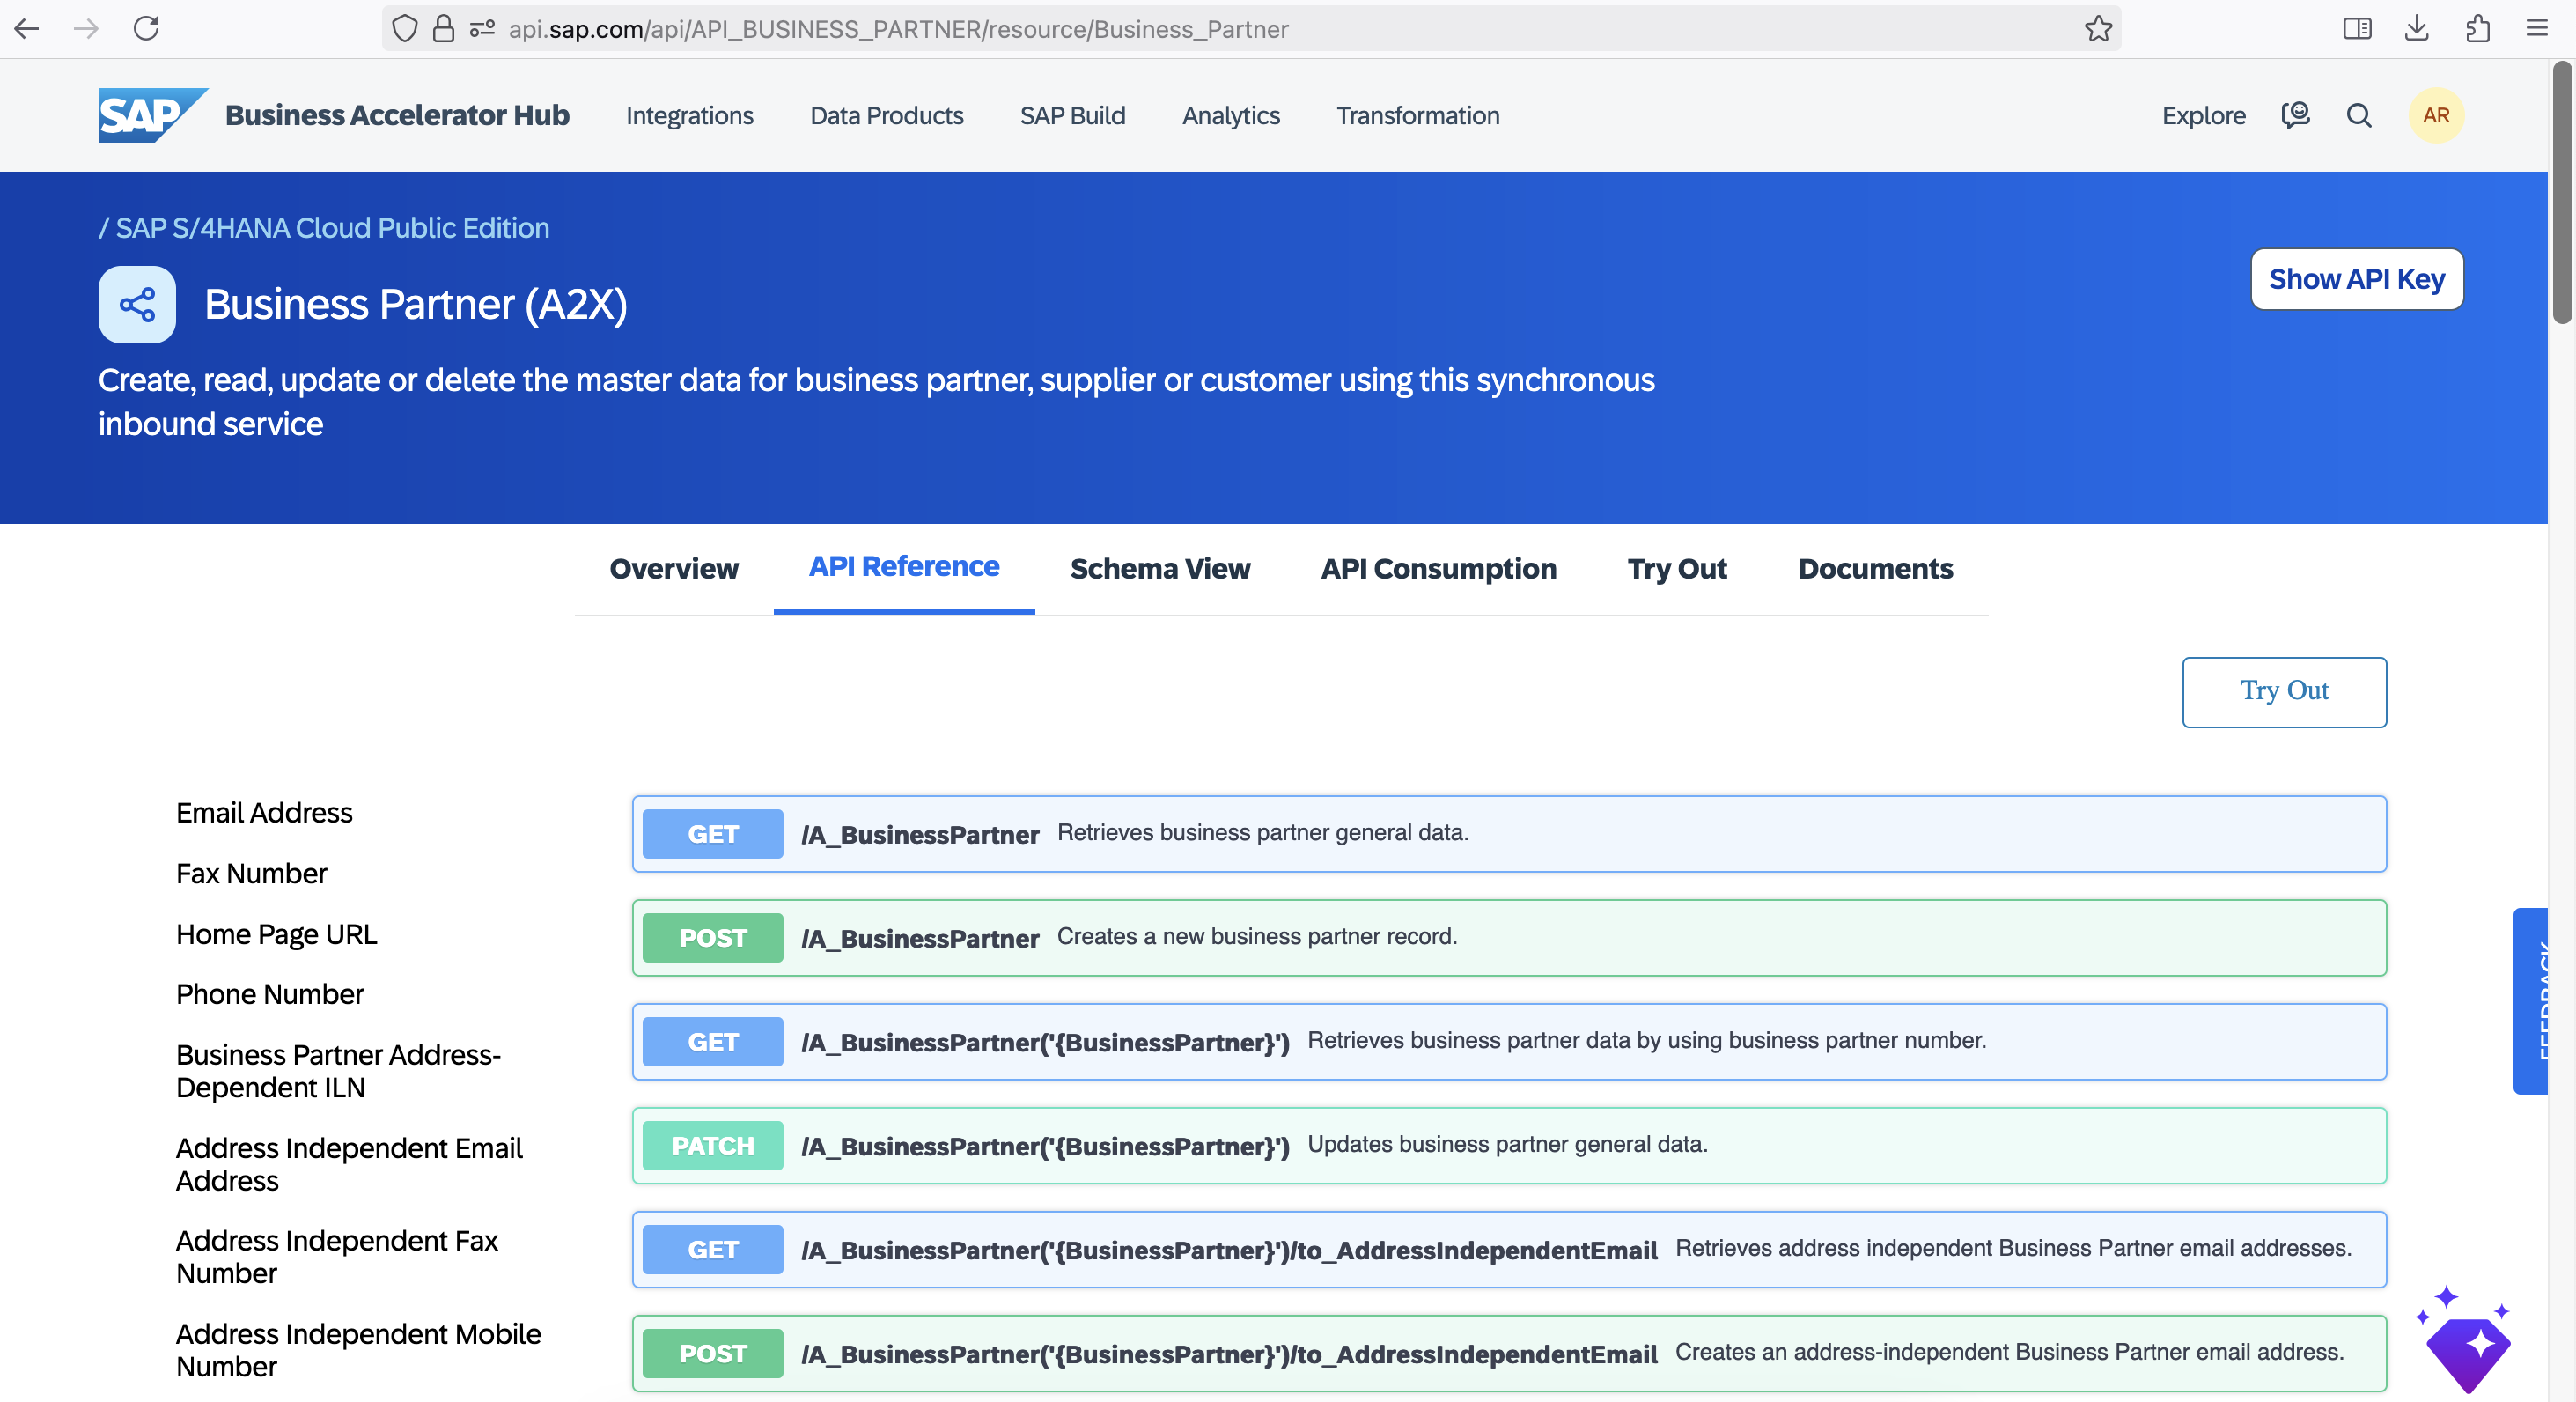
Some features of business accelerator hub:
- Try out the APIs (sandbox environment)
- Useful to view a sample of the response
- View the API capabilities:
- 'API Reference' tab, scroll down to 'Business Partner' and click on it
- This shows the list of capabilities of the API
- View the API specification
- 'Overview' tab, scroll down to 'API Specification' and click on it
- Download OpenAPI JSON
- View in web browser, text editor to see extensive details
The API hub is a useful resource in terms of discovering and designing potential API use.
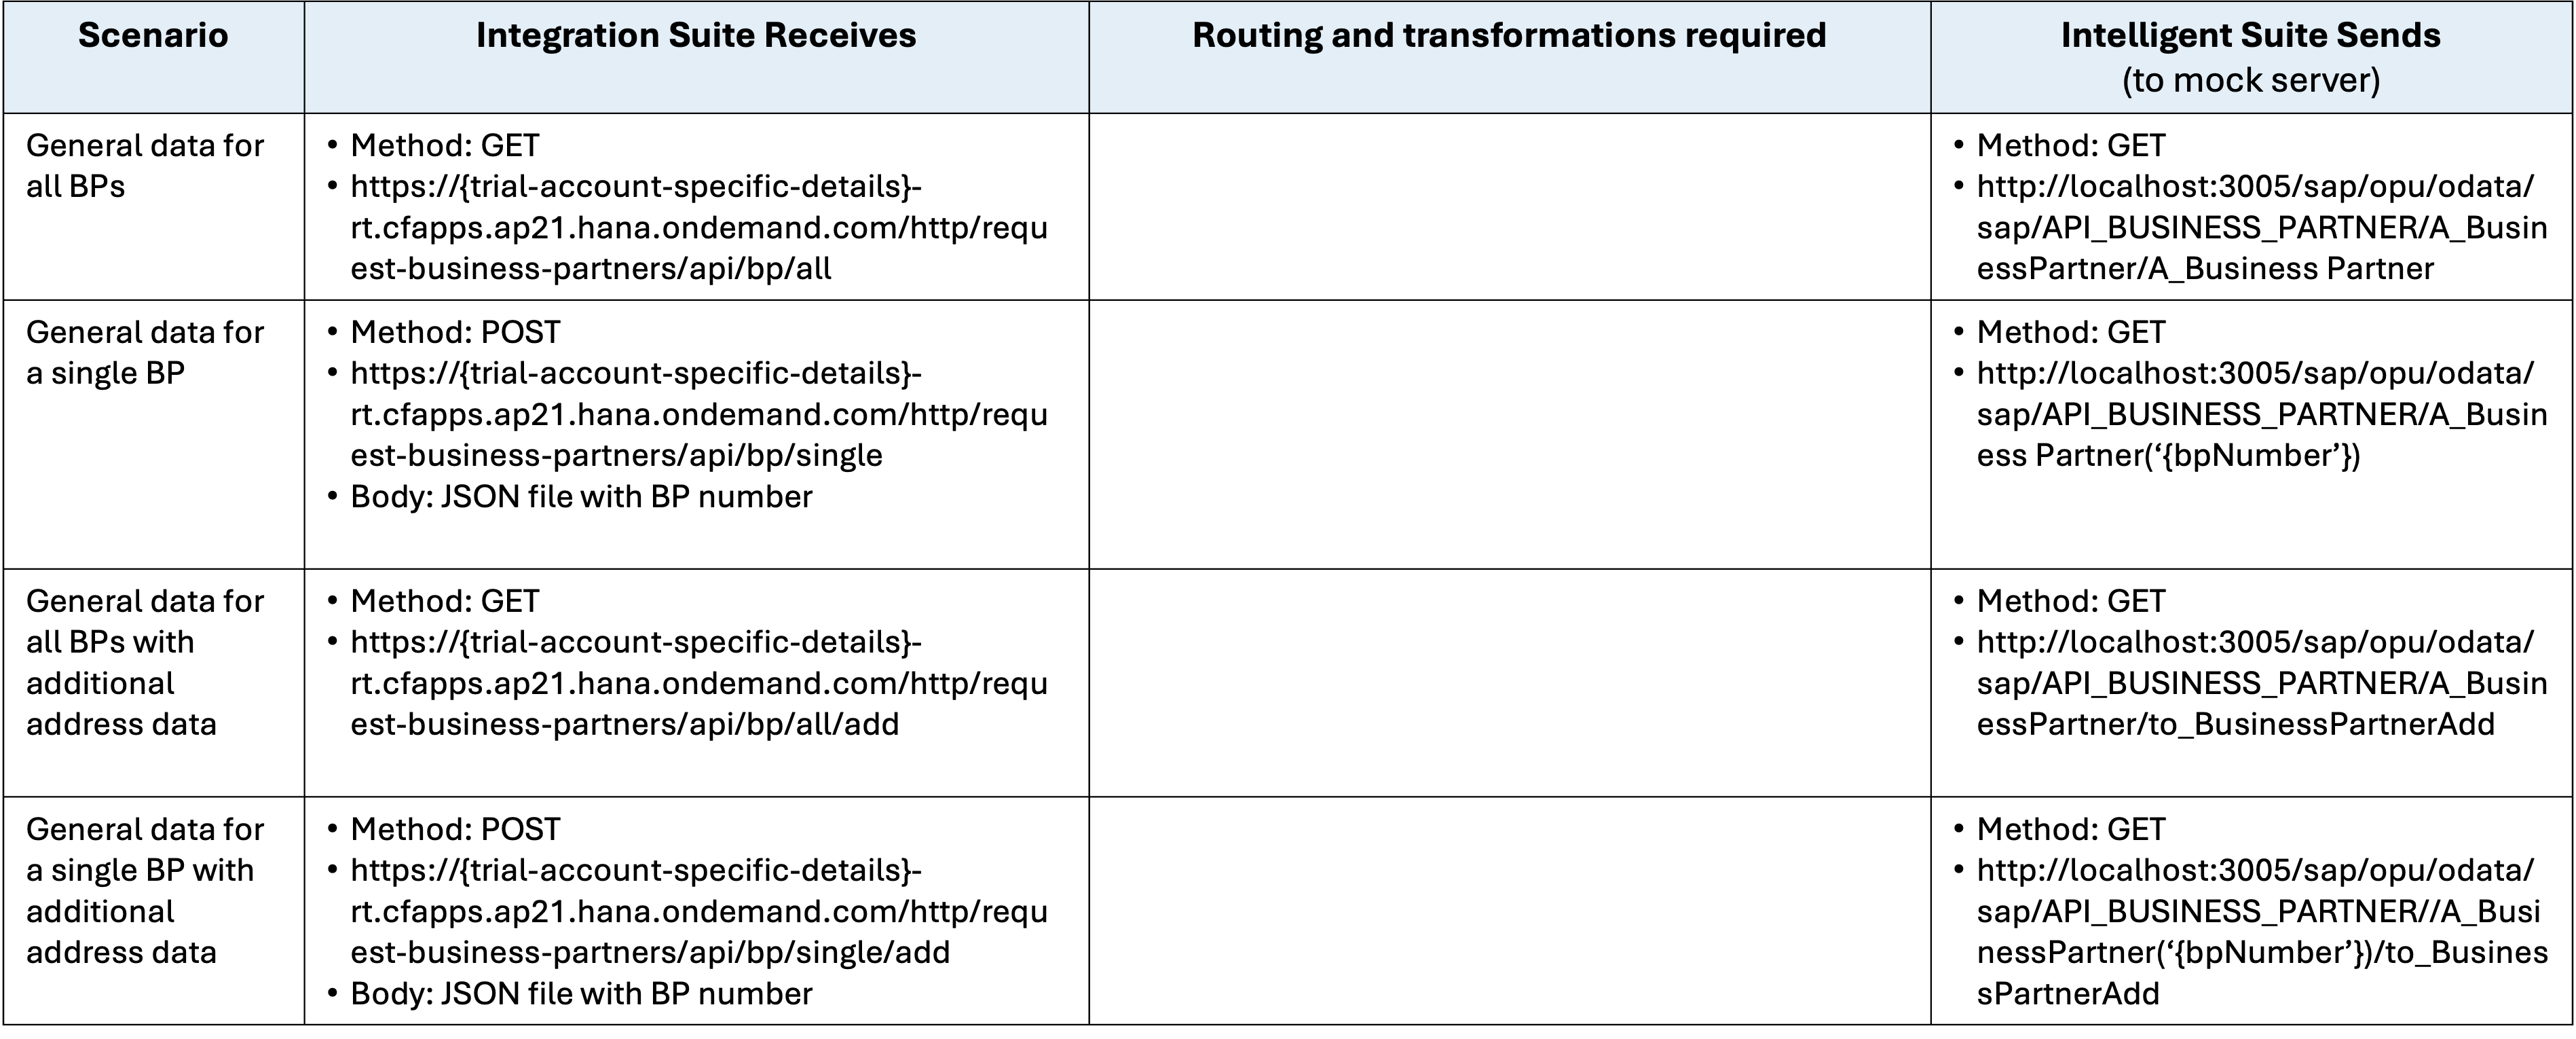
From the mock server specification, we know it's limited to only a few capabilities. We can find the path names for each of these on API hub:
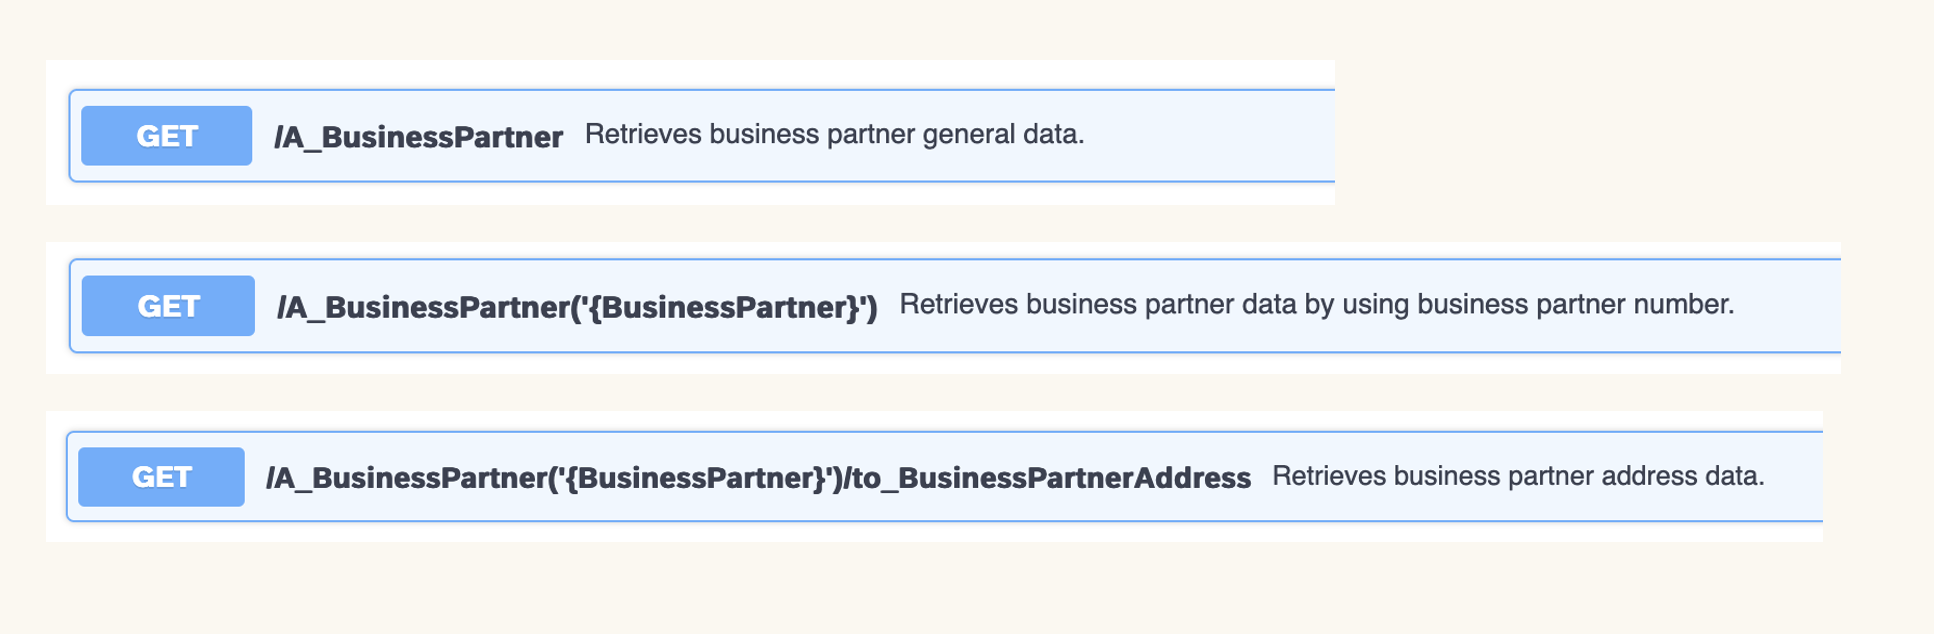
This confirms the mock server only has a small fraction of the full business partner (A2X) capabilities. This makes sense given how extensive business partner data is in SAP. It's noteworthy that the mock server only supports 'read' activities. We can't test creating or changing a business partner.
The details of each of these requests can be viewed by clicking into them.
While there are three request paths. The address path can be added to the "all business partners" or "single business partner", so there are four possibilities:
- All business partners
- "/A_BusinessPartner"
- All business partners with address
- "/A_BusinessPartner/to_BusinessPartnerAddress"
- Single business partner
- "/A_BusinessPartner('{BusinessPartner}')"
- Single business partner with address
- "/A_BusinessPartner('{BusinessPartner}')/to_BusinessPartnerAddress"
These paths describe services of the API and are appended to the base URL.For example:
"http://localhost:3005/sap/opu/odata/sap/API_BUSINESS_PARTNER/A_BusinessPartner('{BusinessPartner}')/to_BusinessPartnerAddress"
The correct terminology for these URLs:
- Base URL/host: http://localhost:3005
- Base path: /sap/opu/odata/sap/API_BUSINESS_PARTNER
- Entity set: /A_BusinessPartner
- Key Access: ('1234567')
- Navigation property: /to_BusinessPartnerAddress
"('{business partner}')" in the example is a placeholder for a business partner number.
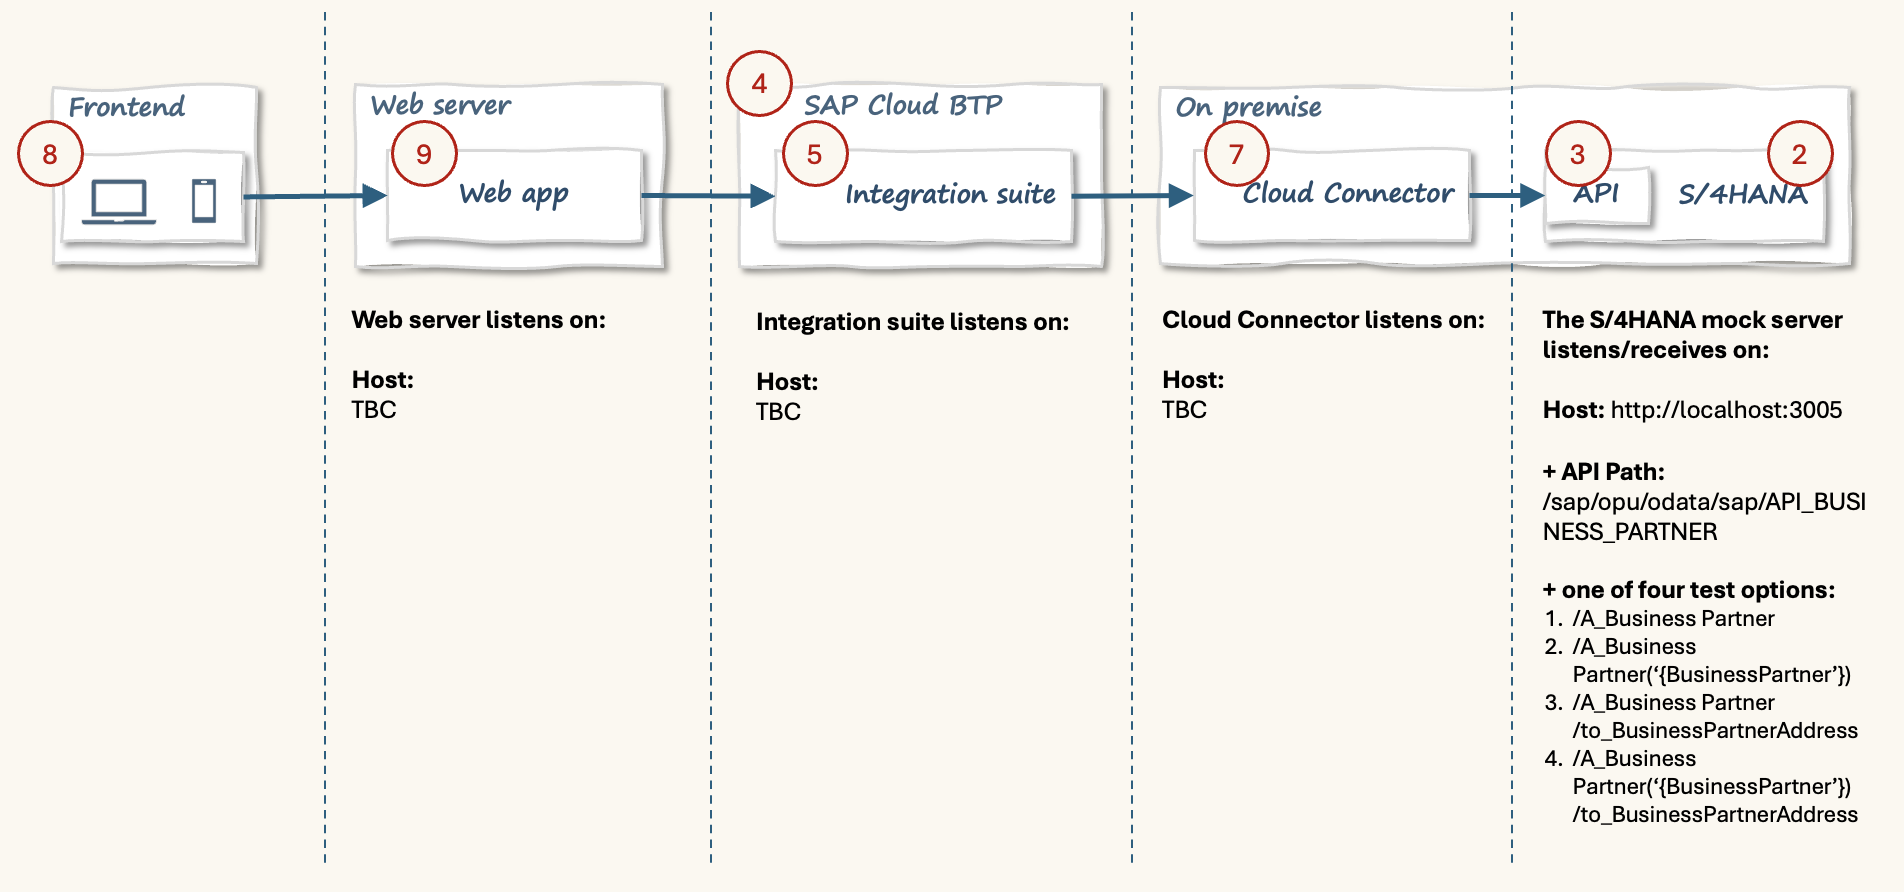
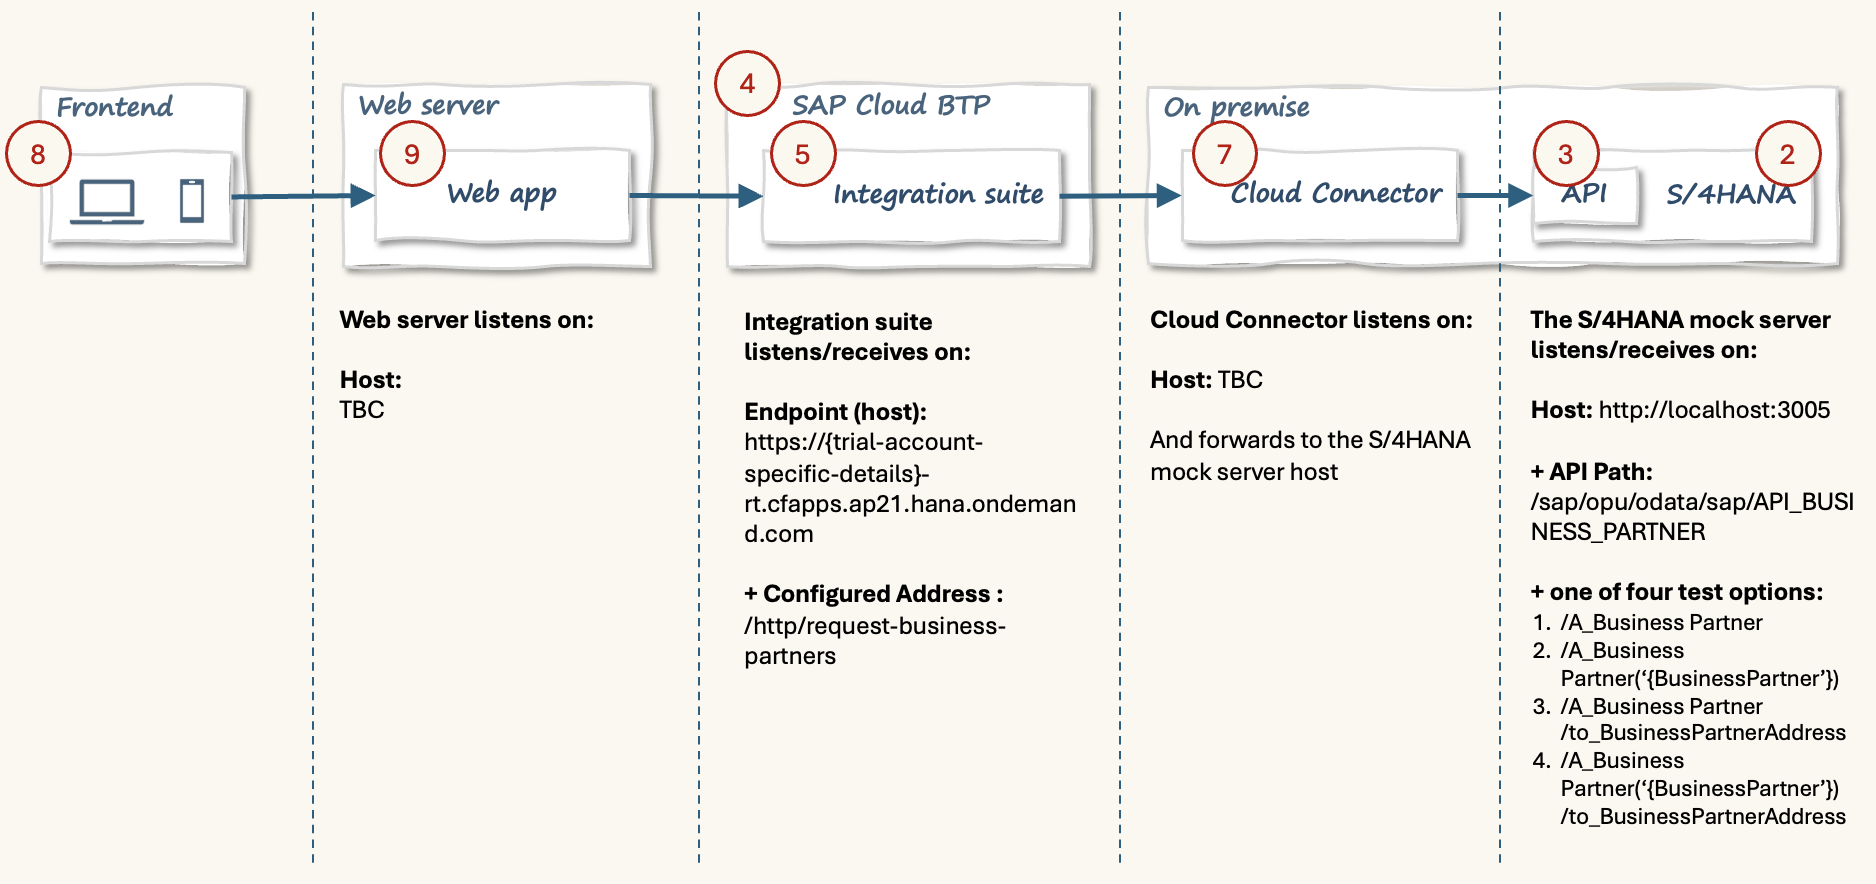
Updating the flow diagram with these details:
Point 6: SAP Integration Suite
Purpose: Design and manage communications between applications.
What is it: A service of SAP BTP.
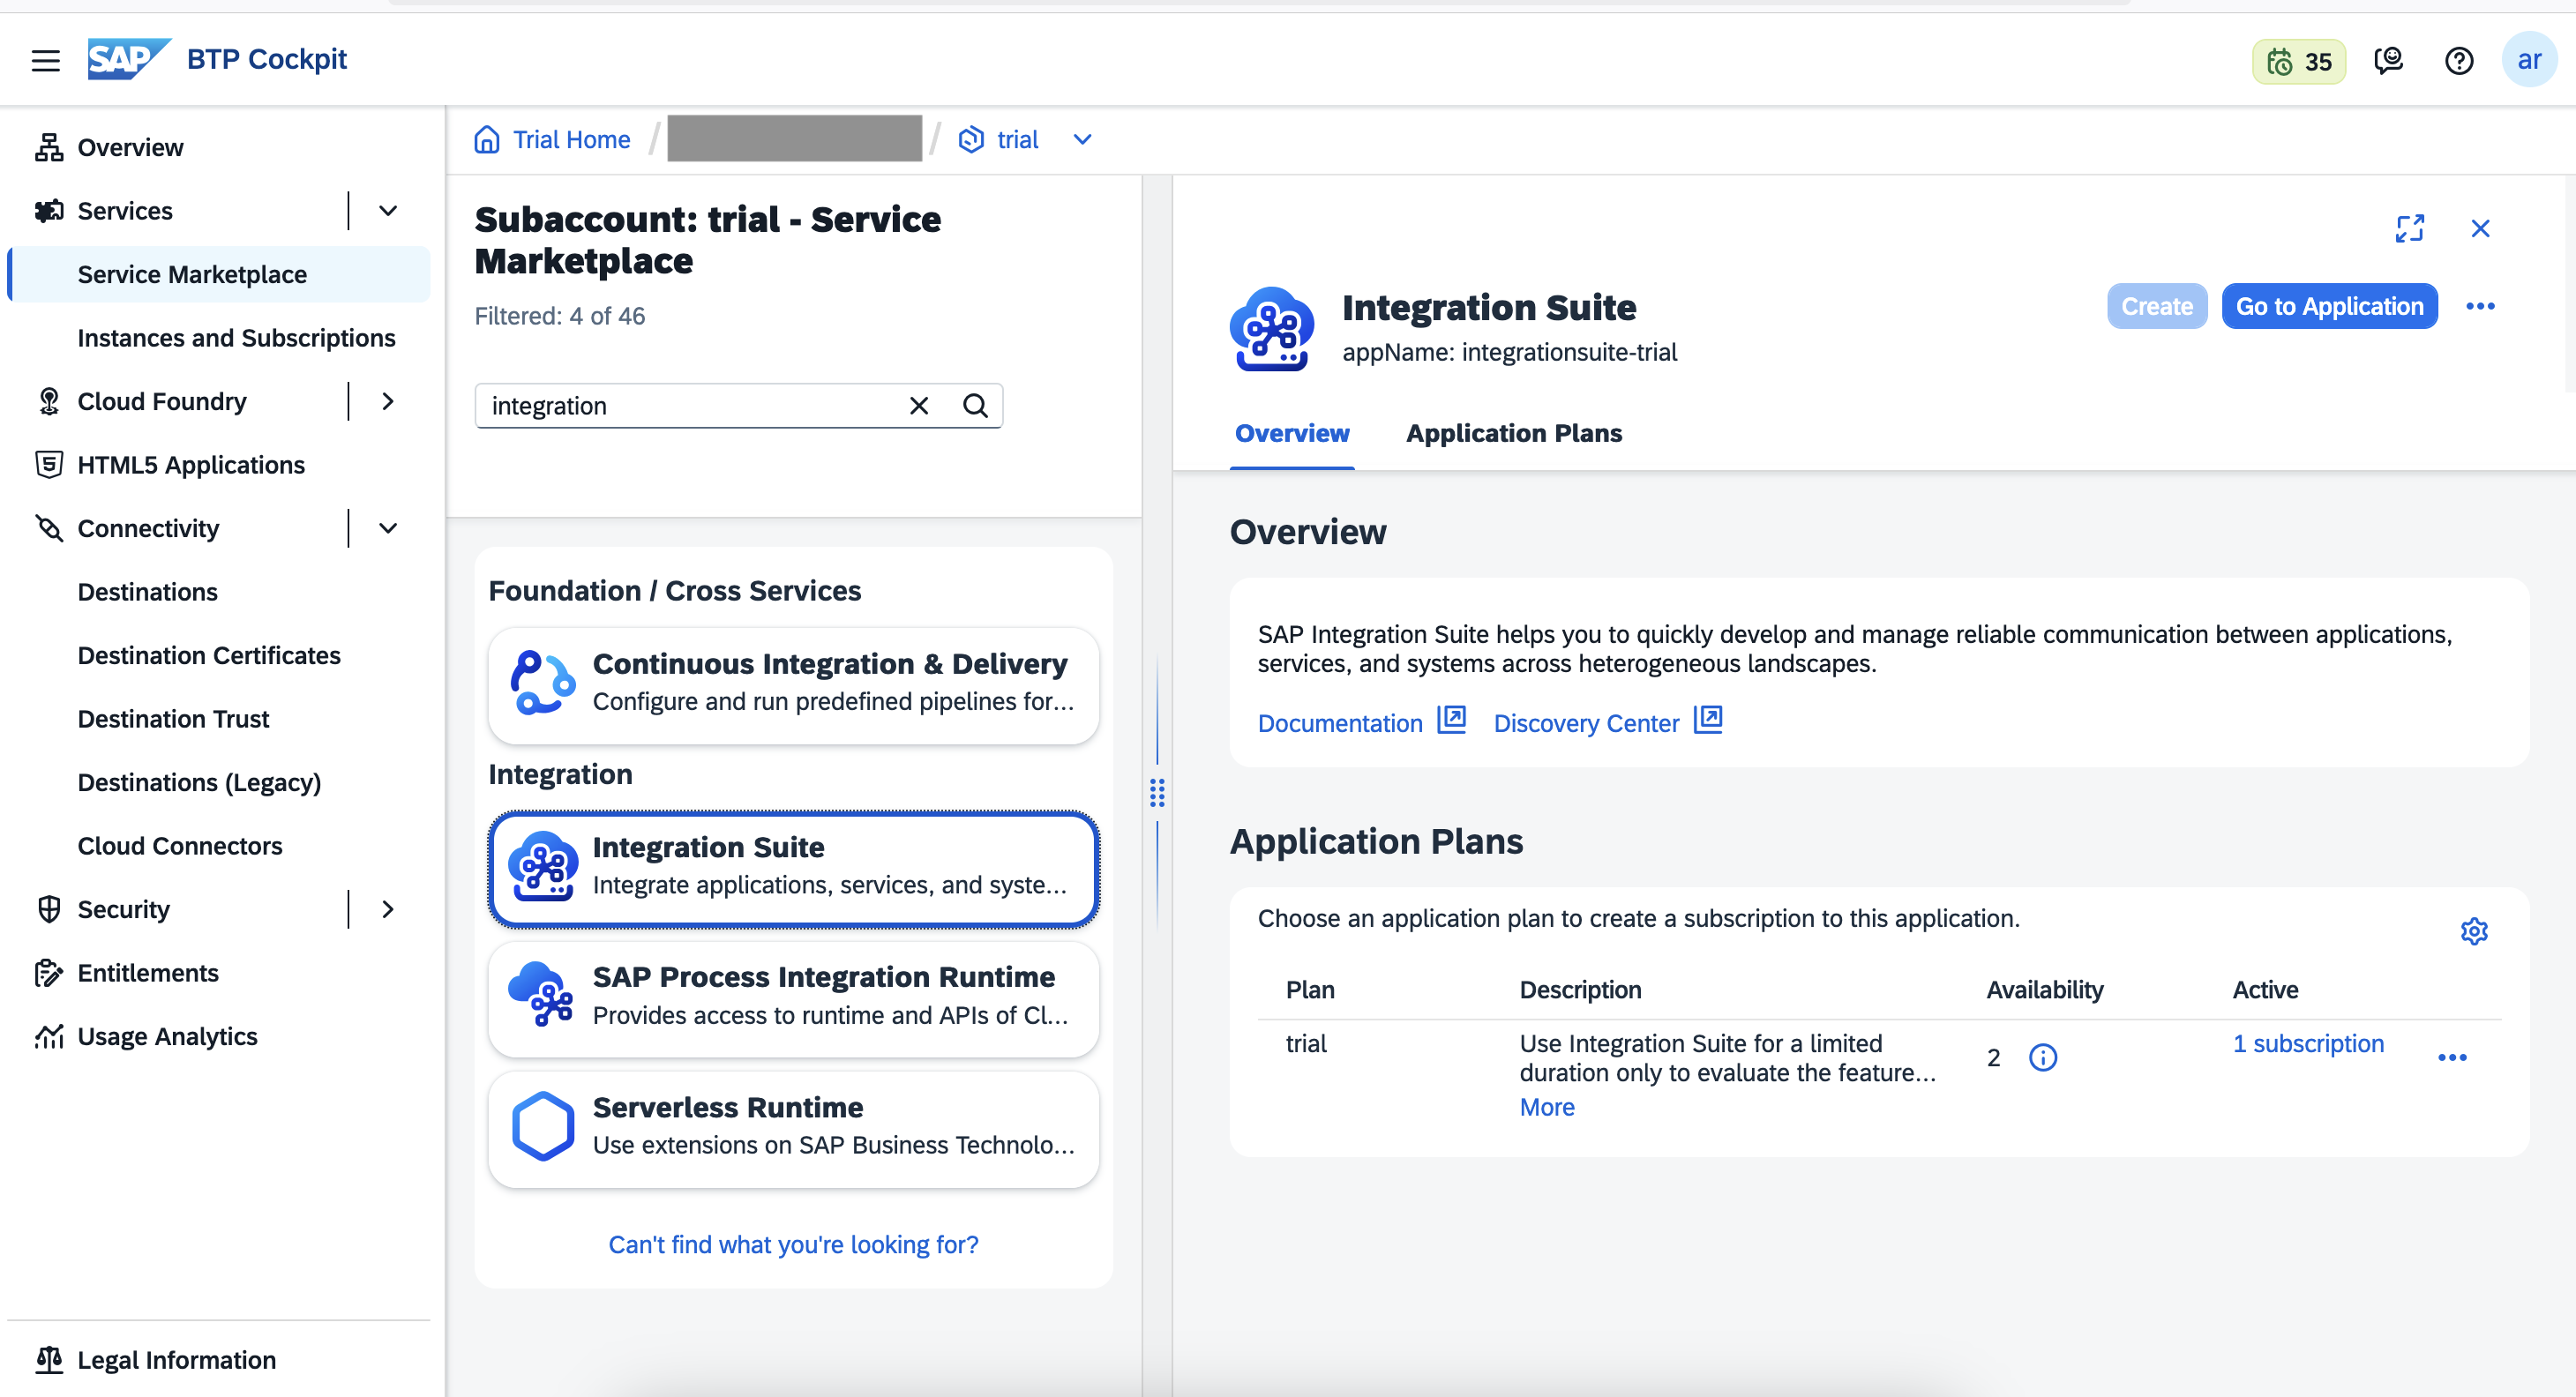
SAP Integration Suite is one of the services available in Business Technology Platform. Therefore, a prerequisite is to register for the BTP free trial.
SAP Integration Suite can then be found under 'Services Marketplace'.
SAP Intelligent suite can be used for Cloud, on-premise, and hybrid scenarios. It includes pre-built, best-practice integration packs
Technically, it's a Java based app, and utilises the Apache Camel framework.
The steps to install and set up are covered in part 3. After the initial set up you can navigate to the application.
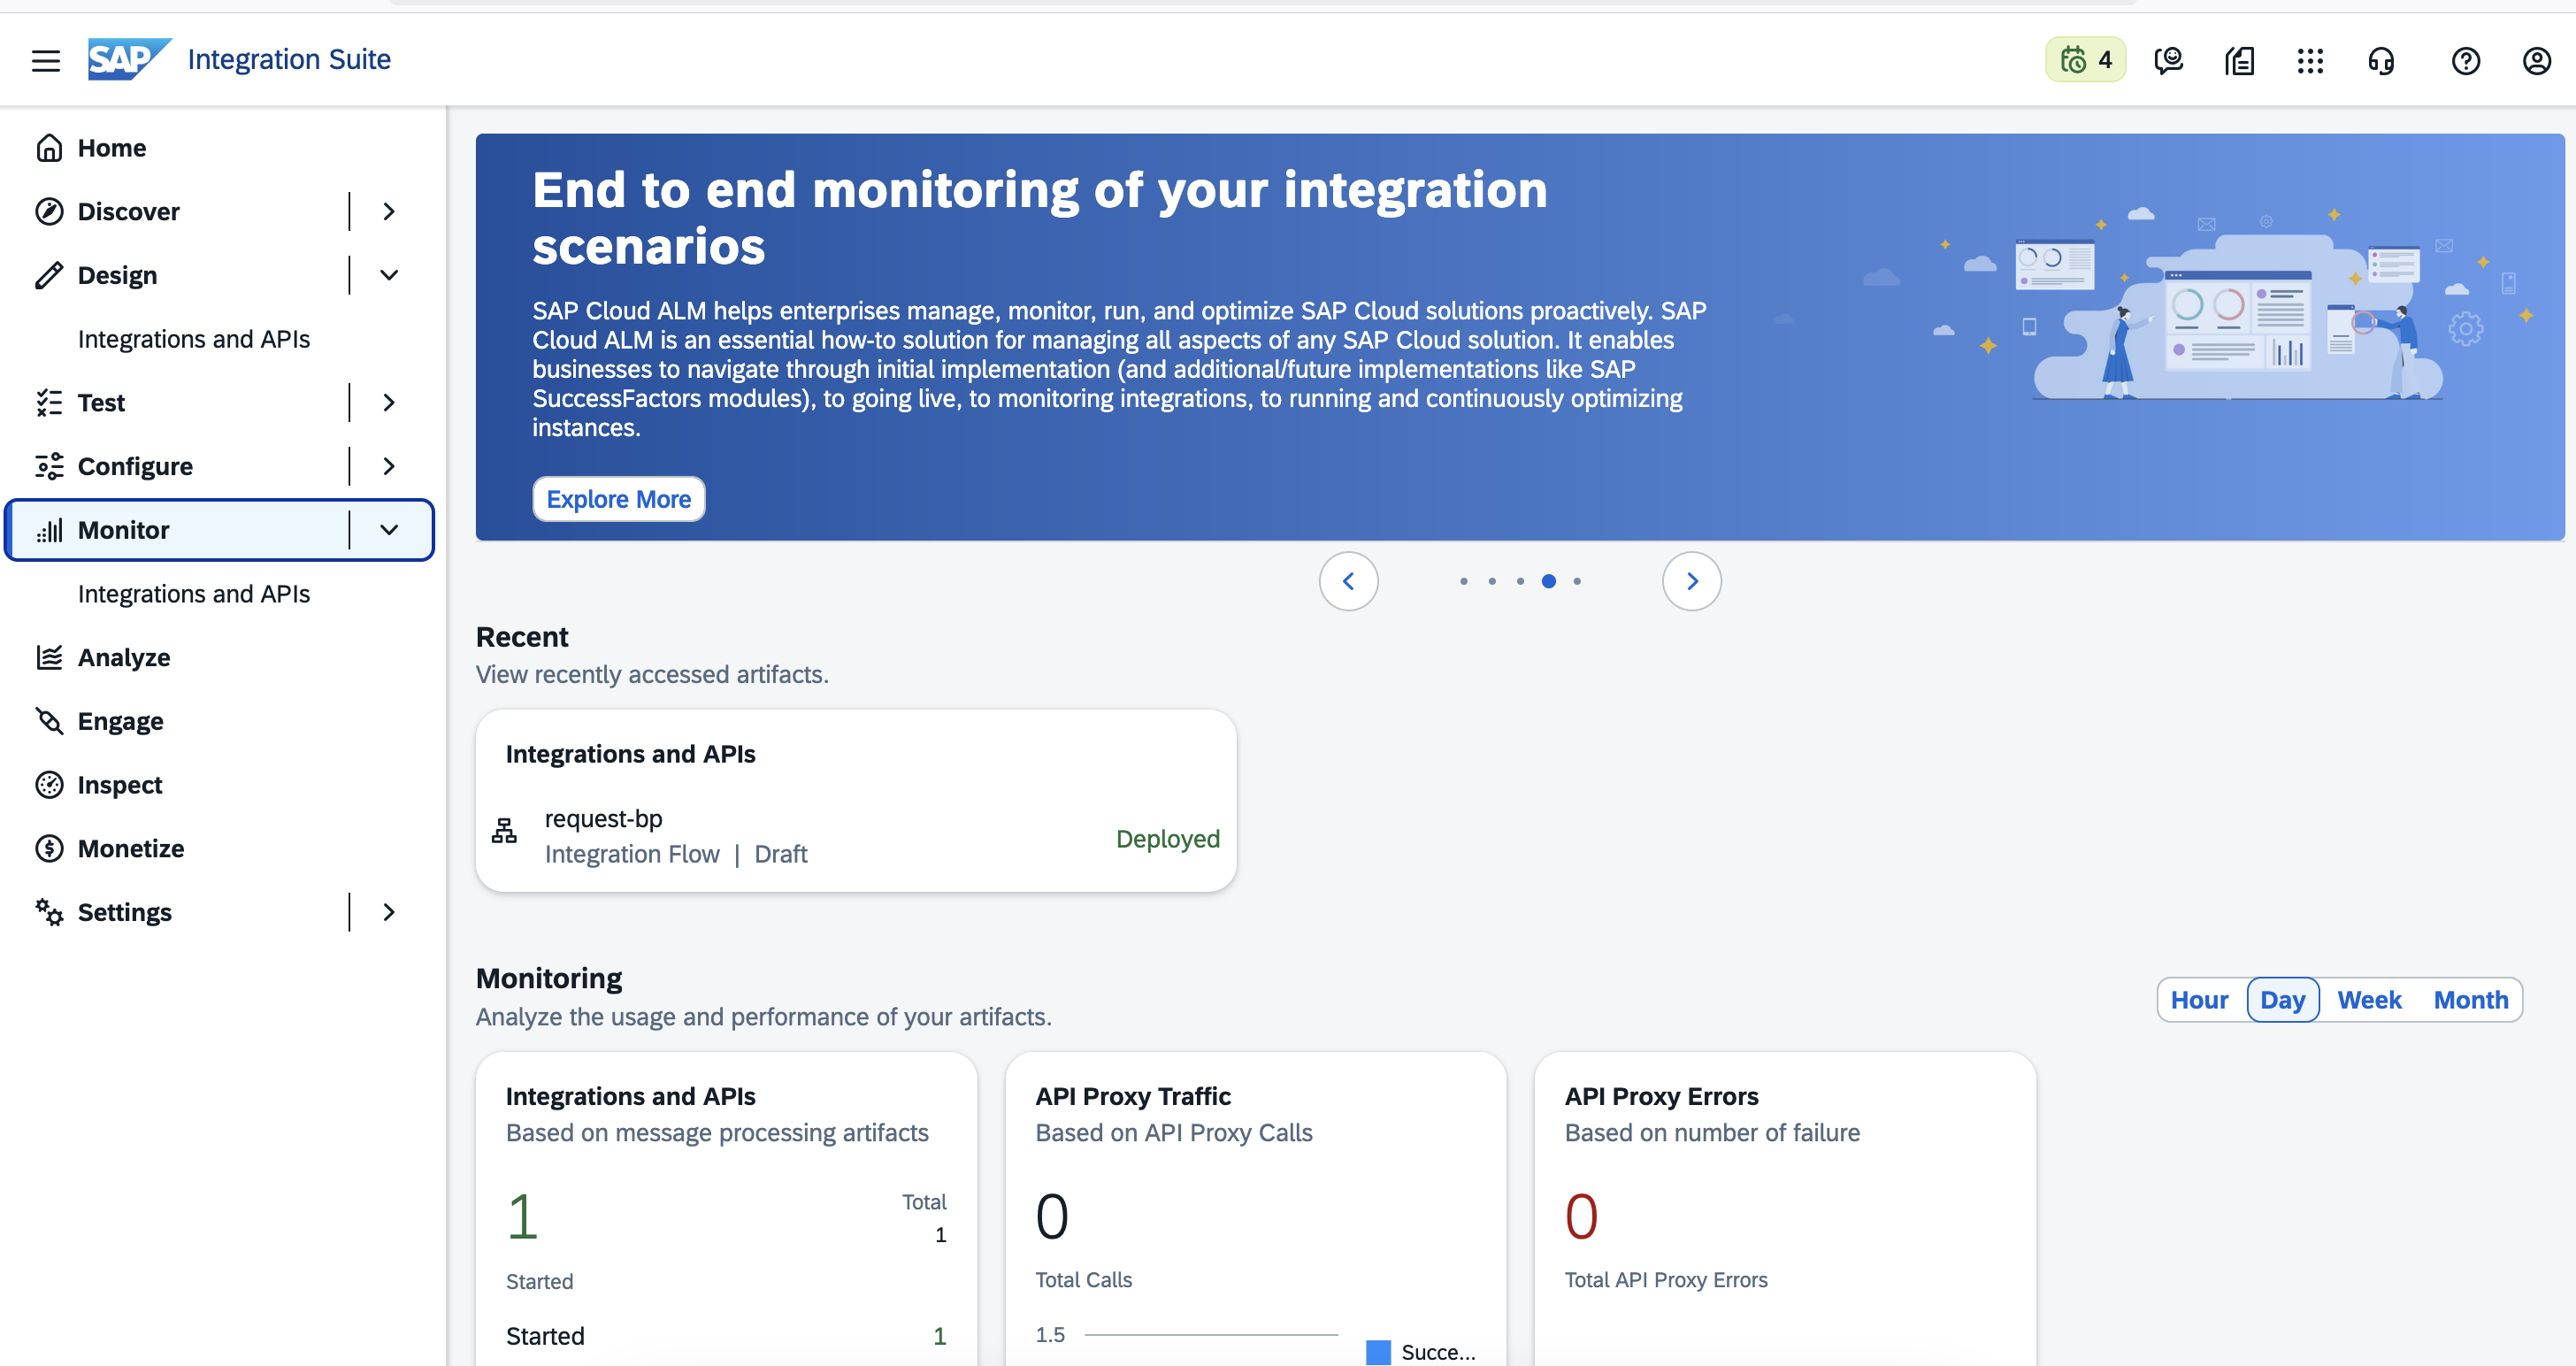
For this demo/test, the two key menus within Integration Suite are:
- Design > Integrations and APIs
- Monitor > Integrations and APIs
The design area allows us to create an integration flow which involves:
- Specifying source or 'sender' system
- Specifying target or 'receiver' system
- Adding flow steps
- Modify message header
- Modify message contents
- Route steps between sender and receiver.
Within design, there is a graphical editor to build the integration flow.
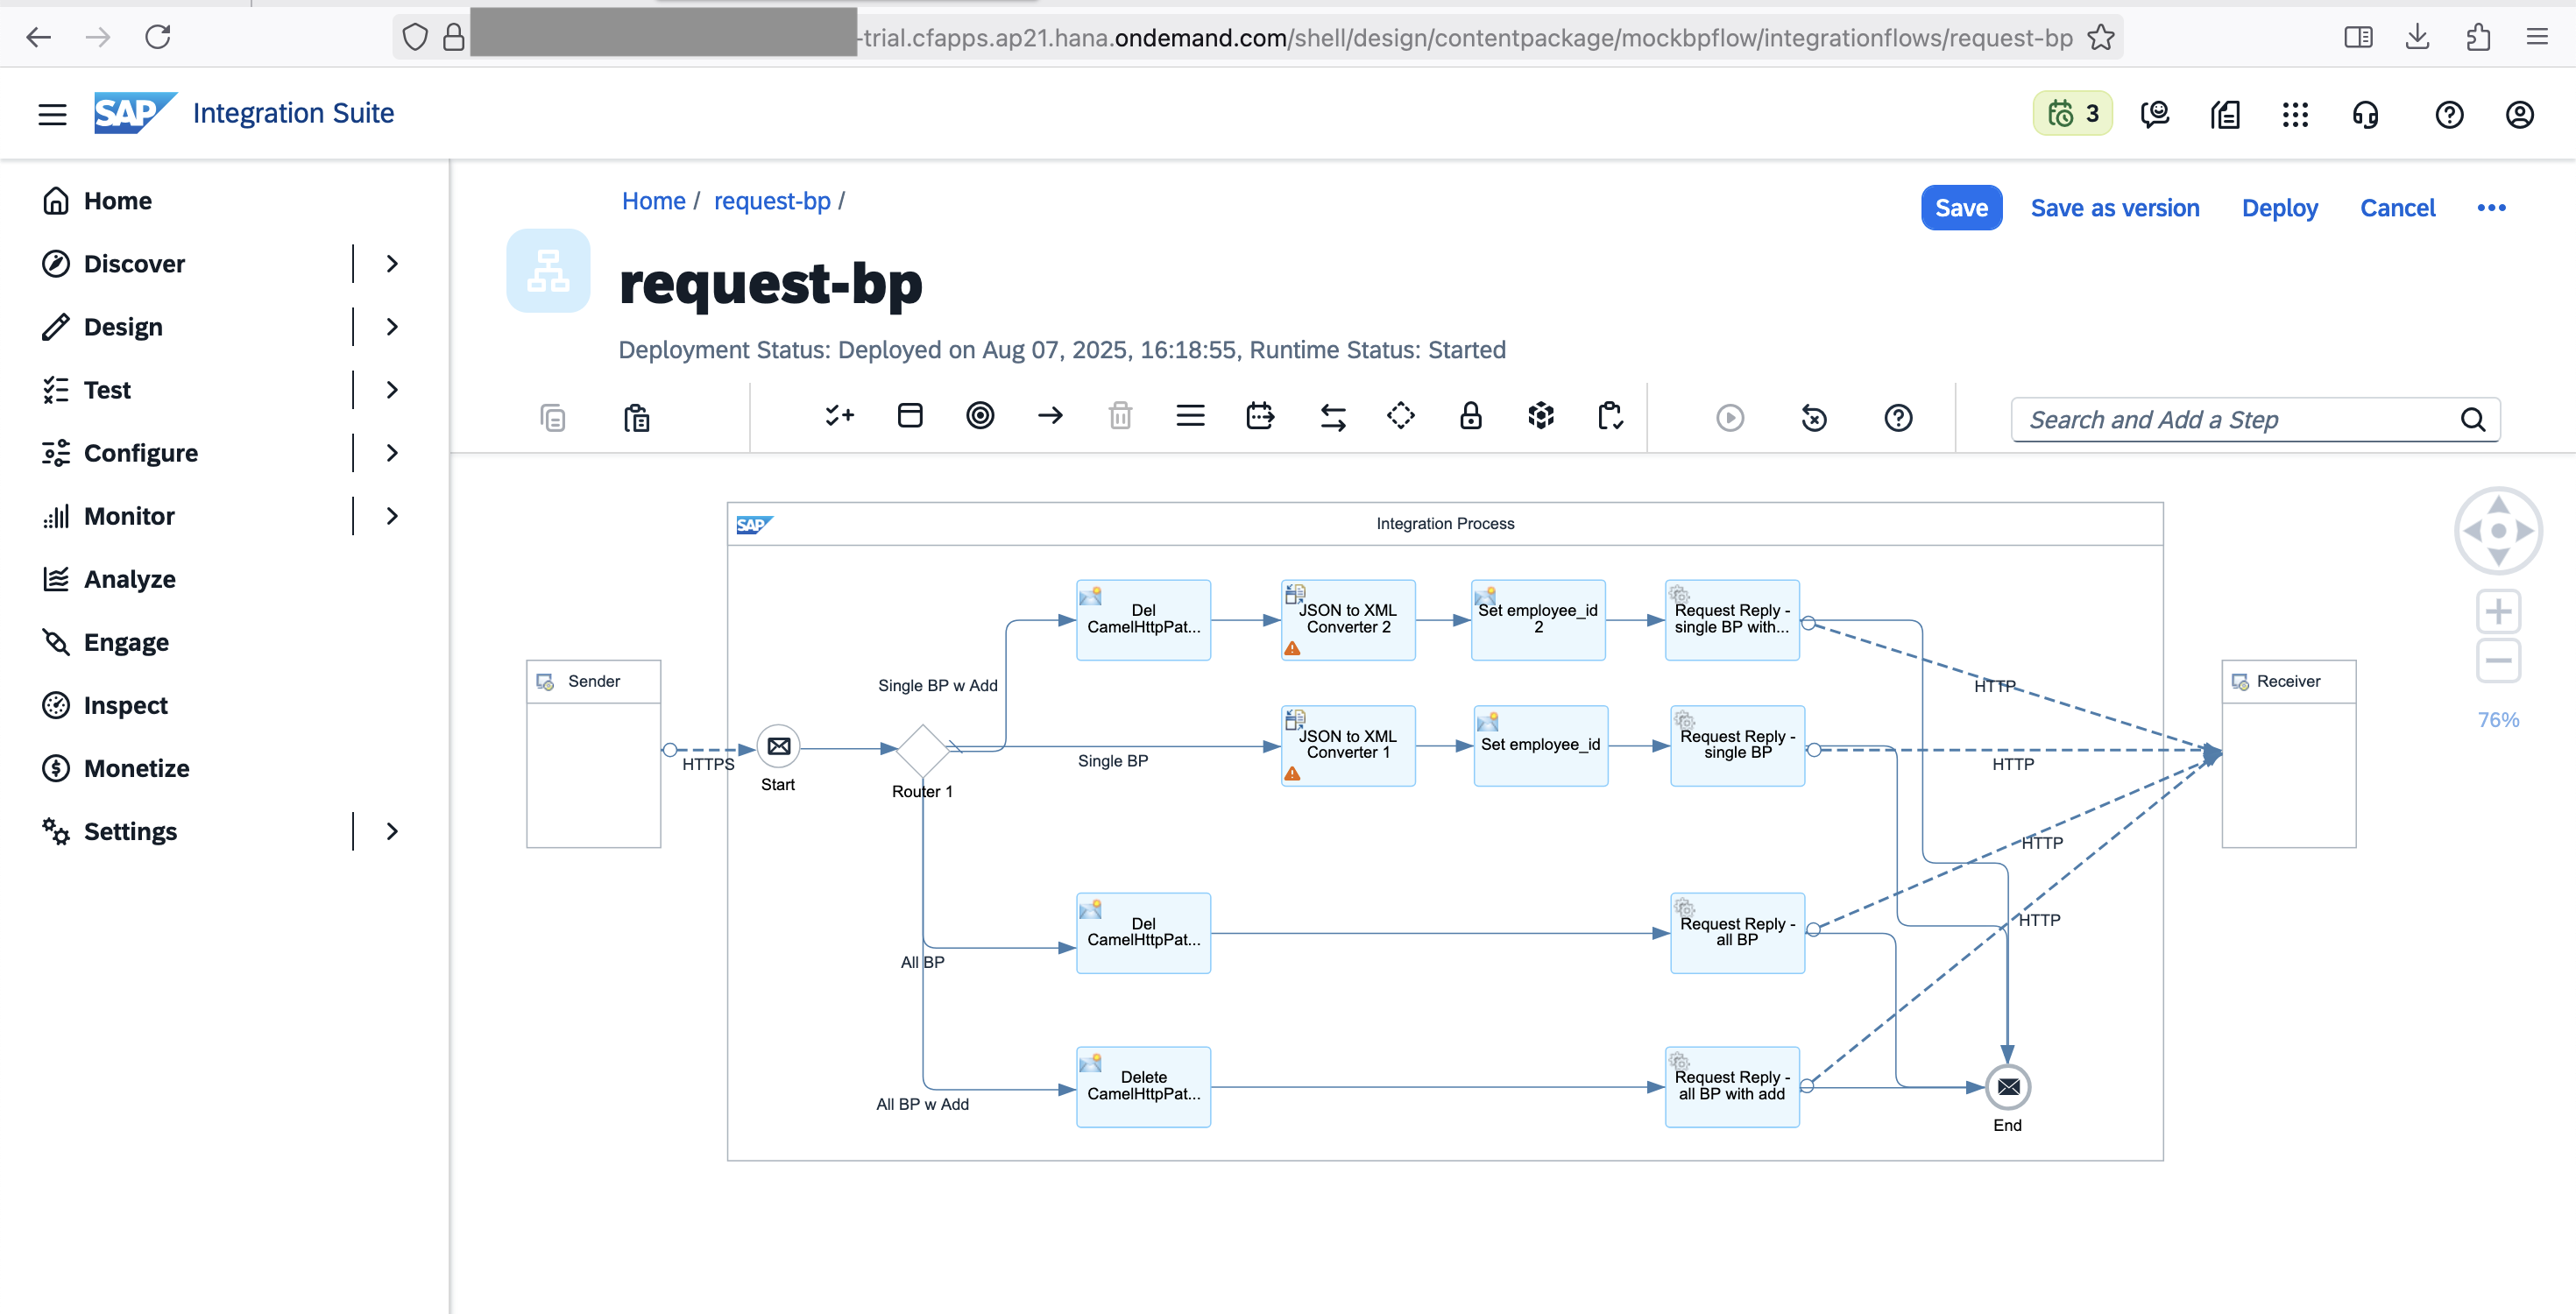
Business Partner Integration Flow
Creating the integration flow involves setting the sender details and designing the required transformations to meet the receiver (API) requirements.
As we work through this keep in mind the API expects one of four paths depending on the search scenario:
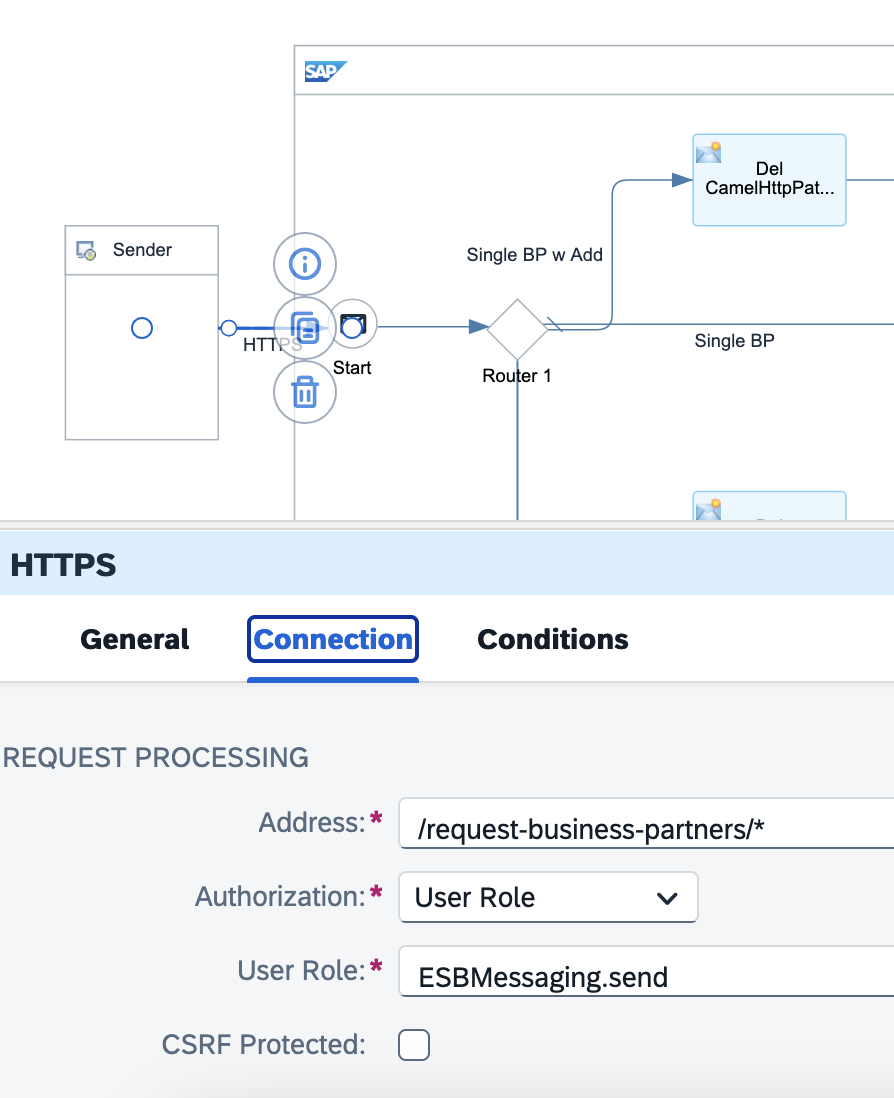
The sender
The sender represents the address that SAP Integration Suite will listen on. This is the address we send a message to from our upstream app. In this case a web app.
This address is built up in three parts:
- A base which is provided when we deploy the integration flow
- An 'Address' that we specify in the integration flow
- Further path details from the web app.
The base of the endpoint is something along the lines of:
https://{trial-account-specific-details}-rt.cfapps.ap21.hana.ondemand.com/http/
For the address name, this demo/test uses the path /request-business-partners/* The "*" at the end allow us to send requests with additional details that can be utilised in the flow logic.
The web app will send four different types of message to match the four API scenarios, for the demo/test I will use:
- "/api/bp/single"
- "/api/bp/all"
- "/api/bp/single/add"
- "/api/bp/single/all"
The web app will also include the BP number in the message body.
We don't need to specify these in the Integration Flow as the * will allow them all to pass as long as they are preceded by "request-business-partners/"
Adding this information to the mapping table.
Routing and Transformations
The integration flow routes and transforms the received messages to meet the API requirements at the receiver. This involves:
- Routing of messages from receiver to sender based on their content
- 1:1 relationship for each of the four scenarios
- Transform the URLs
- A part of the transformation is extraction of the business partner number from the received message and the placement of it into the API format URL.
The receiver
The receiver is set up to match the S/4HANA business partner mock server.

More detail on the settings of each step are in part 3.
At this point, the integration flow is:
As an alternative, the web app could have been programmed to send messages that already fit the API requirements. However, in some scenarios sender systems may be inflexible or difficult to develop on, making these transformation capabilities in Integration Suite important.
Further reading on SAP Integration Suite:
Point 7: Cloud Connector
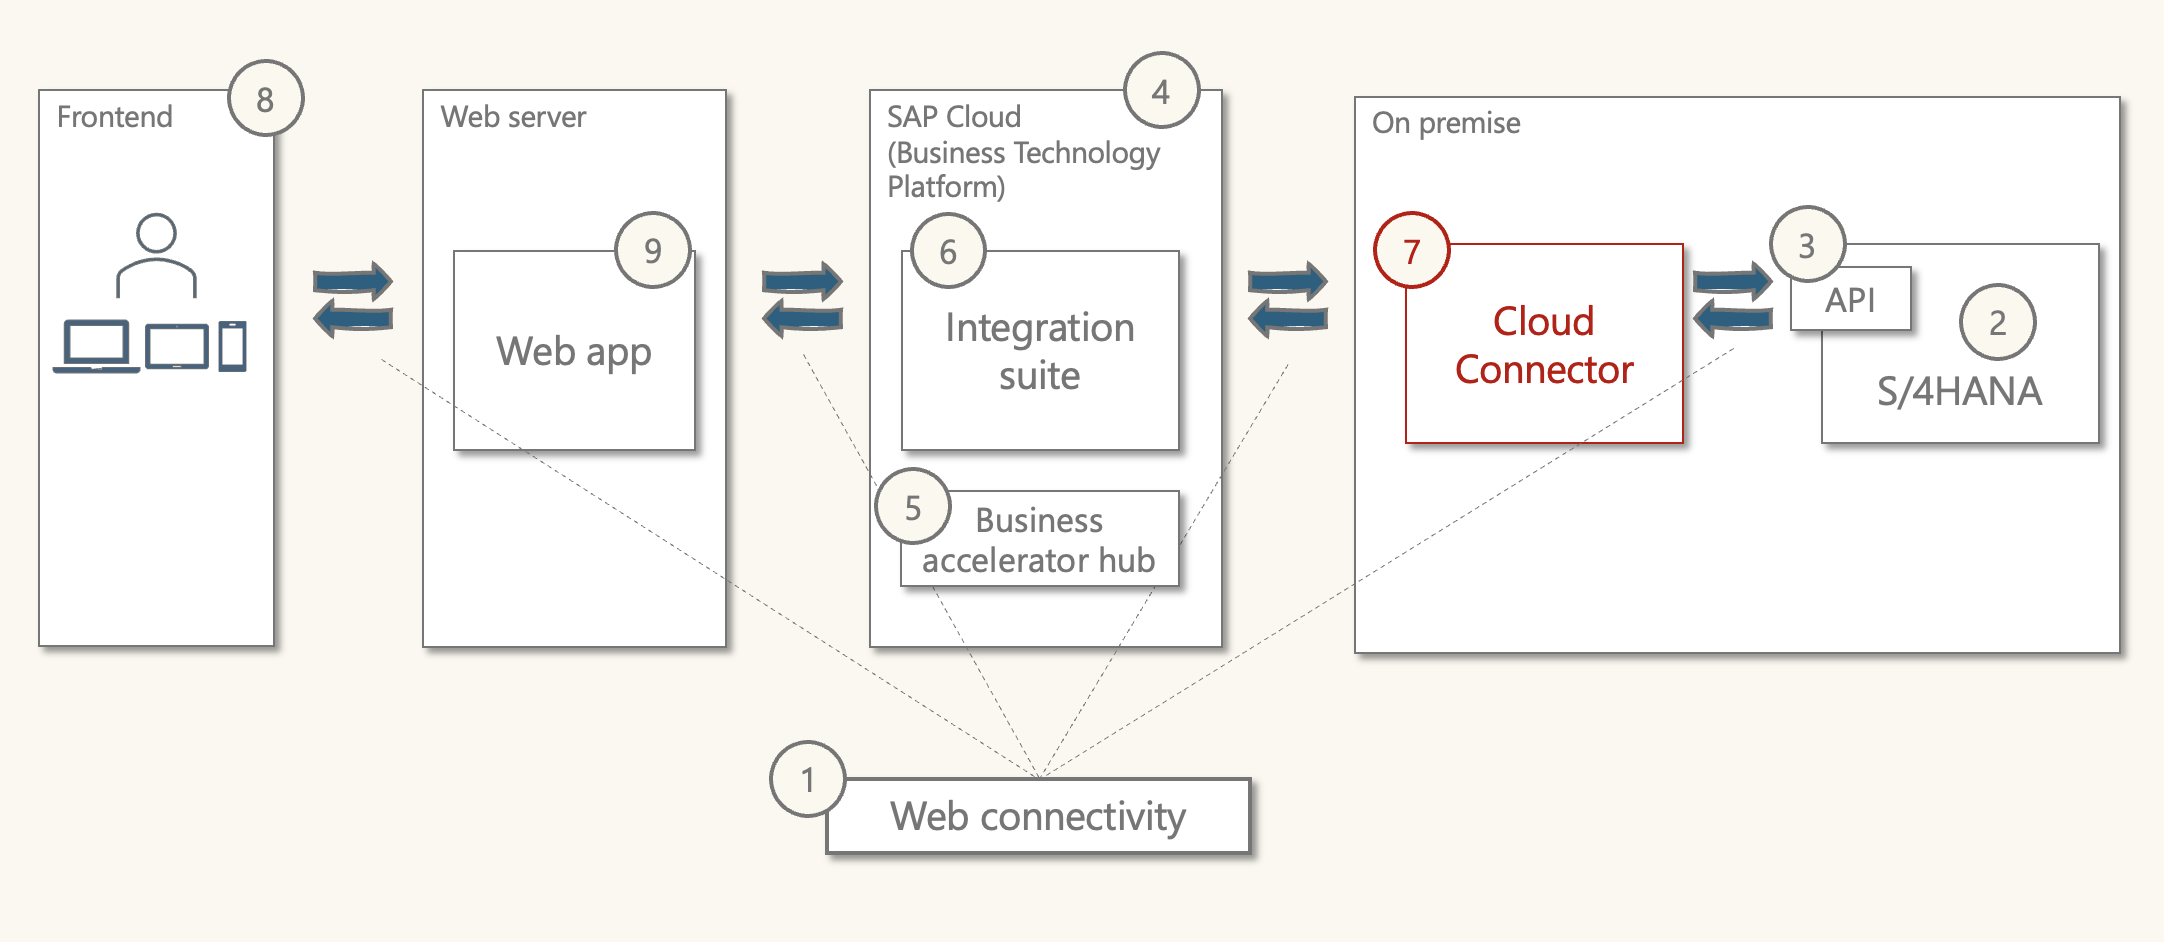
Purpose: Allow SAP BTP to communicate to On-Premise SAP.
What is it: An application that can provide a secure connection between SAP Cloud and On-Premise applications.
In the previous part, we defined the address details of the S/4HANA business partner mock server as:
- Base URL/host: http://localhost:3005
- Base path: /sap/opu/odata/sap/API_BUSINESS_PARTNER
- Entity set: /A_BusinessPartner
- Key Access: ('1234567')
- Navigation property: /to_BusinessPartnerAddress
If you paid attention to the screenshot of the receiver configuration in Intelligent Suite, you will note that it was set to
http://s4-mock:3006/sap/opu/odata/sap/API_BUSINESS_PARTNER/A_BusinessPartner('${property.employee_id}')
The domain was "s4-mock:3006" not "localhost:3005".
This is because we can't connect SAP Cloud directly to an on-premise system. The S/4HANA business partner mock server is a JavaScript server that runs locally on desktop/laptop and is hence considered 'on-premise' or outside the SAP Cloud.
SAP provides "SAP Cloud Connector" to connect on-premise applications to the SAP Cloud.
It's a JavaScript application that can be installed and run locally. Part of the set-up involves entering authentication details from BTP.
After it's set-up, Cloud Connector will accept messages from Integration Suite and forward them to the S/4HANA business partner mock server.
The detailed set-up is covered in part 3.
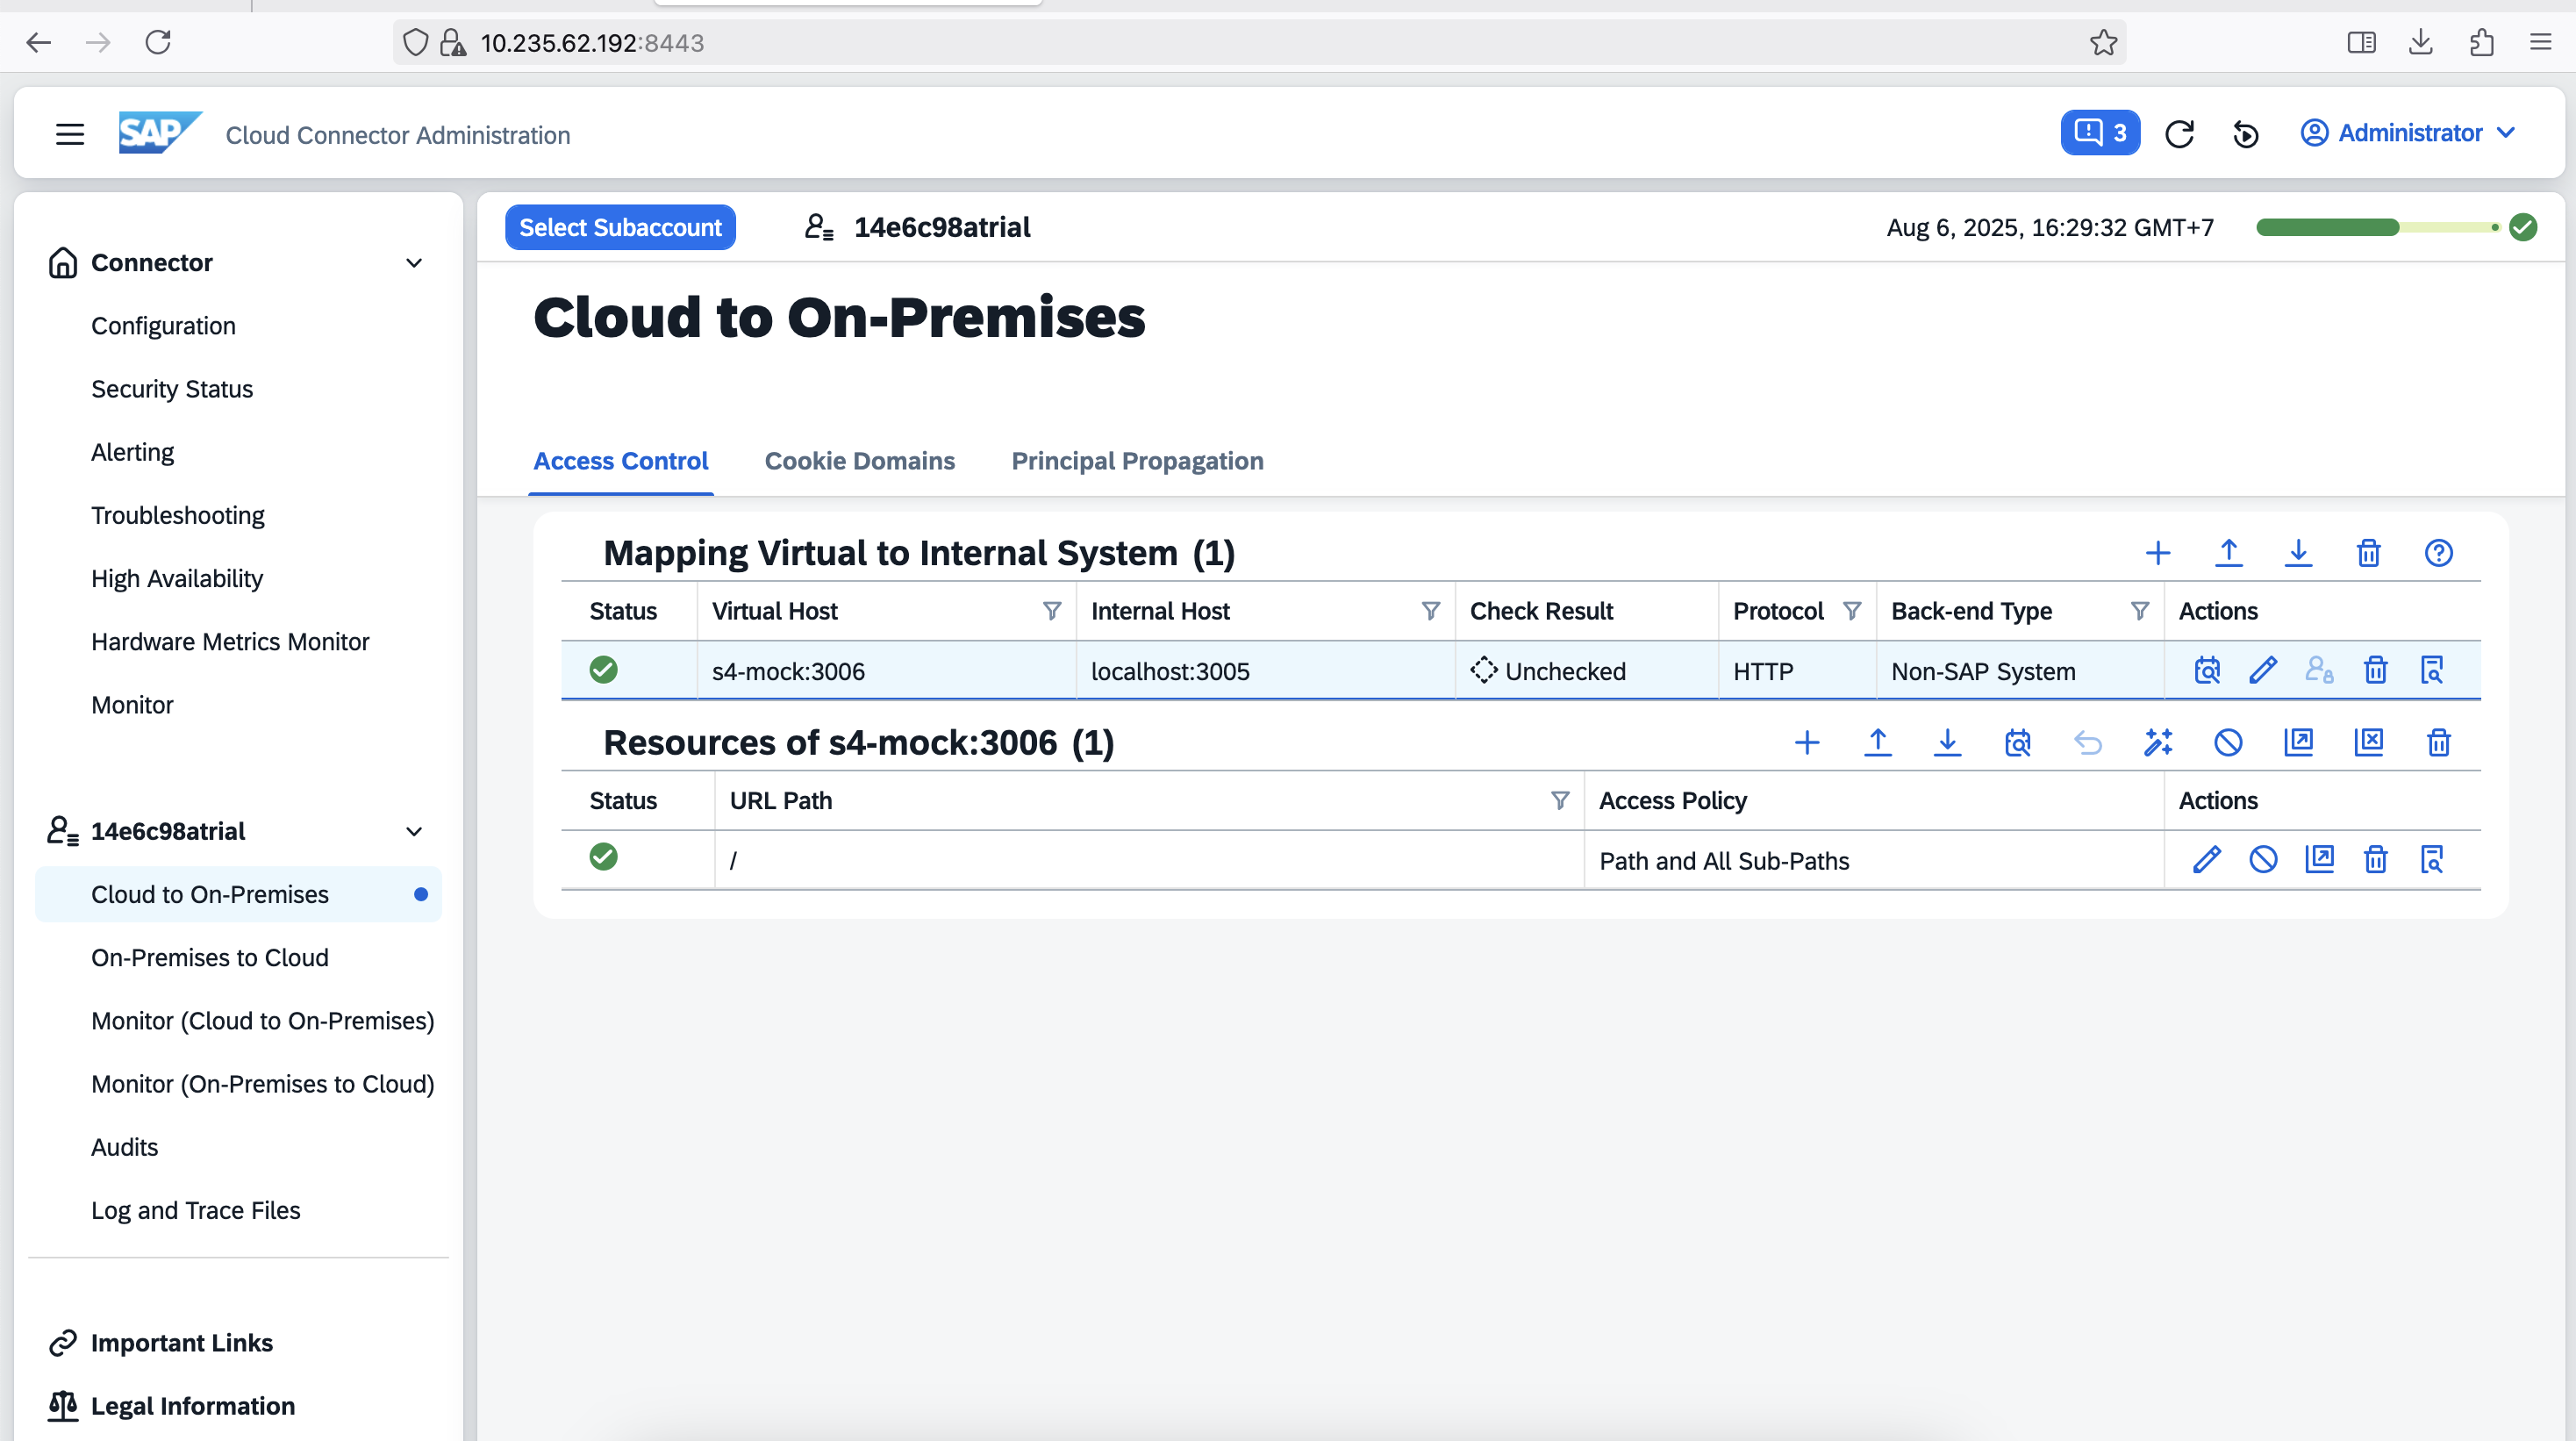
The screenshot above shows the "Cloud to On-Premise" mapping. A virtual host "s4-mock:3006" is mapped to the S4/HANA business partner mock server running locally on "localhost:3005".
Updating the integration flow.
Point 8: Web app: intro
The web app is an application that uses JavaScript as a programming language. Web browsers have JavaScript engines and can run JavaScript code.
There are two parts to the web app. The frontend and the backend.
Think of JavaScript in two categories. frontend JavaScript and server (backend) JavaScript.
Frontend JavaScript
- Runs in the web browser, utilising the browsers JavaScript engine
- Is oriented towards manipulating web documents (HTML documents), for example:
- Retrieve fields from HTML (e.g. sign up form)
- Update HTML (e.g. show results, dynamically add a new page)
- The JavaScript engine in the browser has limitations.
Server JavaScript
- Installed on a server (can also be run on a desktop/laptop)
- A popular engine is Node.js
- Is oriented towards messaging, connectivity, security, authentication
- Has a lot less limitations than the web browser.
We could try to send a request from the frontend to SAP Integration Suite, but because it comes from a browser, it will likely result in errors.
I did try sending a message to Integration Suite from the browser, but received various CORS errors. CORS, or Cross-Origin Resource Sharing, is a browser security feature that controls whether a web page on one domain can access resources from a different domain.
Therefore, the frontend will send a request to the backend, which will then prepare the message and send it as a request to SAP Integration Suite.
Let's look at the frontend first, then the backend.
Point 8.1: Web app: frontend
Purpose: Search for and display business partner details on a web page.
What is it: A simple web app based on HTML, CSS and JavaScript.
The frontend can be built with plain HTML, CSS and JavaScript.
- HTML: Used to define the content of the web page
- CSS: Used to apply styles to the web page (layout, colours, font, etc.)
- JavaScript: Use for programming logic, for example:
- Get input field values from HTML
- Fetch data from the server
- Restructure data for display
HTML, CSS, and JavaScript are written in their own files. They are typically in the same folder.
frontend/
├── index.html
├── styles.css
└── script.js
The HTML file includes references to the 'styles.css' and 'script.js' documents. These can all be written in simple text editors, but applications like 'visual studio code' help with syntax highlighting and formatting.
For demo/test these files can simply be kept on a computers hard drive. Or they could be hosted on a static web server like Netlify or GitHub pages.
Point 8.2: Web app - HTML
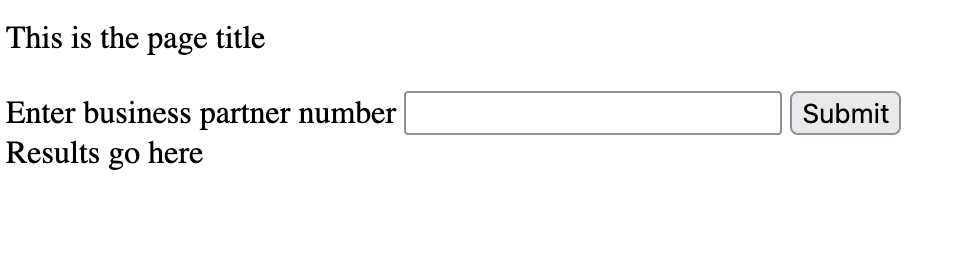
Web pages are written with HTML, they are hierarchically structured documents where 'tags' are used to denote different types of element which contain content.
As a simple illustration, the following would create a web page with a title, a text input field, a submit button and a space for results.
<header>
  <p>This is the page title</p>
<body>
  <article>
    <form>
      <label>Enter business partner number
        <input type="text" />
      </label>
      <button type="submit">Submit</button>
    </form>
  <div id="js-results">
    Results go here
  </div>
</body>
This would display:
- A simple element such as paragraph is denoted by
<p>enter paragraph</p> - A more complex element, an input field is denoted by
<input type="text" /> - In this case,
typeis an attribute set totextfor text field.
Getting HTML to talk to CSS and JavaScript
There are two attributes that allow them to work together:
- "id": for example id="bp-input" (where bp-input is a variable name)
- "class": for example class="bp-input" (where bp-input is a variable name)
These attributes can be added to HTML elements to allow us to access those elements with CSS and JavaScript. The difference between the two is a single "id" value is unique and should only be used once in an HTML document, while a class can be applied to multiple HTML elements.
The body of the web app frontend is:
<body>
  <header class="header">
    <div class="header-title">
      <img class="logo" src="assets/team.png">
      <p class="title">Employee portal: business partner search</p>
    </div>
    <nav class="nav">
      <a href="/index.html">Home</a>
    </nav>
  </header>
  <article class="bp-article flow">
    <h2>Search</h2>
    <div class="divider"></div>
    <form id="bp-form" class="bp-search">
      <label for="bp-inp-number">Business partner number:</label>
      <p class="text-small">(Enter 7 digit number or leave blank to return all)</p>
      <input id="bp-inp-number" class="bp-inp-number" name="bp" type="text" />
      <p id="bp-error" class="bp-error"></p>
      <p class="options">Options:</p>
      <div>
        <input id="bp-inp-address" value="add" type="checkbox" />
        <label class="text-small" for="bp-inp-address" name="bp-input-address">Include address details</label>
      </div>
      <div>
        <input id="bp-inp-tab" value="tab" type="checkbox" />
        <label class="text-small" for="bp-inp-tabulate" name="bp-inp-tabulate">Show results in table</label>
      </div>
      <button id="js-inp-sub" type="submit">Submit</button>
    </form>
    <h2>Results</h2>
    <div class="divider"></div>
    <div id="js-bp-results" class="bp-results">
    </div>
  </article>
</body>
It's not very complex. Most of the complexity is in the CSS styling and the JavaScript programming to return the results.
This segregation of content (HTML), styles (CSS), and programming logic (JS) makes working with frontend well structured.
The web app initial HTML includes:
- A header bar with the logo, page name and home link
- A search section with search field options
- BP number
- Checkbox to get address
- Checkbox to show results in detail view
This is how this looks without styling.
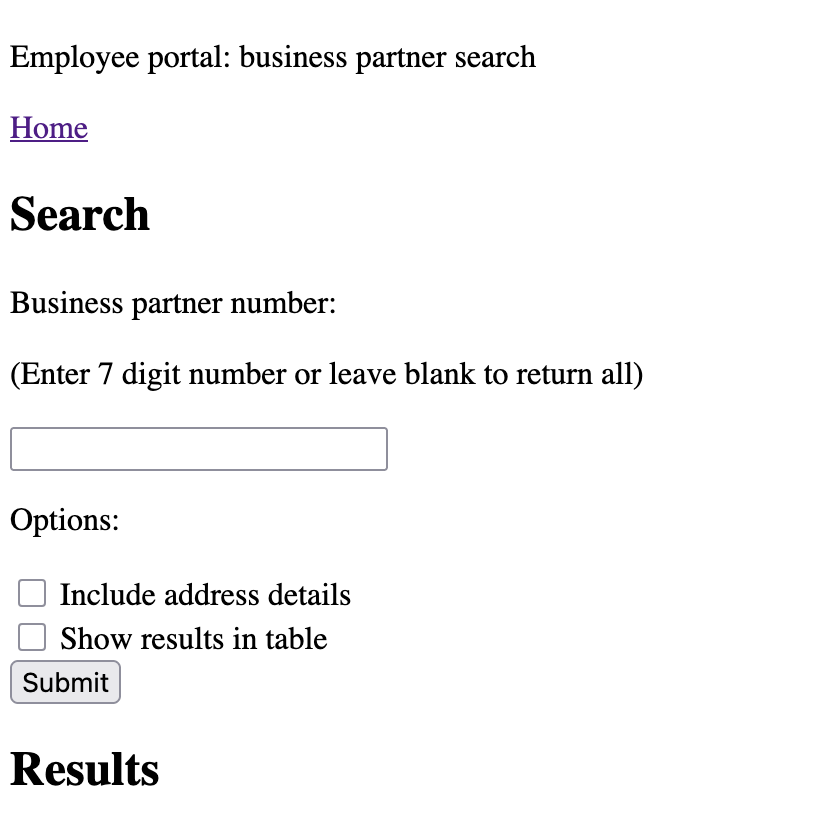
The version with styling was shown at the start of the article.
Here is the HTML file
Point 8.3: Web app - CSS
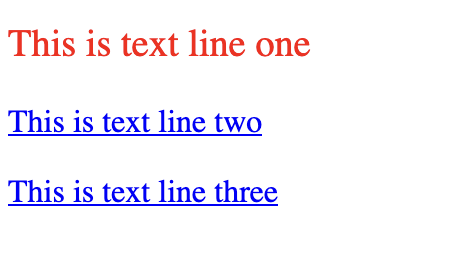
Cascading style sheets (CSS) are used to apply styles to HTML documents. Consider an HTML document with three lines of text:
<p id="line-one">This is text line one</p>
<p class="other-lines">This is text line two</p>
<p class="other-lines">This is text line three</p>
These can be styled with CSS as follows:
#line-one {
  color: red;
  font-size: 1.2rem;
}

.other-lines {
  color: blue;
  text-decoration: underline;
}
This would show:
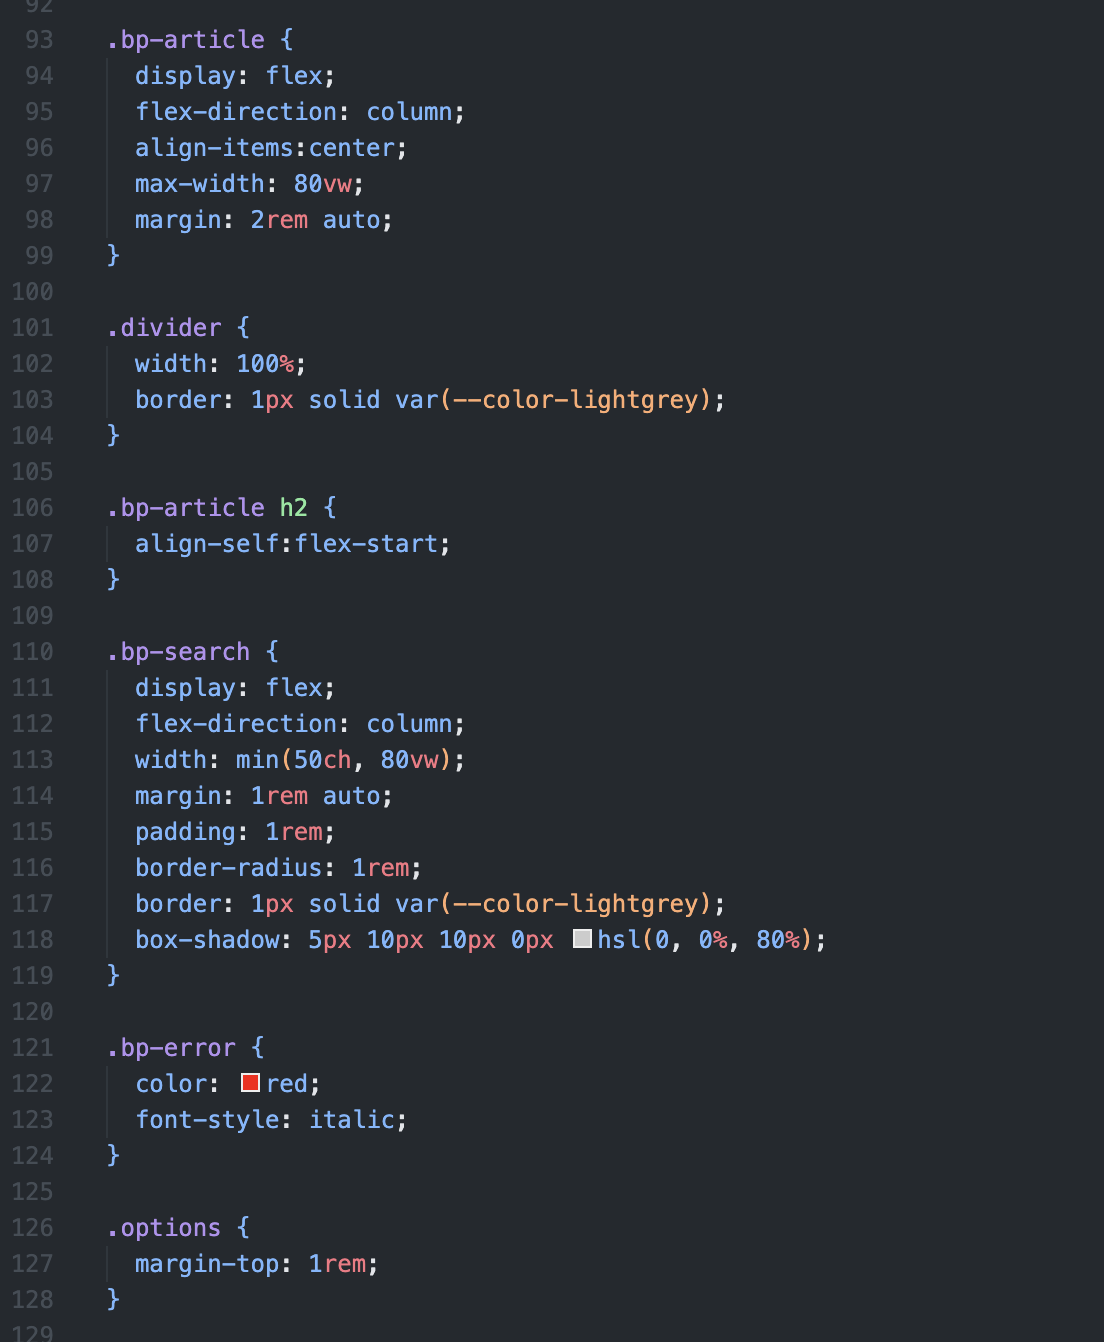
The complete CSS for the demo/test web app is lengthy. Around 200 lines. Here is a snippet to get an idea of what it looks like:
CSS is easy to pick up, but challenging to master!
Looking at the class "bp-search". This applies to the area of the HTML document where the search fields are collected. The CSS here does things like orient those search fields in a column "flex-direction:column" and apply a border and a shadow.
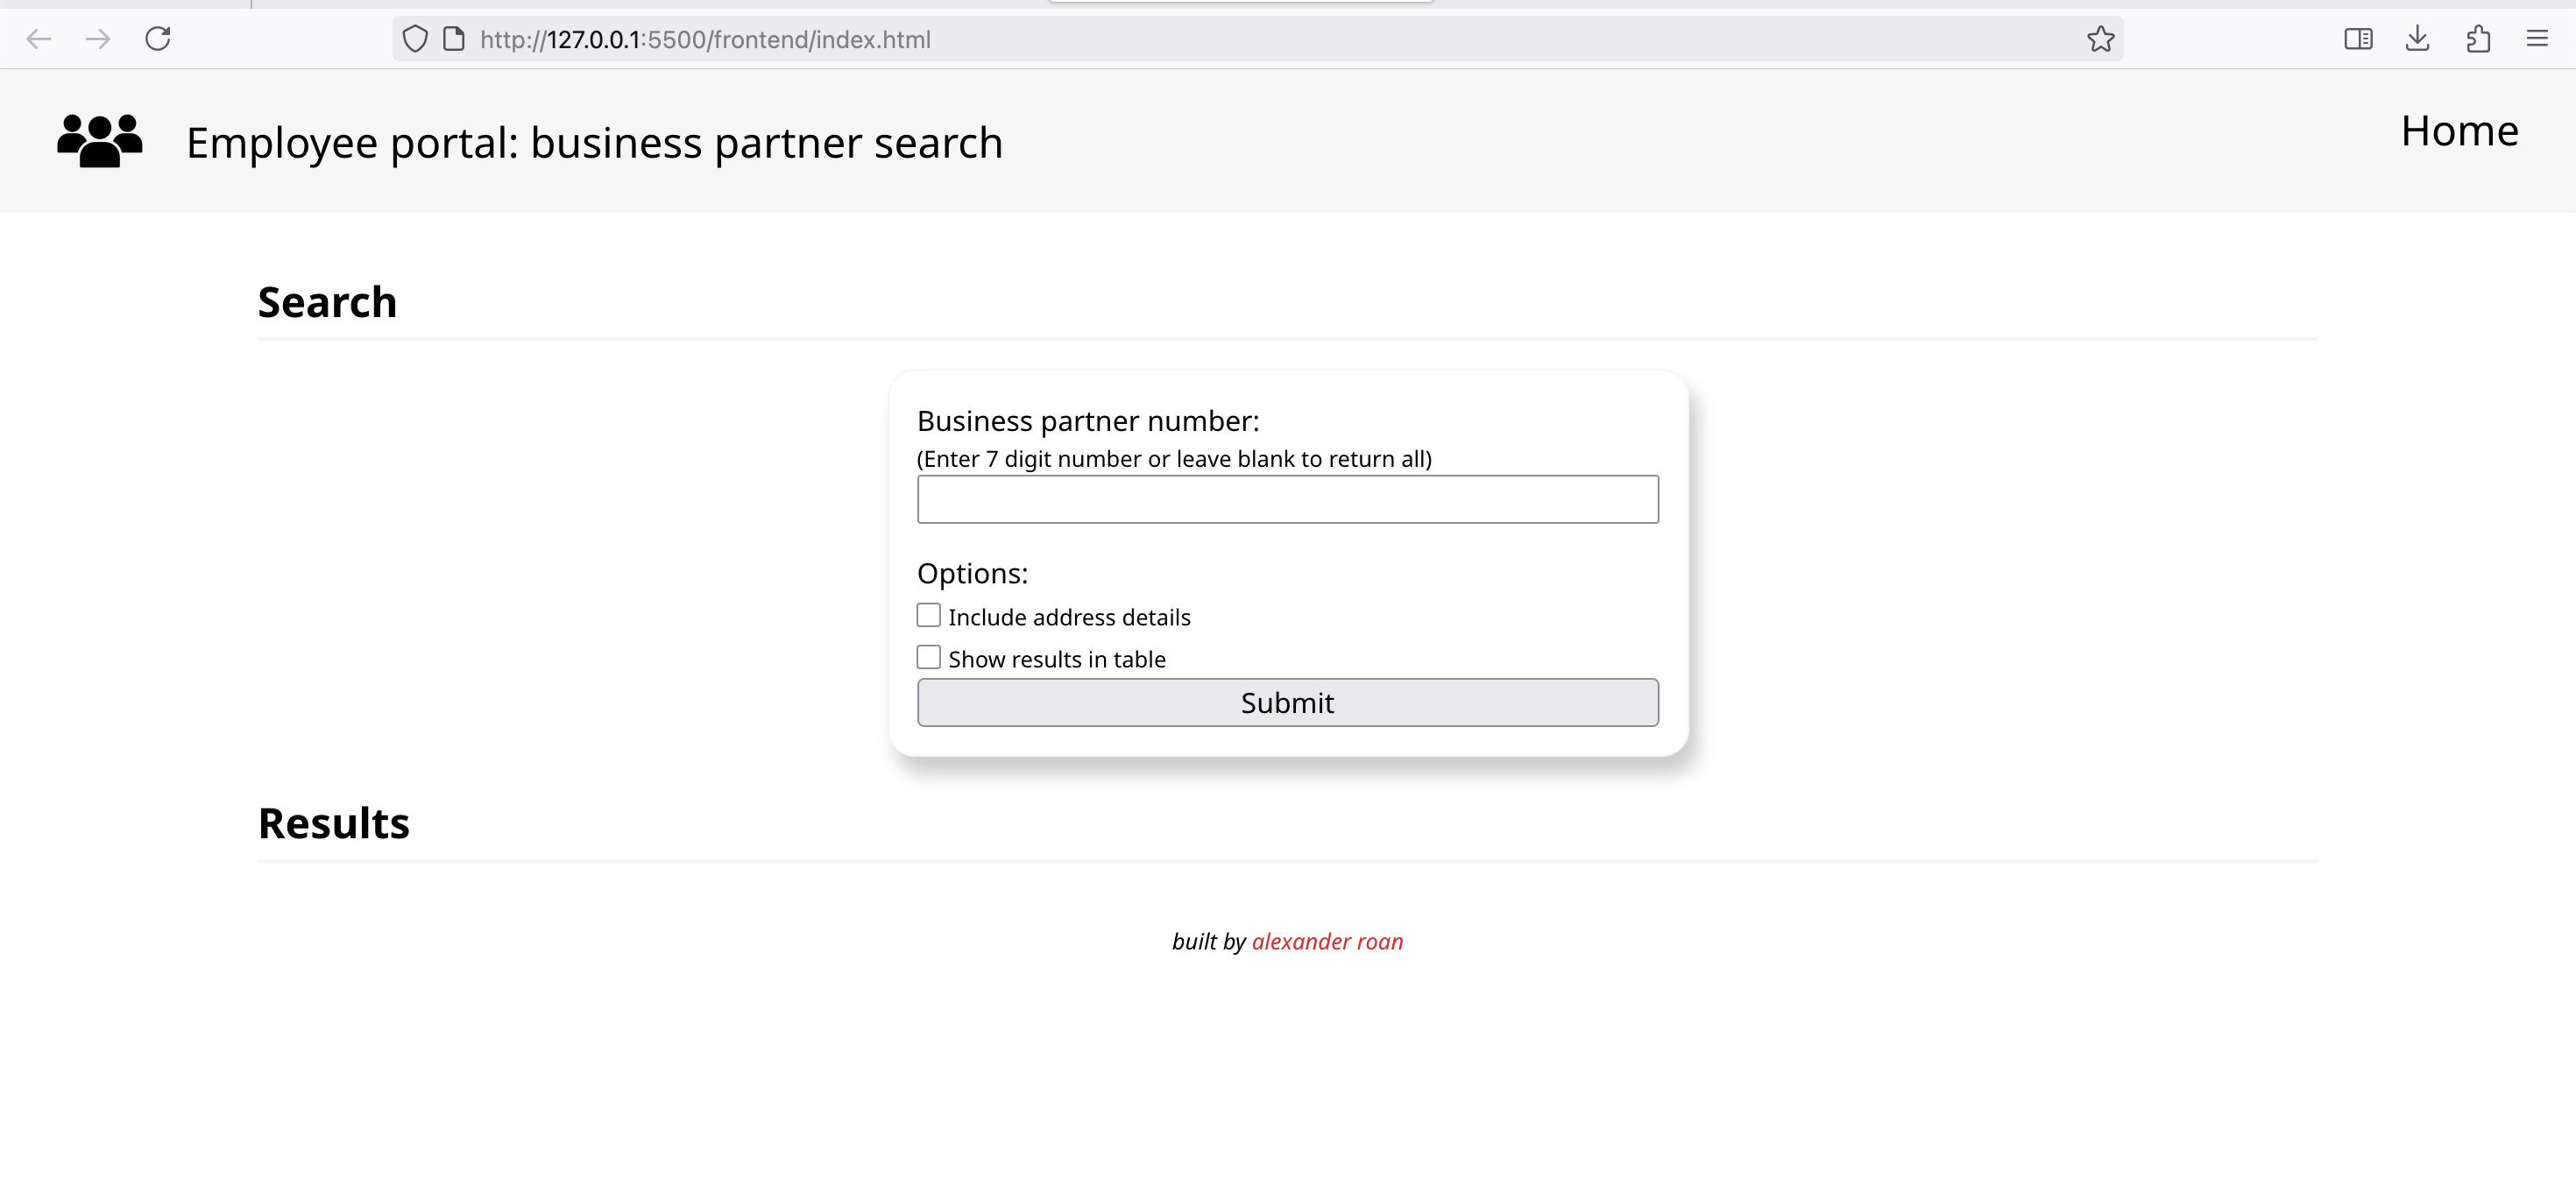
This is how our page looks with styling.
Here is the full CSS file
Point 8.4: Web app - JavaScript
Frontend JavaScript is able to retrieve, edit and add elements to the HTML document. Writing the JavaScript is possibly the most challenging part of this demo/test, so I'll just summarise what the code does:
- Listen for a click of the 'submit' button
- Get the value of the form input elements
- The Business partner number
- The status of the 'include address details' checkbox
- The status of the 'show results in table' checkbox
- Check the business partner value is valid
- It has to be blank or a 7-digit number
- Create a variable object called 'request' to track the request type
- The variable includes:
- request URL
- request method
- request body
- (The ability to track multiple values in an Object is a key JS feature)
- The variable includes:
- Based on the input fields, identify the request type & update the 'request' object.
- The combinations are:
- If bp number is blank and get address isn't checked
- If bp number is blank and get address is checked
- If bp number is entered and get address isn't checked
- If bp number is entered and get address is checked.
At this point, the request object will store a set of values based on the input selections. The values will be one of the four options listed in the earlier tables.
The JavaScript now has what it needs to send a request to SAP Integration Suite. The rest of the JavaScript handles various things:
- Use the JavaScript method 'fetch()' to send requests to the server
- Handle security and authorisation
- Getting a token if needed
- Sending a token with requests
- Handling errors
- If successful, capturing the returned data
- Working through the returned data and updating the HTML
- Creating cards for the summary view
- Creating a table for the detailed view
Here is the JavaScript.
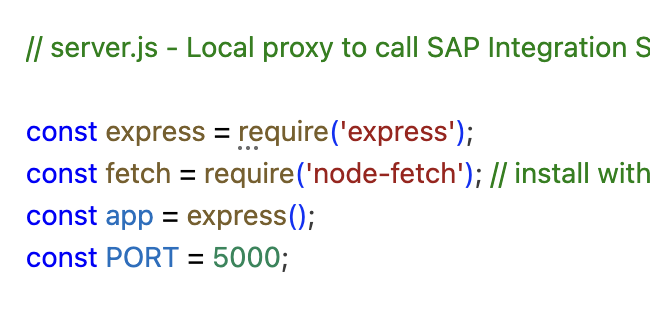
Point 9: Web app: backend server
Purpose: Allow a web frontend to communicate with SAP BTP.
What is it: A JavaScript web backend server for message formatting and routing.
The backend server is locally hosted on our computer for this test/demo, but in reality would be on a web server somewhere.
It's written in express, which is a framework on Node.js. It's quite different from frontend JavaScript.
The logic of the backend is:
- Listen for communication from the frontend
- If a message is received:
- Do some manipulation of the message related to authorisations
- Using fetch() try sending a request to SAP Integration Suite
- More authorisation/security handling
- If successful, return the response back to the browser
- If unsuccessful, log and return the error.
Here is the backend JavaScript code. This needs to be set up as part of a Node.js server.
The JavaScript server is a bit more complex than the frontend. The server folder contains:
web-app-server/
├── node_modules/         # created by npm install
├── package-lock.json     # created/updated by npm install
├── package.json          # you write this (or generate with `npm init`)
└── server.js             # your server code
server.js contains the actual JavaScript code for the server. package.json defines project settings, dependencies, and scripts. node_modules/ and package-lock.json are automatically generated when dependencies are installed using npm install.
The port can be specified in 'server.js'. I choose port 5000.
This means the server will run on 'http://localhost:5000'.
After writing package.json and server.js, the following steps are required in terminal to initialise the server, install express, and then start the server.
- cd web-app-server
- npm init -y
- npm install express
- node server.js
We can now update the flow diagram with the details for the frontend.
One flow, many messages
Looking at the diagram, a click on the search button triggers a message that passes through four stages:
- From the frontend (browser) to the backend web server
- From the web server to SAP Integration Suite
- From Integration Suite to Cloud Connector
- From Cloud Connector to the S/4HANA system
JavaScript doesn’t normally “wait” for things to happen — it’s designed to keep running while other operations (like network requests) complete in the background.
However, the fetch() function is asynchronous, which means it starts a request and immediately returns a kind of “promise” — a placeholder that will eventually be resolved when the response comes back (or if it fails).
When testing this flow, there are multiple layers where errors can occur:
- The browser console (frontend logs)
- The backend server console (Node.js logs)
- Integration Suite’s monitoring tools
The message can fail at any step, and it sometimes takes a bit of detective work to figure out where it failed and why.
If everything works, and S/4HANA returns a successful response (status code 200), that response flows automatically back through the same chain — each layer staying in a “waiting” state until the result is passed back to the frontend and displayed to the user.
Don't worry if it's not 100% clear, it took me a while to figure this out.
Conclusions to the walkthrough
It's really fun to build your own frontend and connect it to a real enterprise grade system.
A few important considerations:
- Precision is needed with the integration configuration:
- Host names, types, routing, transformation are all sensitive to mistakes
- The JavaScript is a little complex, but it is all well established.
- A JavaScript and Node.js course and some googling could enable anyone to create this.
- Using the S/4HANA business partner mock server is a quick and fun way to test out a potential integration with S/4HANA. However, it is just a mock server with limited features and a build and test with a real S/4HANA system would be required.
However, it's easily achievable with a little study and practice and it opens the possibility to develop a wide range of things. The APIs brings together:
- Real-time fast access to a wide range of business data thanks to S/4HANA.
- Extreme flexibility on the frontend side thanks to modern HTML, CSS and JS.
This integration could have been much simpler by just having the frontend deliver a URL in the format required for the API. We don't really need the complexity of Integration Suite for this.
Share, comment/discuss
Share to: LinkedIn, X